Maven 概念 Maven是apache旗下的一个开源项目,是一款用于管理和构建Java项目的工具
仓库:用于存储资源,管理各种Jar包
中央仓库:由Maven团队维护的全球唯一的
本地仓库:自己计算机中的一个文件夹
远程仓库(私服):一般由公司团队搭建的私有仓库
当Maven管理一个Jar包时,它会去本地仓库查找,如果没有再去中央仓库下载到本地仓库,如果有私服,则先去私服下载,如果私服没有,则去中央仓库下载到私服,再去私服下载到本地仓库
作用
依赖管理:方便快捷的管理项目依赖的资源(Jar包),避免版本冲突问题
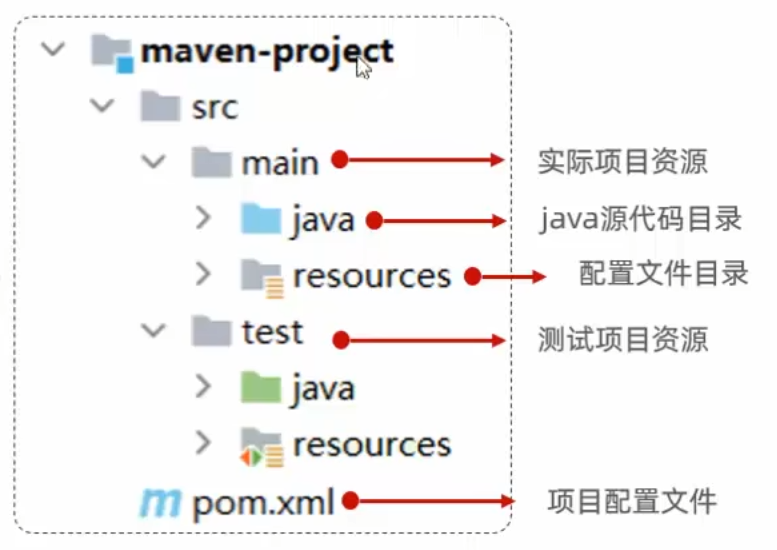
统一项目结构:提供标准、统一的项目结构
项目构建:提供标准跨平台的自动化项目管理构建方式
IDEA 集成 Maven(全局配置)
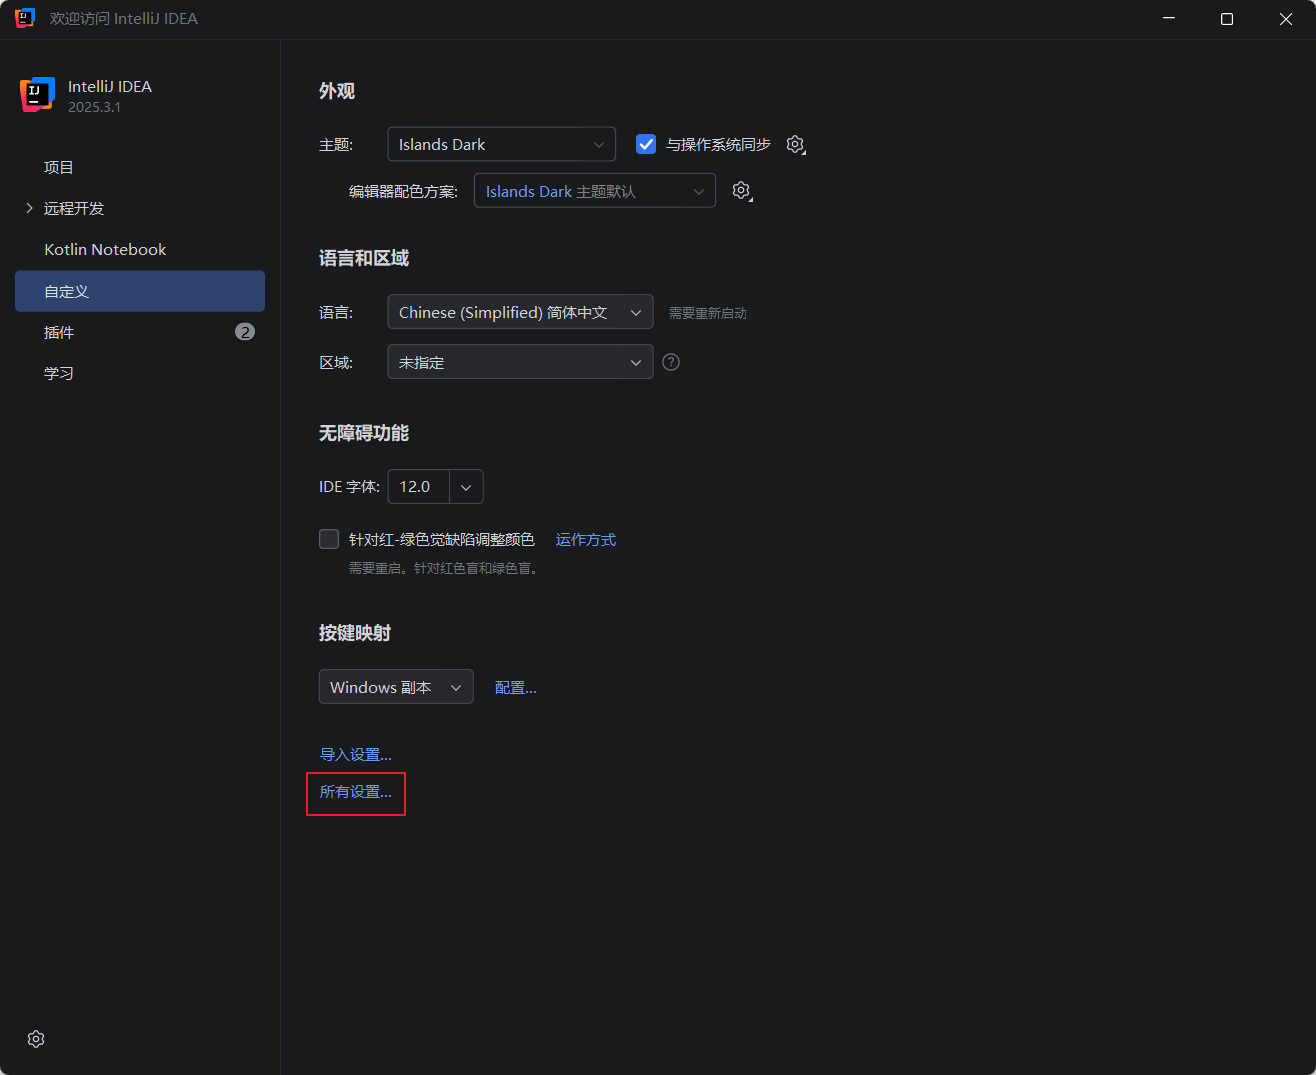
在IDEA初始化页面找到所有设置
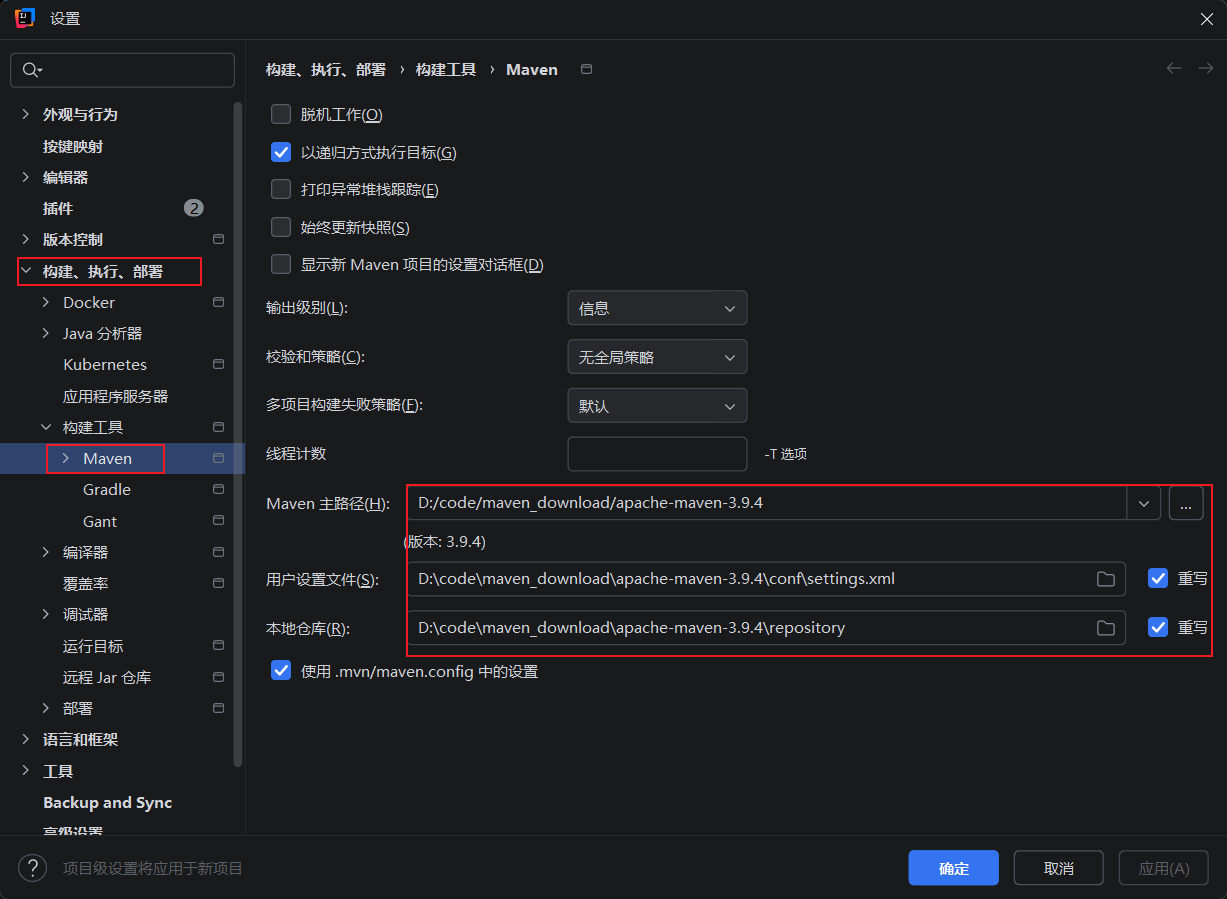
选择构建、执行、部署 -> Maven -> 配置Maven环境
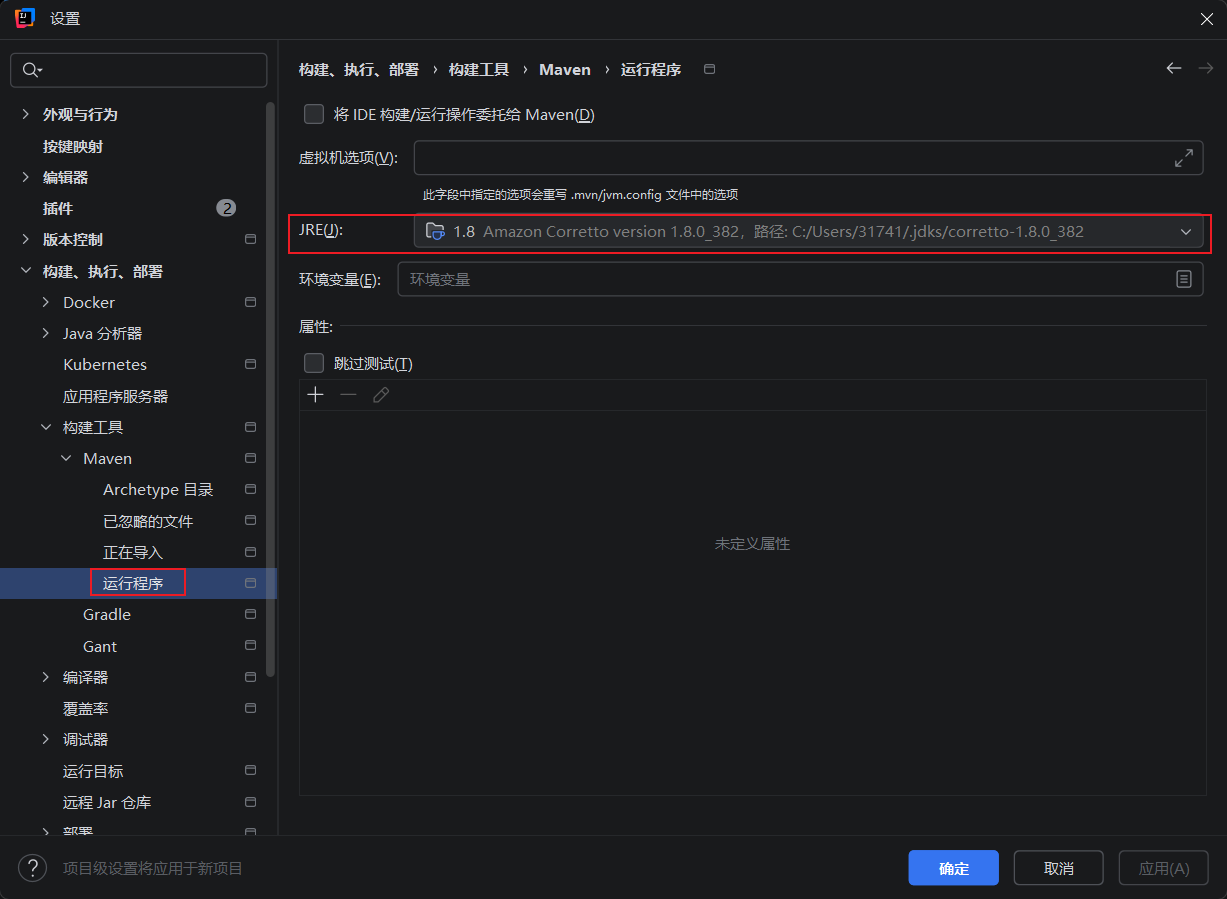
选择运行程序 -> 配置JRE
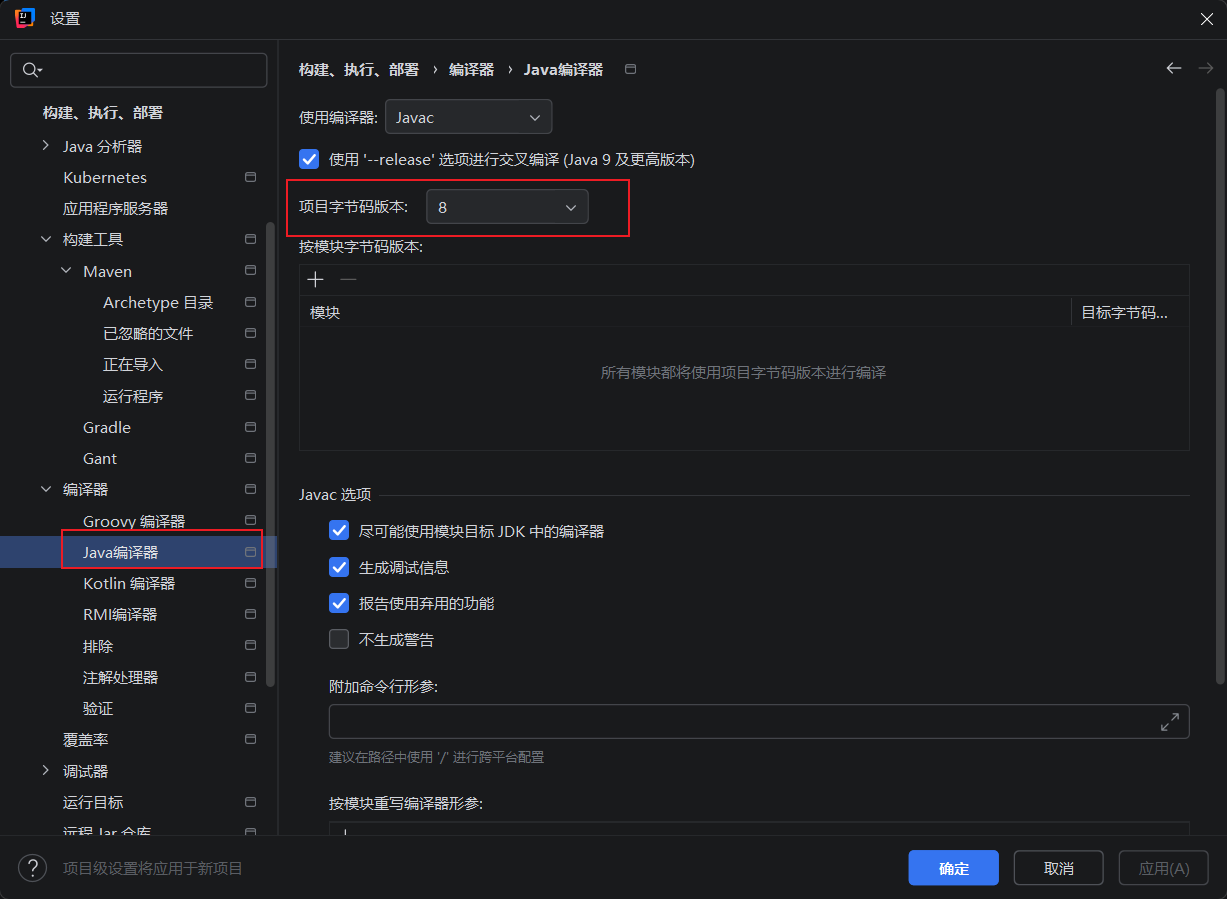
选择编译器 -> Java编译器 -> 选择项目字节码版本
IDEA 创建 Maven 项目
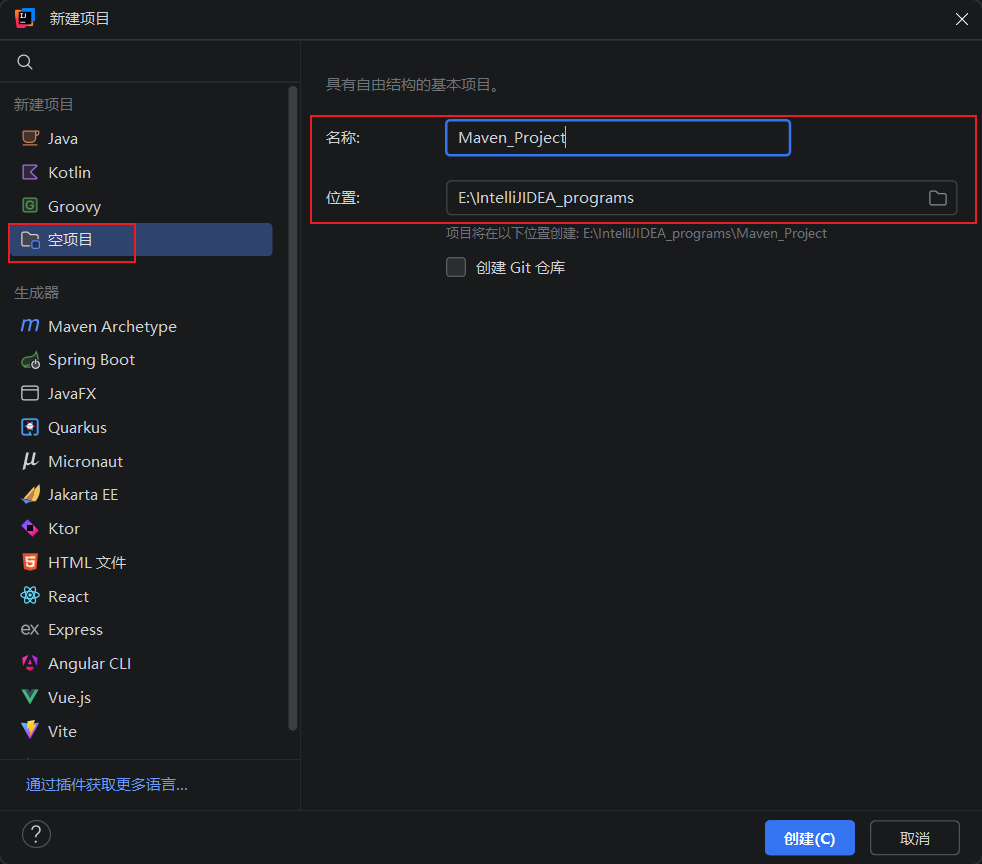
新建空项目 -> 输入名称和存储位置
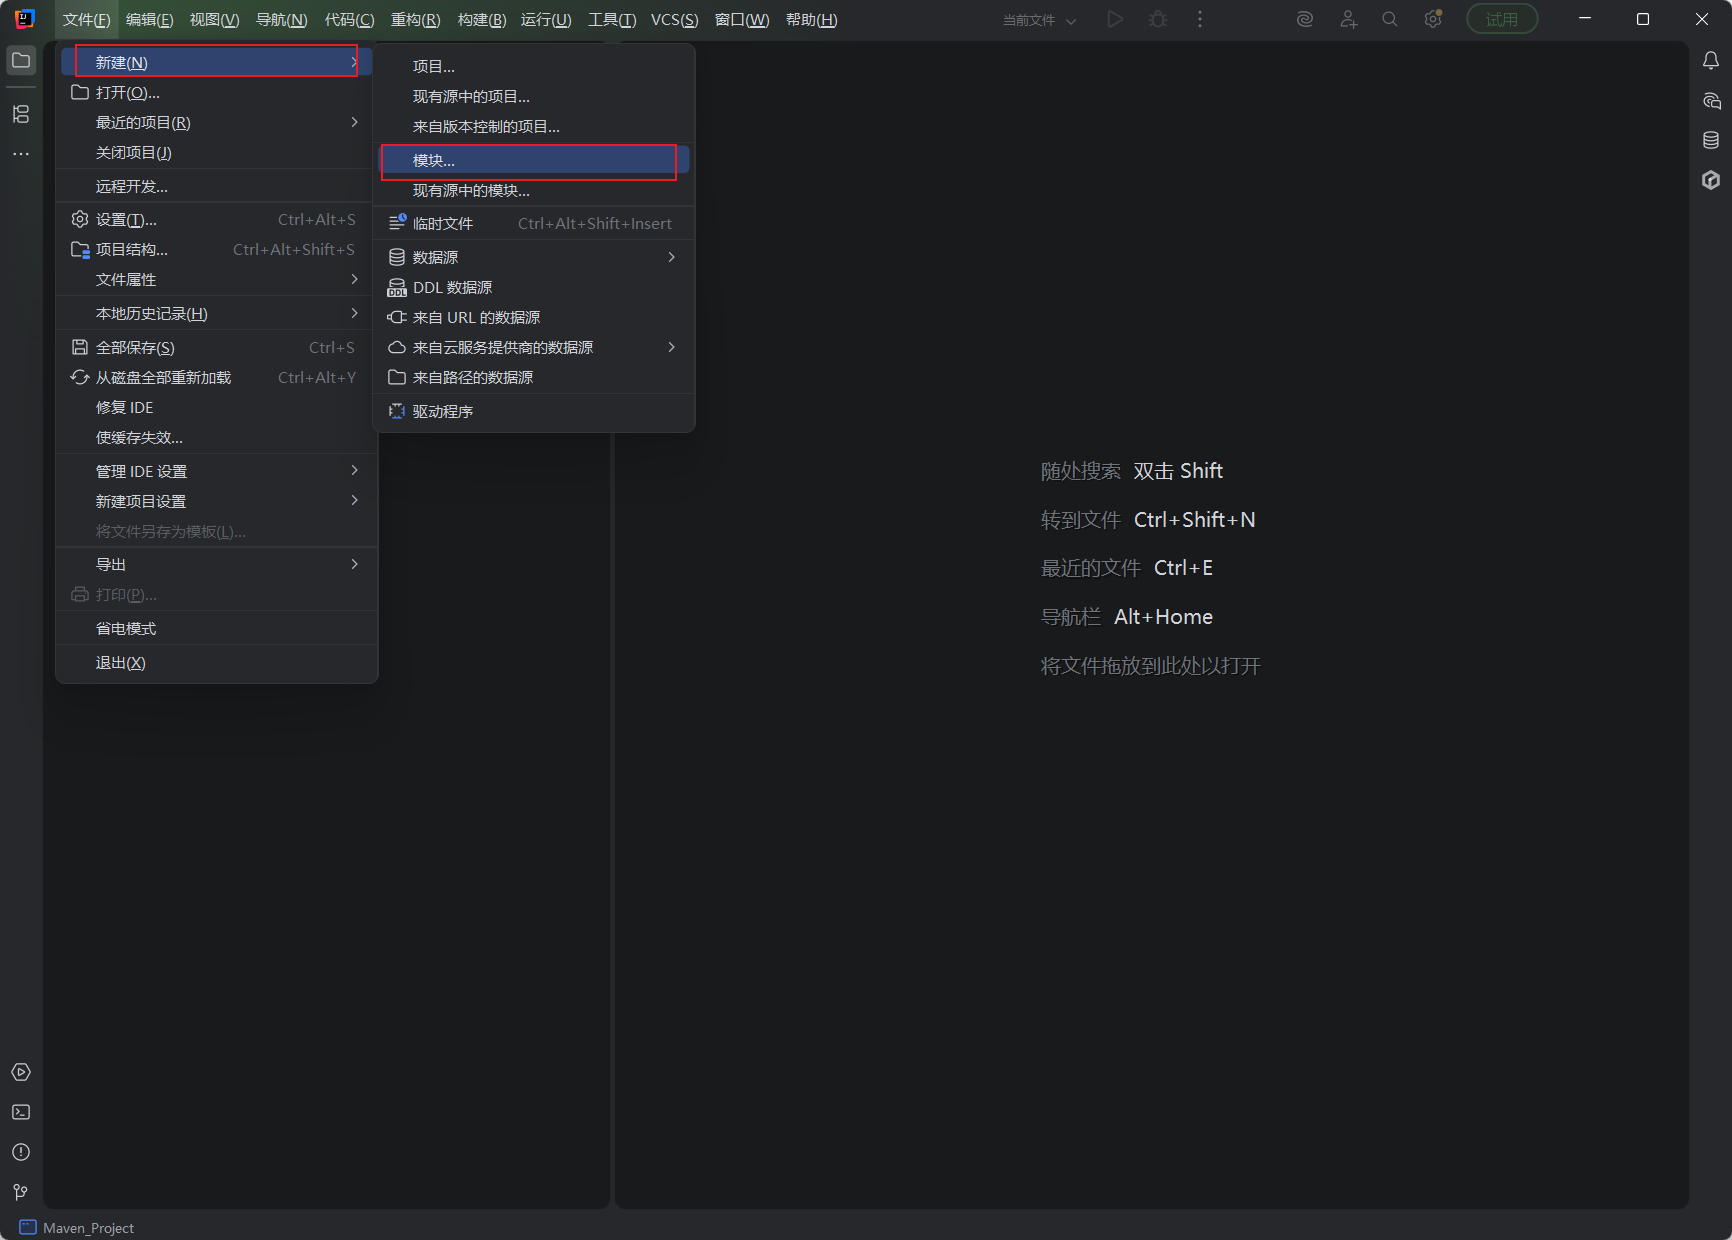
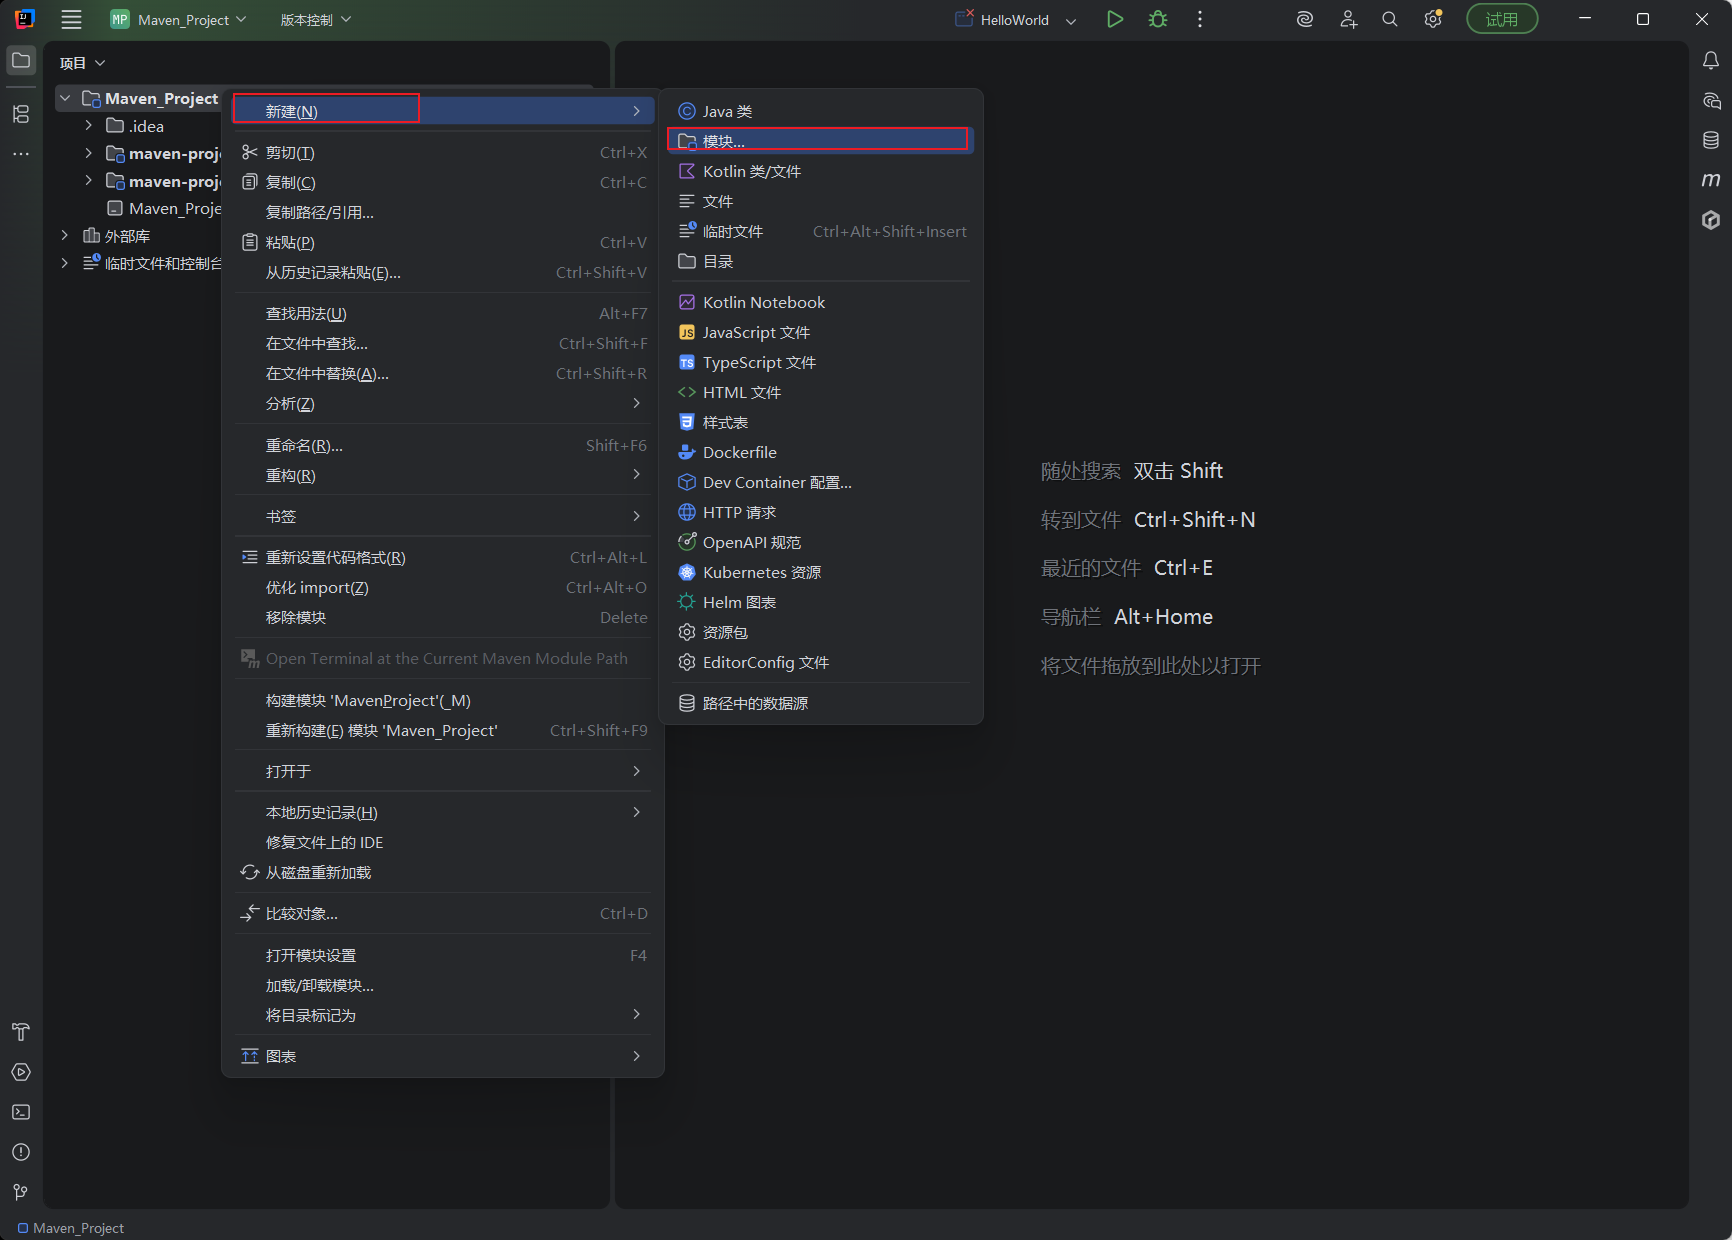
选择新建 -> 模块
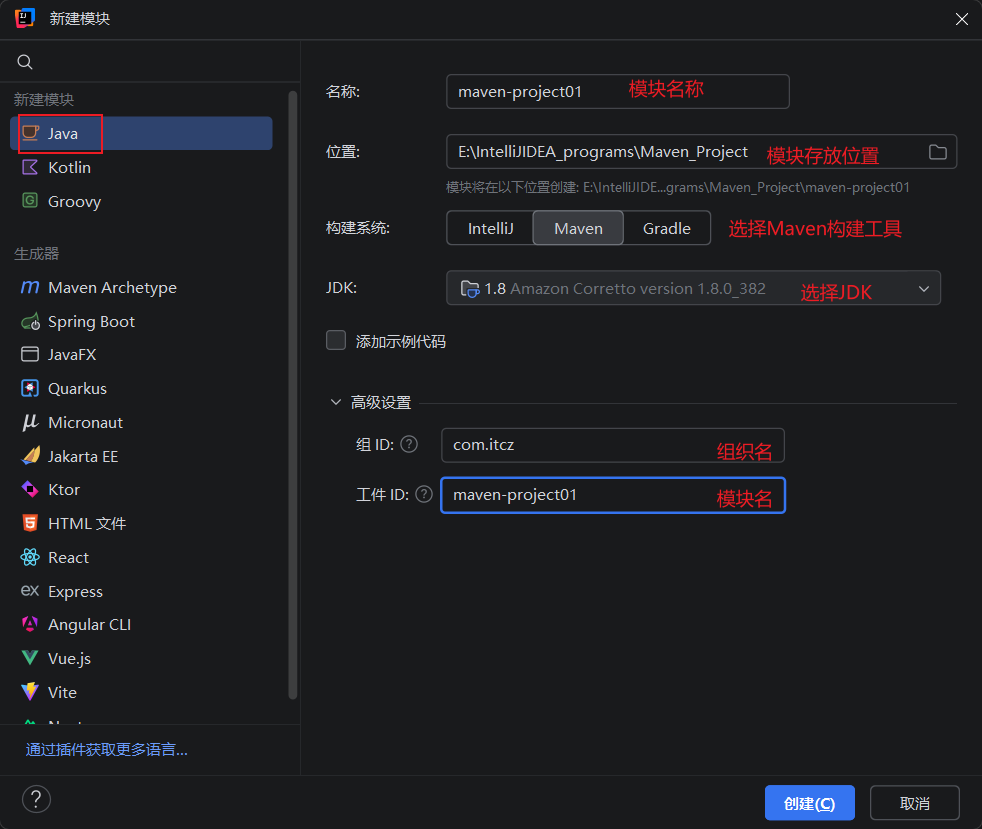
选择Java -> 填写相应的信息(模块路径选择在空项目文件夹下)
IDEA 导入 Maven 项目
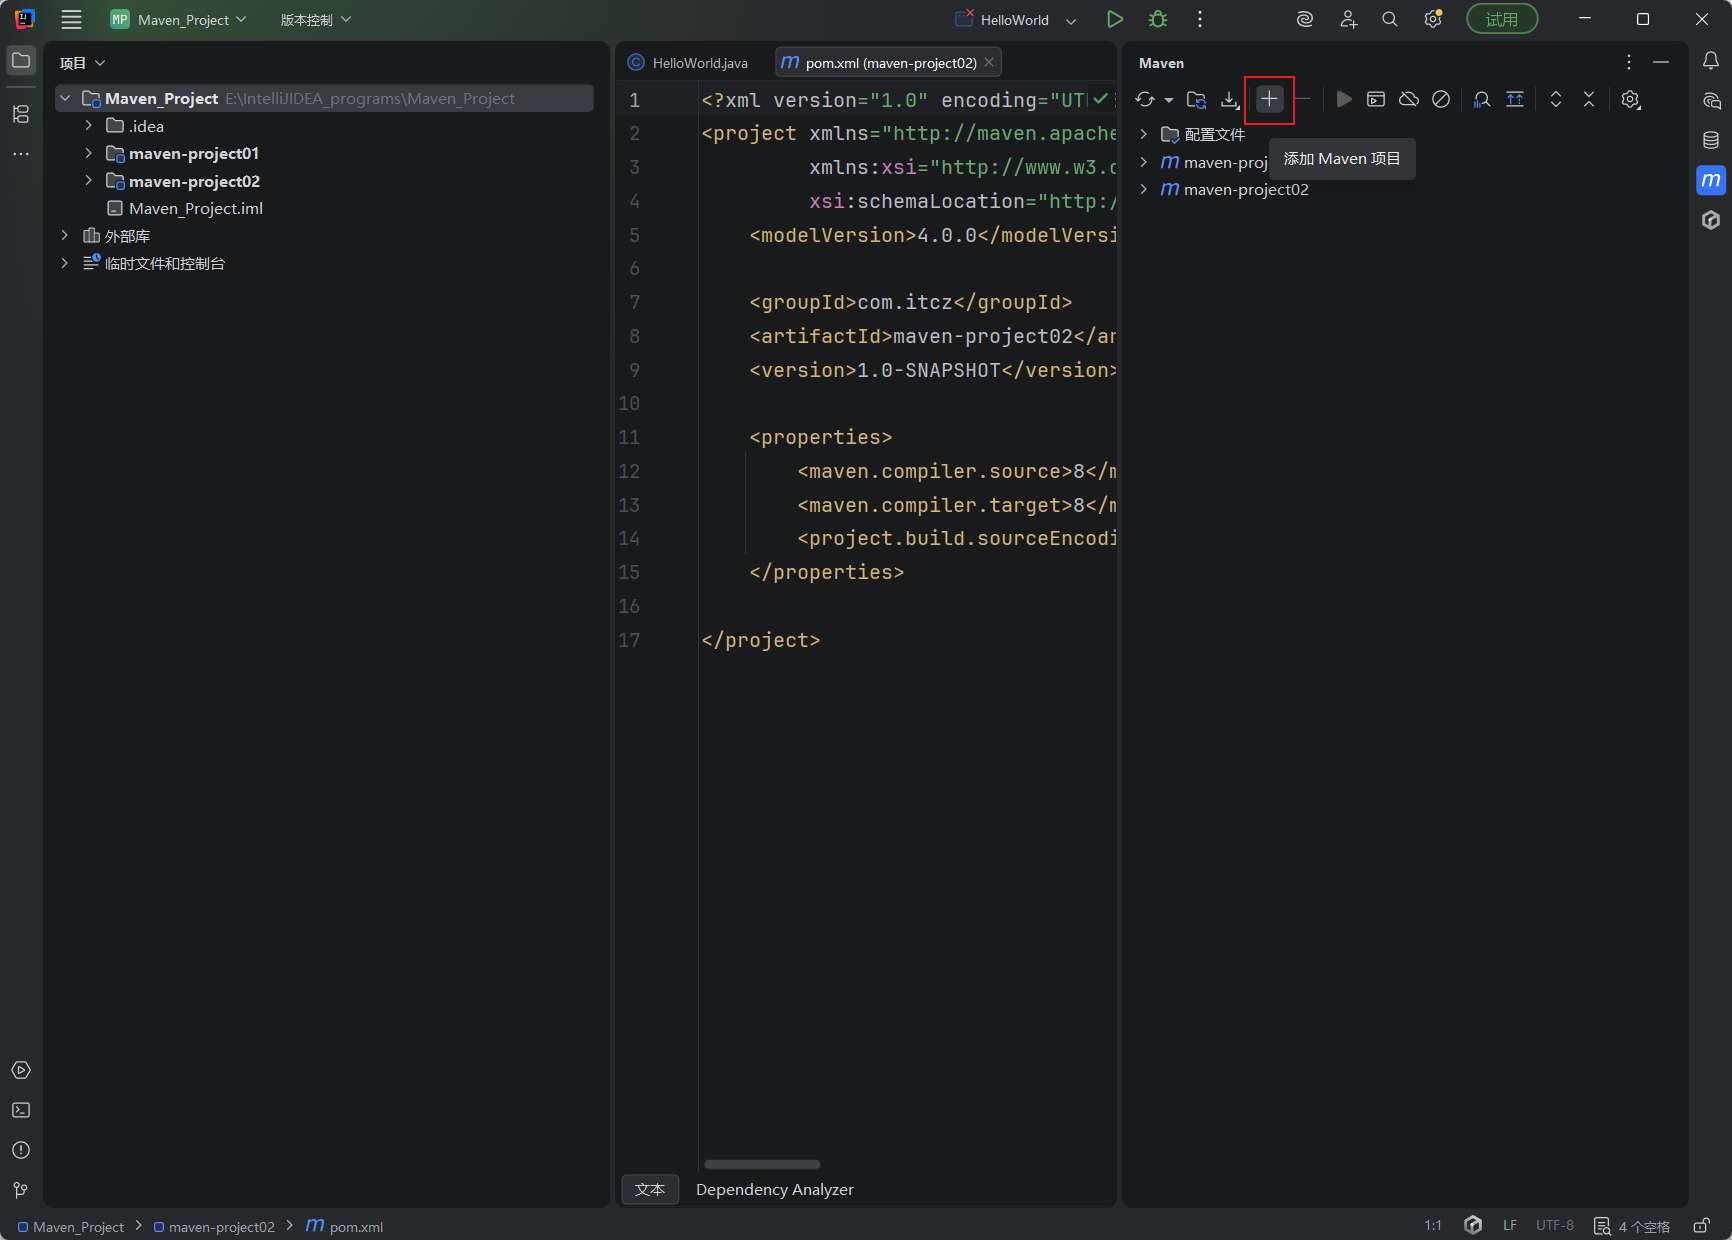
方式一 :从Maven侧边栏中导入
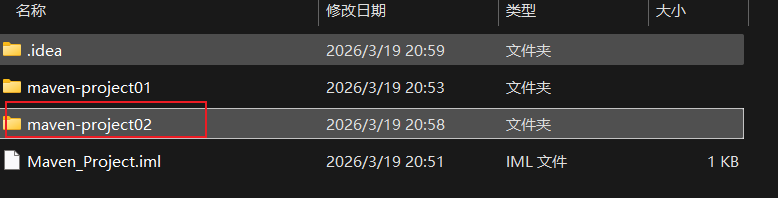
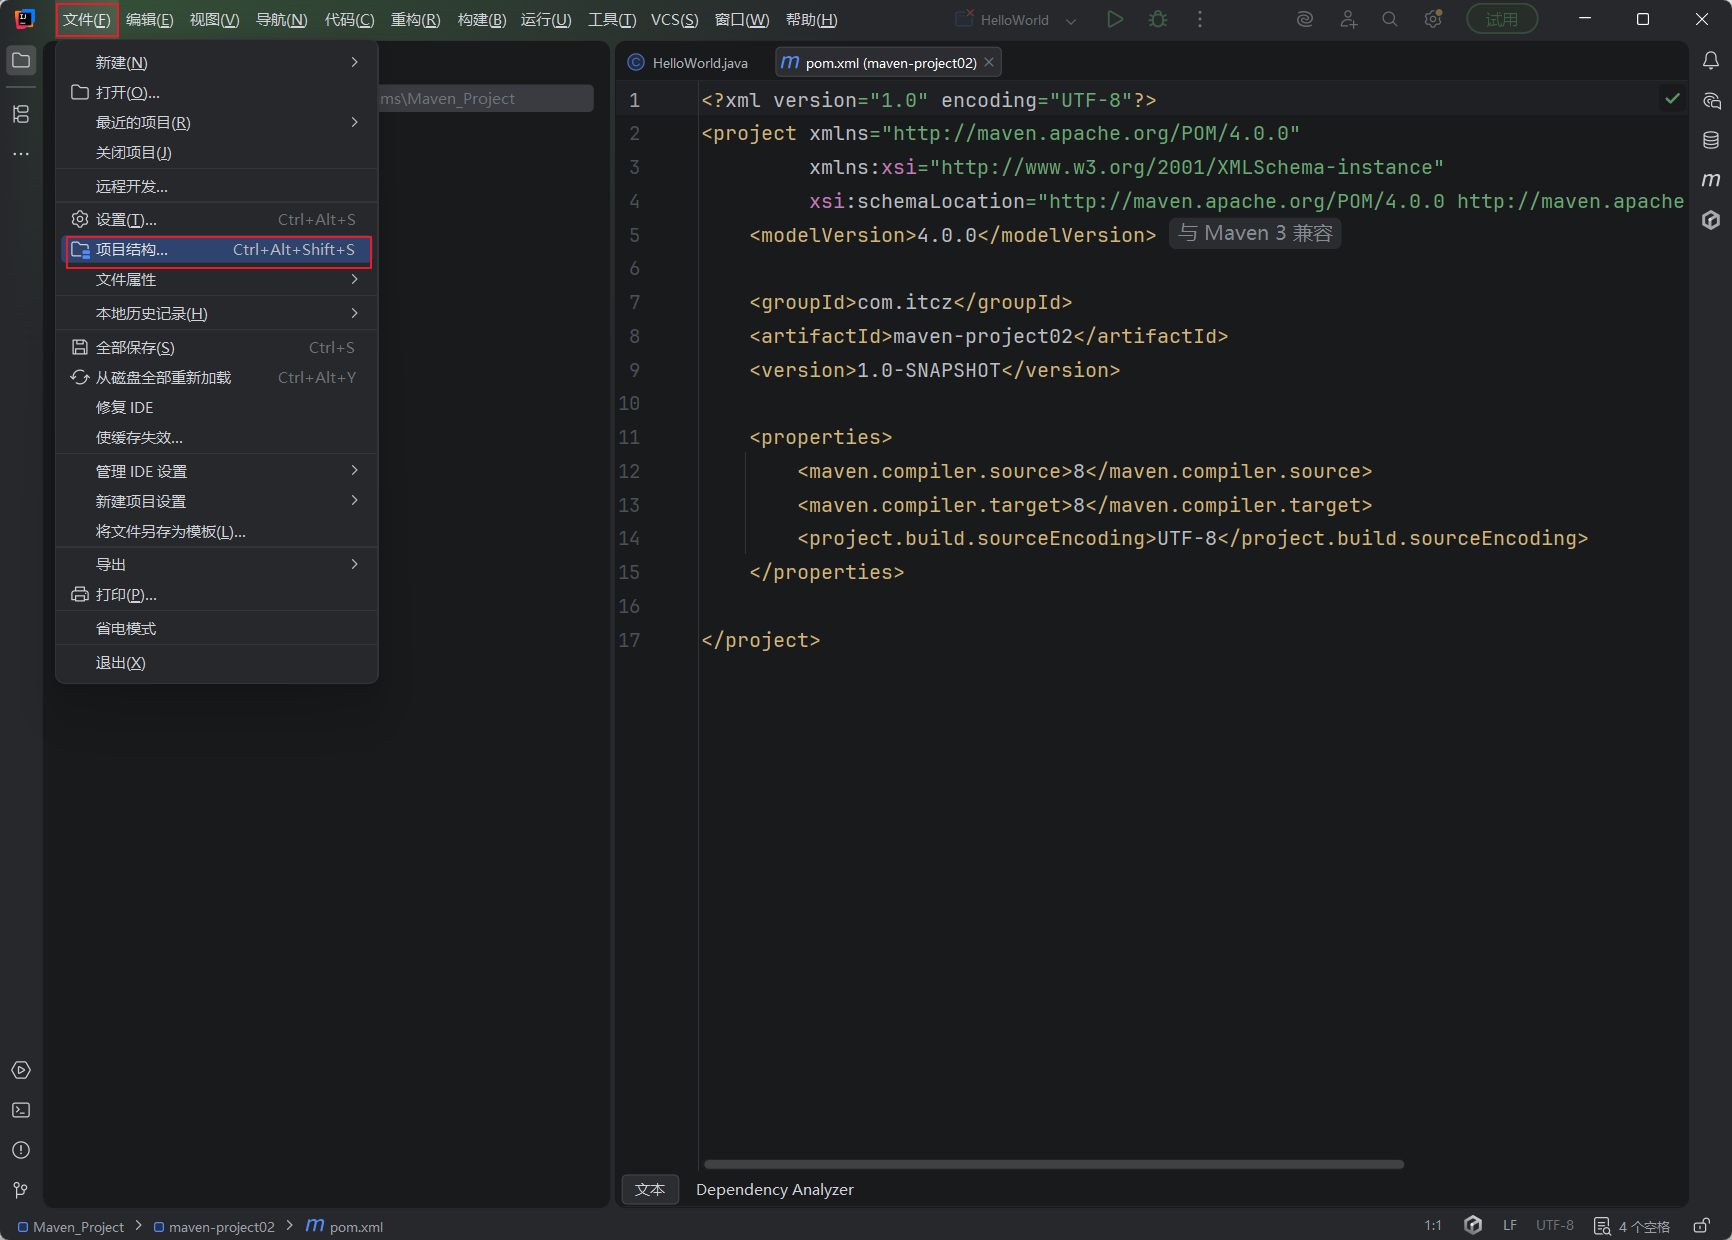
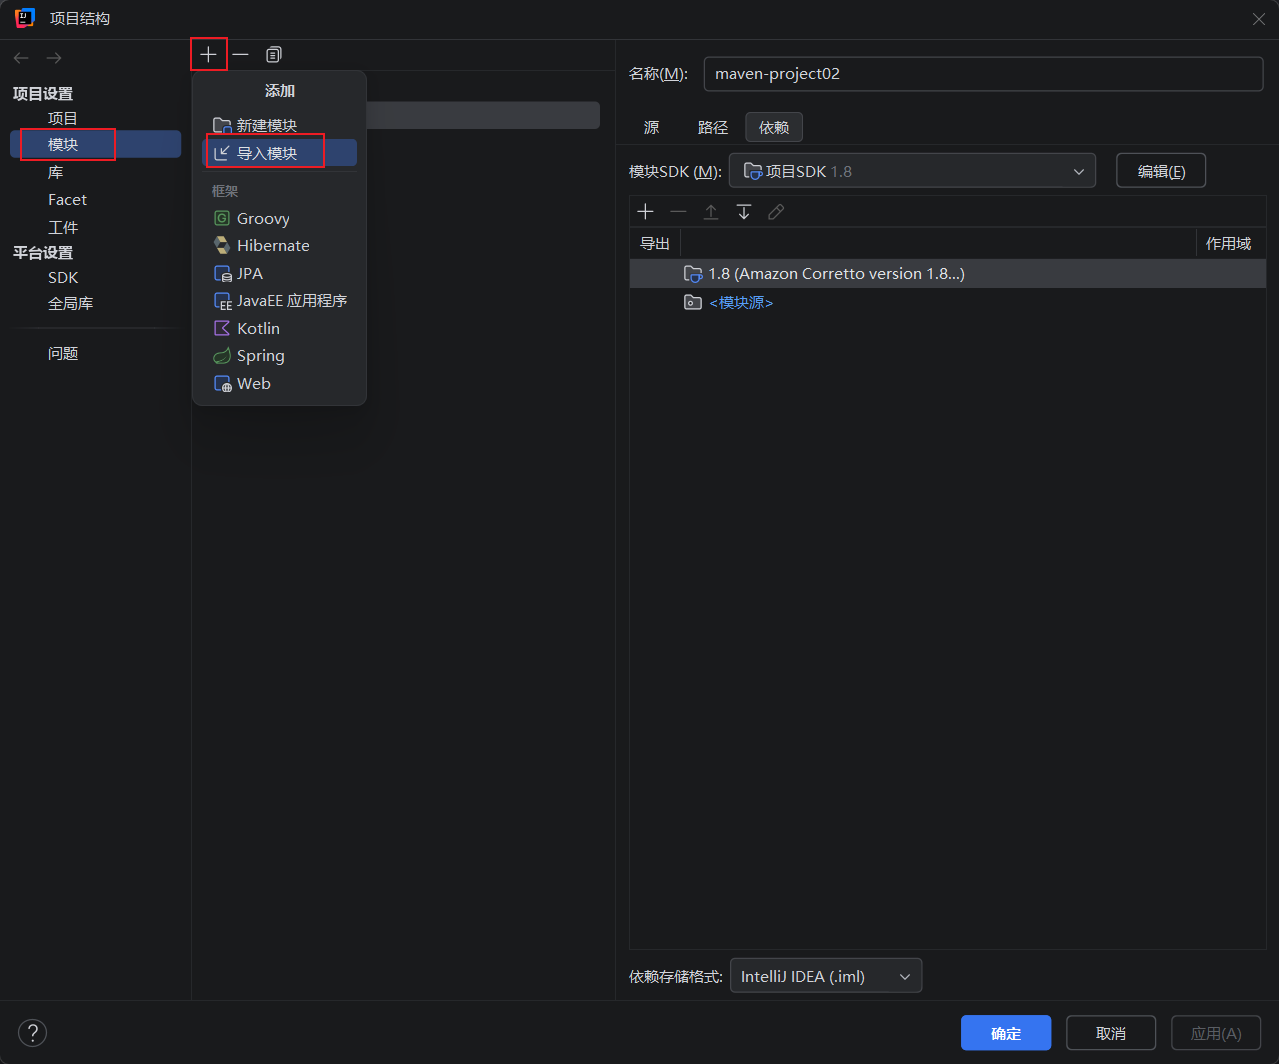
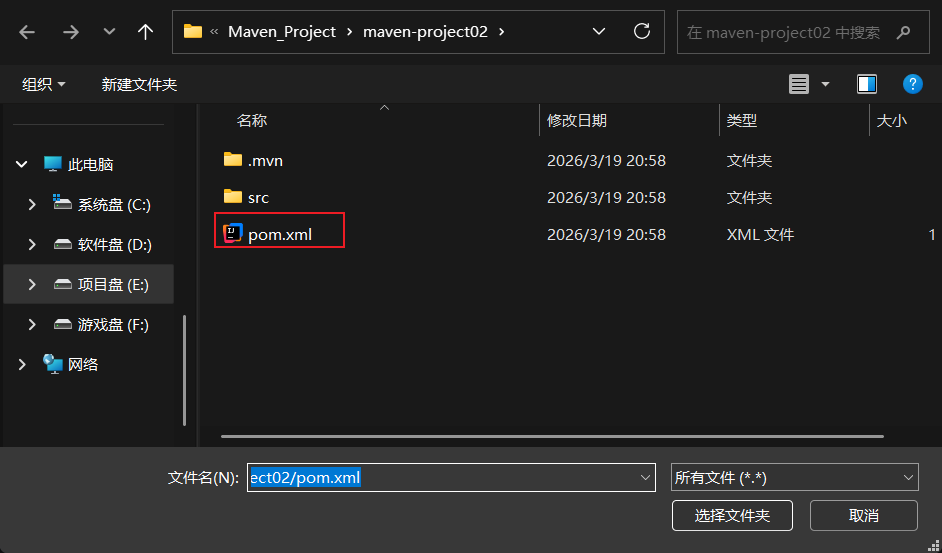
方式二 :从项目结构中导入Maven模块
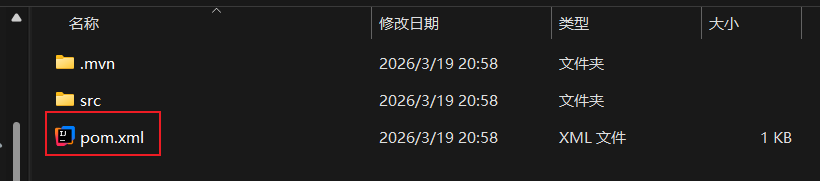
选择模块 -> 选择导入模块文件 -> 选择pom.xml文件
坐标
概念 :Maven中的坐标是资源的唯一标识,通过该坐标可以唯一定位资源位置。使用坐标来定义项目或引入项目中需要的依赖。组成 :
groupld:定义当前Maven项目隶属组织名称(通常是域名反写,例如:com.itheima)
artifactld:定义当前Maven项目名称(通常是模块名称,例如 order-service、goods-service)
version:定义当前项目版本号
依赖配置
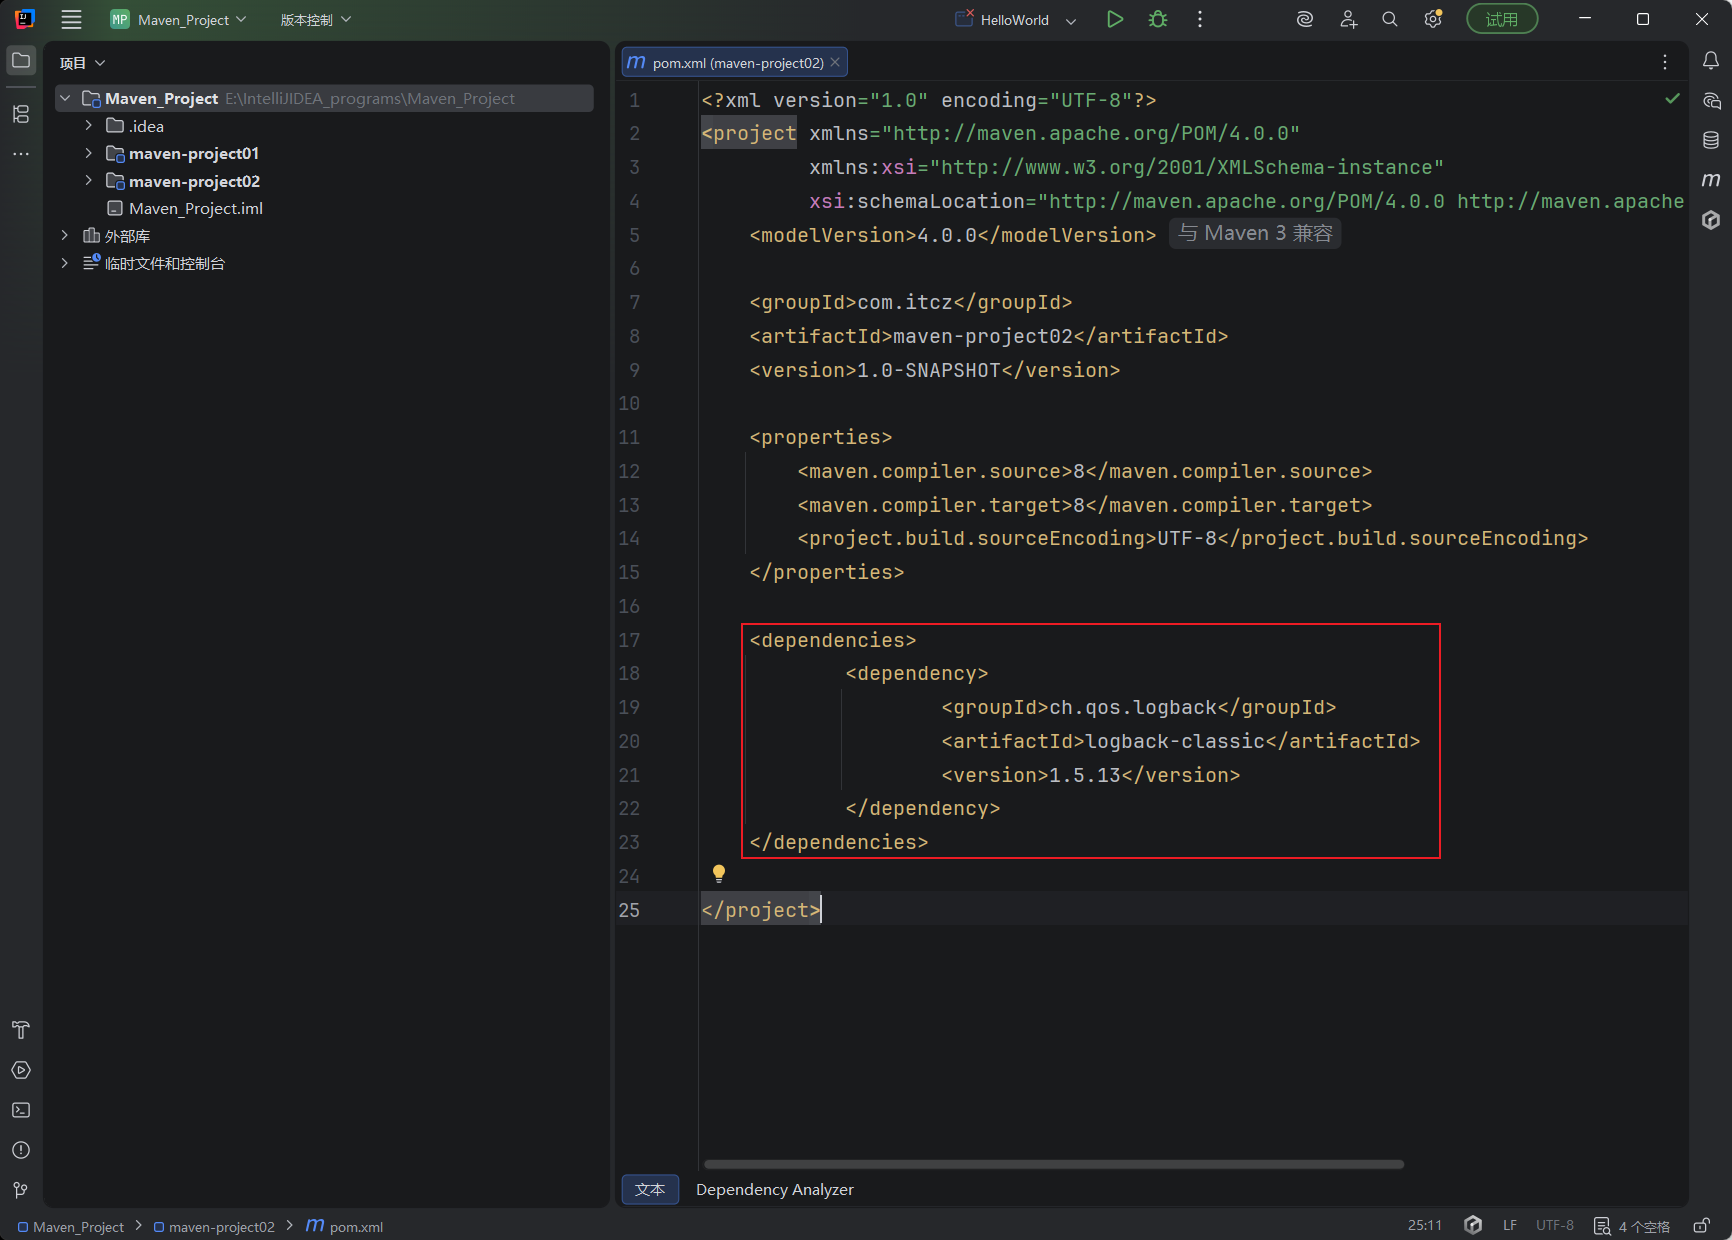
在pom.xml 中编写标签
在标签中 使用引入坐标
定义坐标的 groupld,artifactld, version
点击刷新按钮,引入最新加入的坐标
可以在https://mvnrepository.com/ 中搜索想要的依赖,其中就有对应的依赖配置
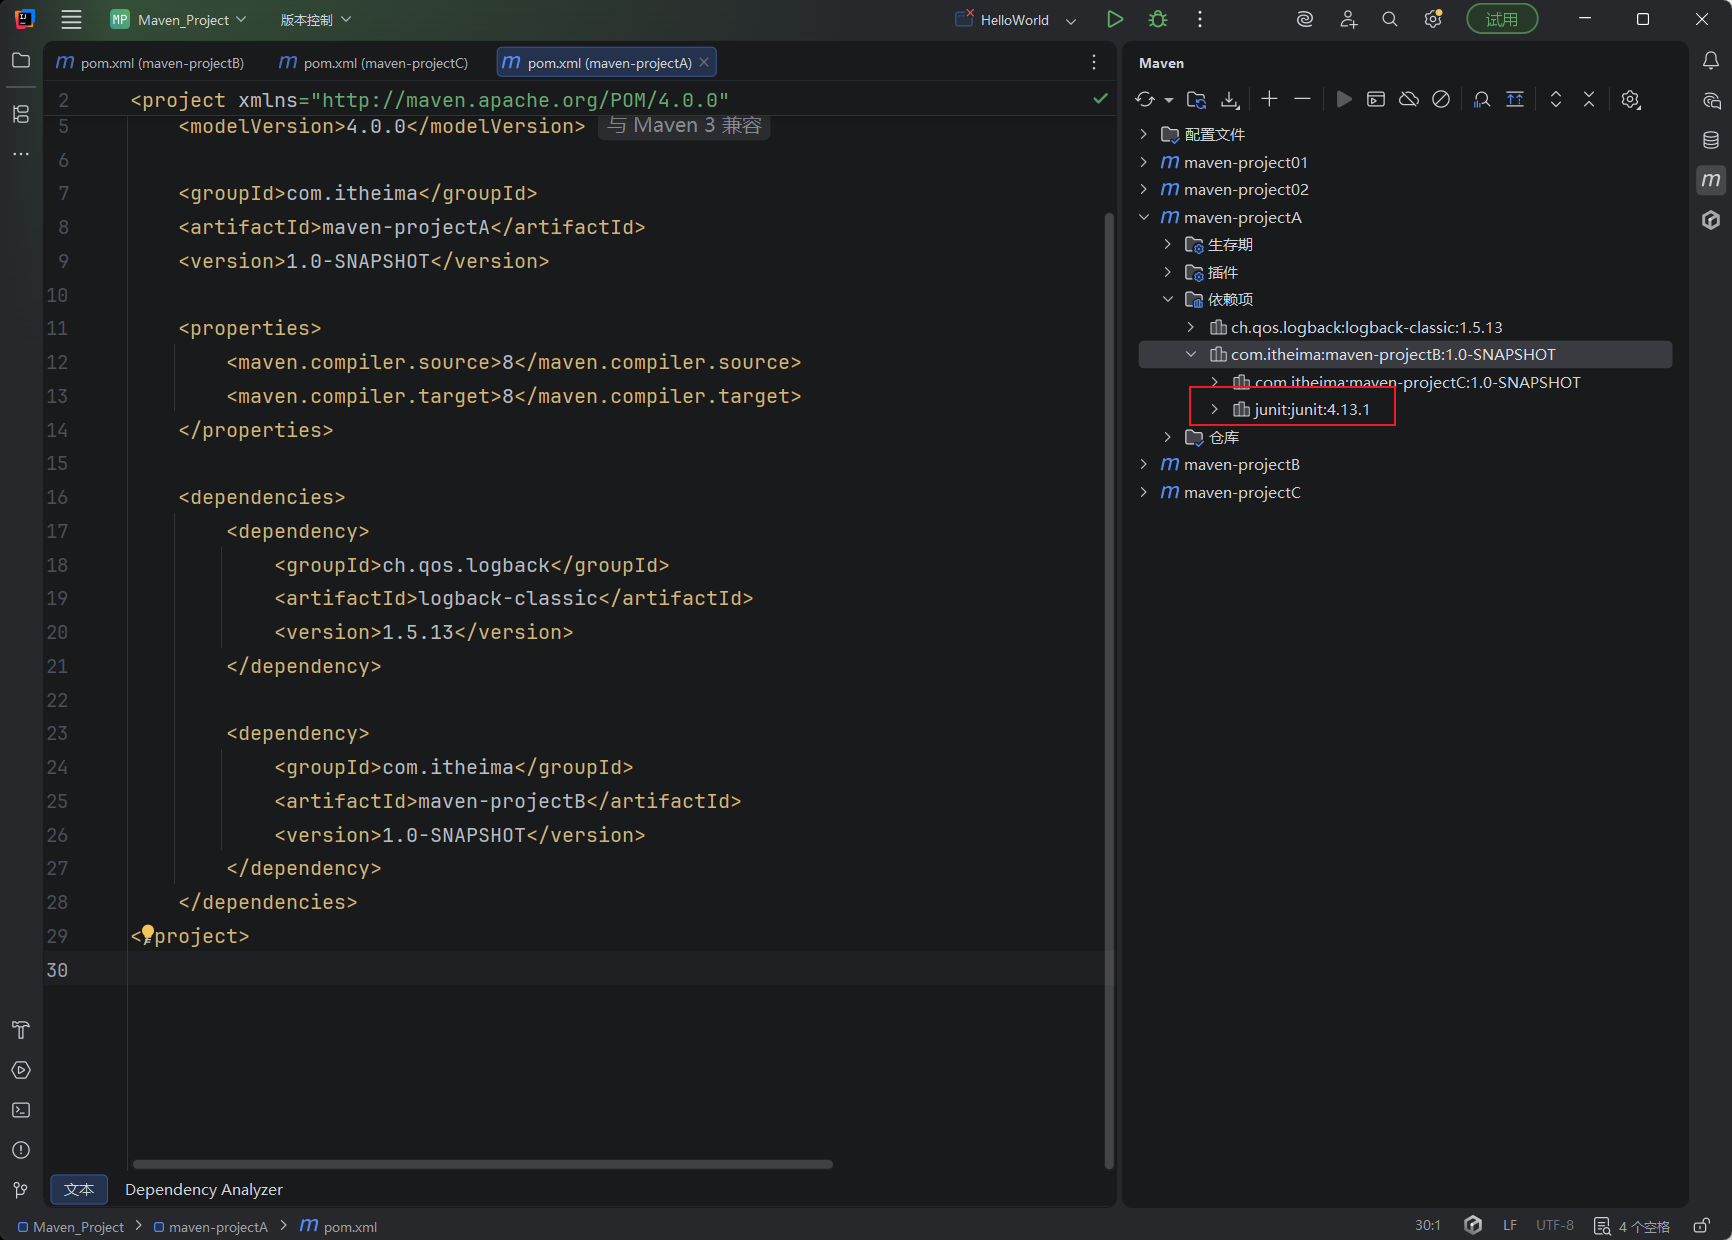
依赖传递
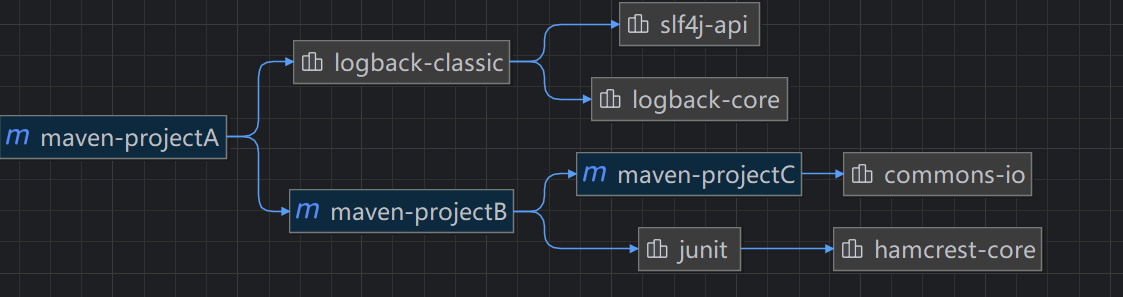
依赖具有传递性 :
直接依赖:在当前项目中通过依赖配置建立的依赖短息
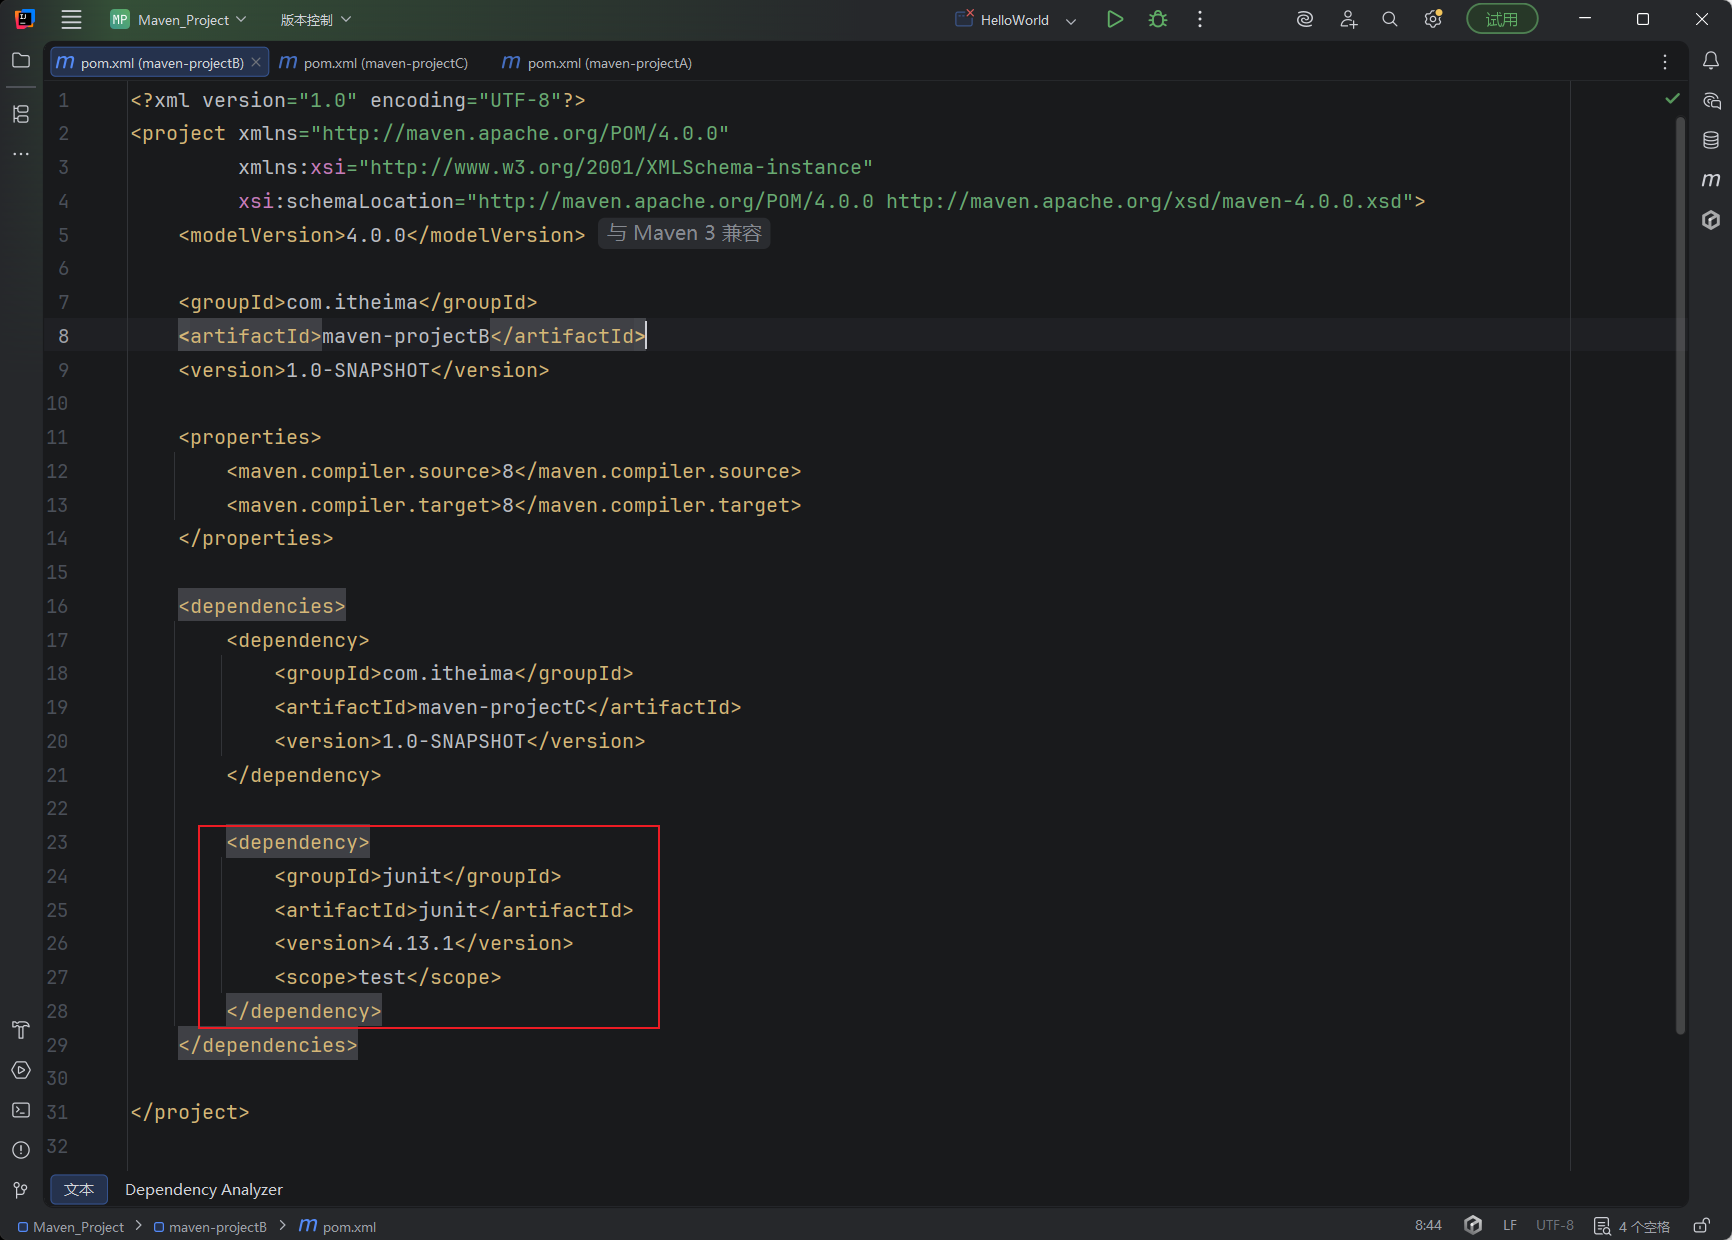
间接依赖:被依赖的资源如果依赖其他资源,当前项目间接依赖其他资源
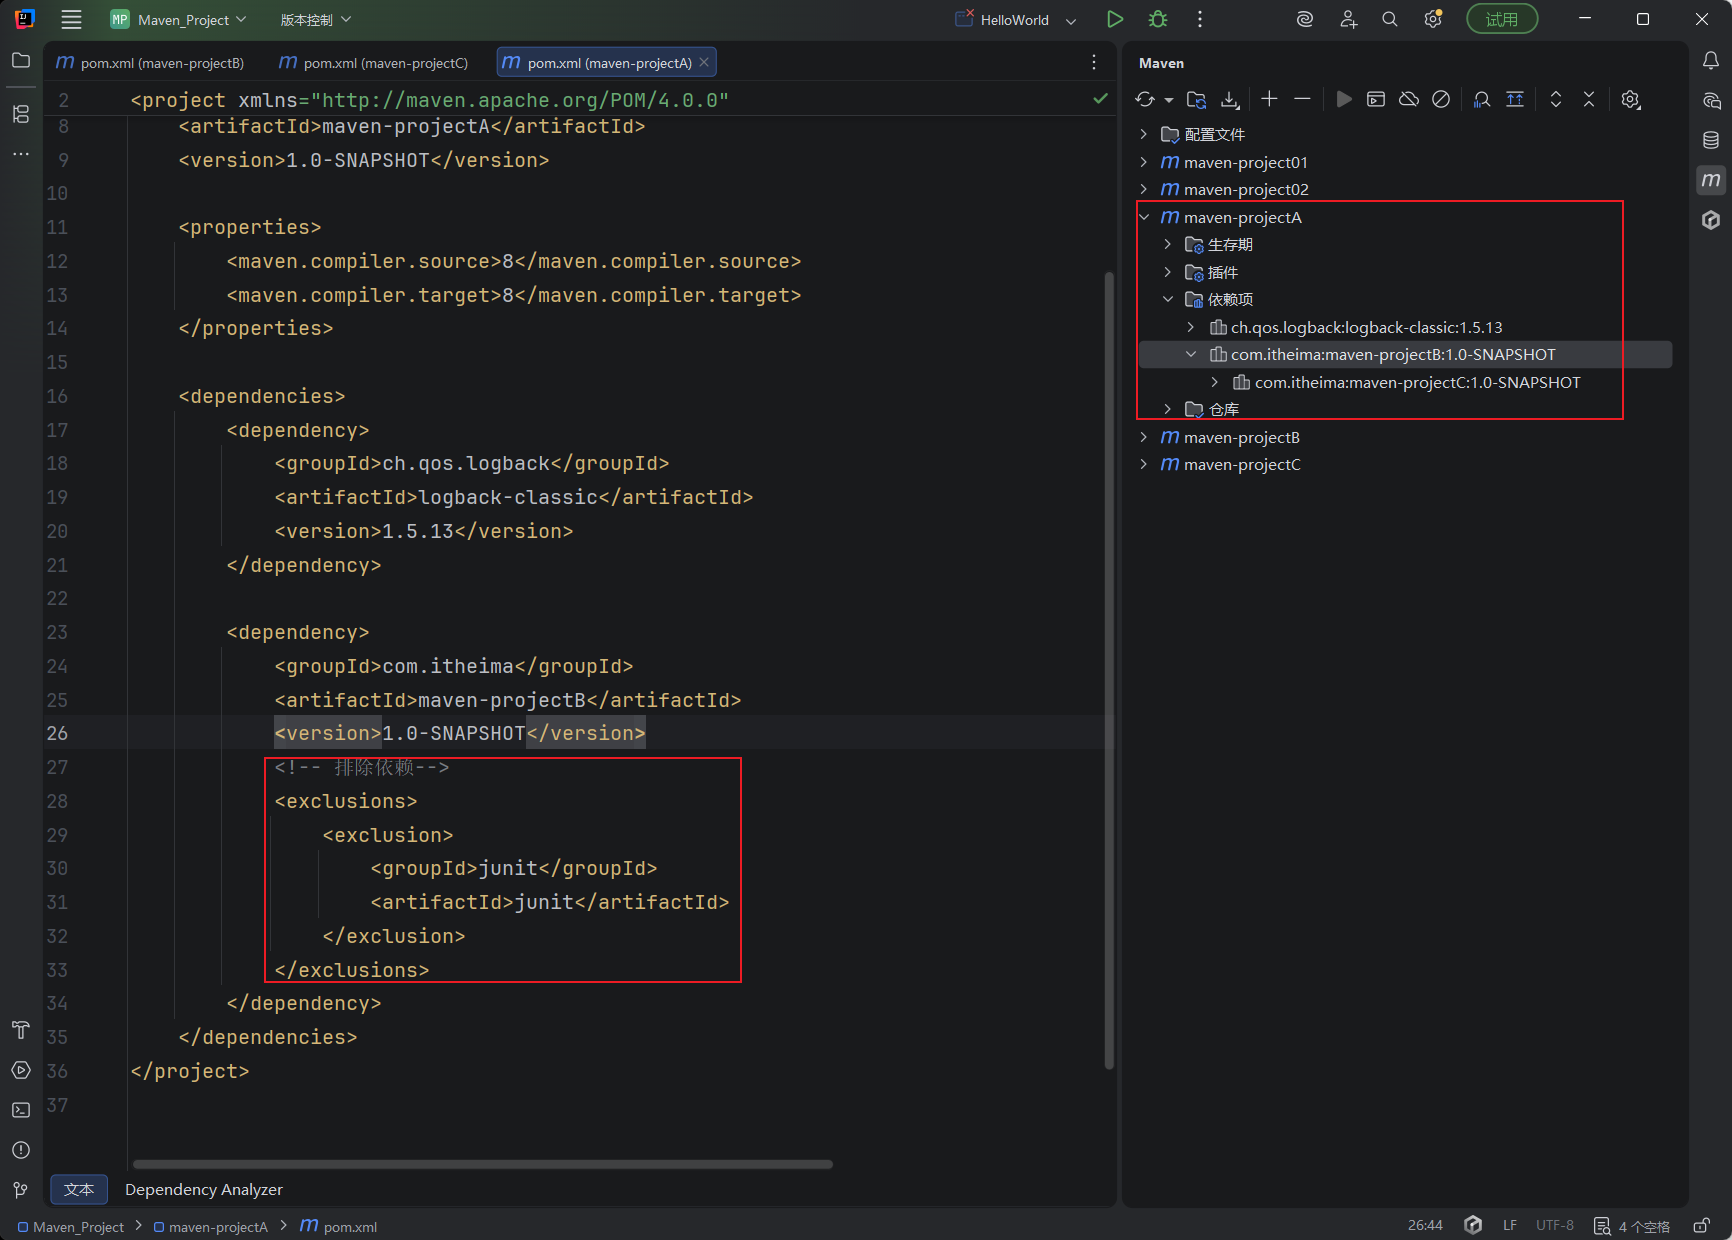
排除依赖 :主动断开依赖的资源,被排除的资源无需指定版本
依赖范围 依赖的jar包,默认情况下,可以在任何地方使用。可以通过 …< /scope>设置其作用范围。
主程序范围有效。(main文件夹范围内)
测试程序范围有效。(test文件夹范围内)
是否参与打包运行。(package指令范围内)
scope值 主程序 测试程序 打包(运行) 范例
compile(默认)
Y
Y
Y
log4j
test
-
Y
-
junit
provided
Y
Y
-
servlet-api
runtime
-
Y
Y
jdbc驱动
声明周期
概念 :Maven的生命周期就是为了对所有的maven项目构建过程进行抽象和统一分类 :Maven中有3套相互独立的生命周期
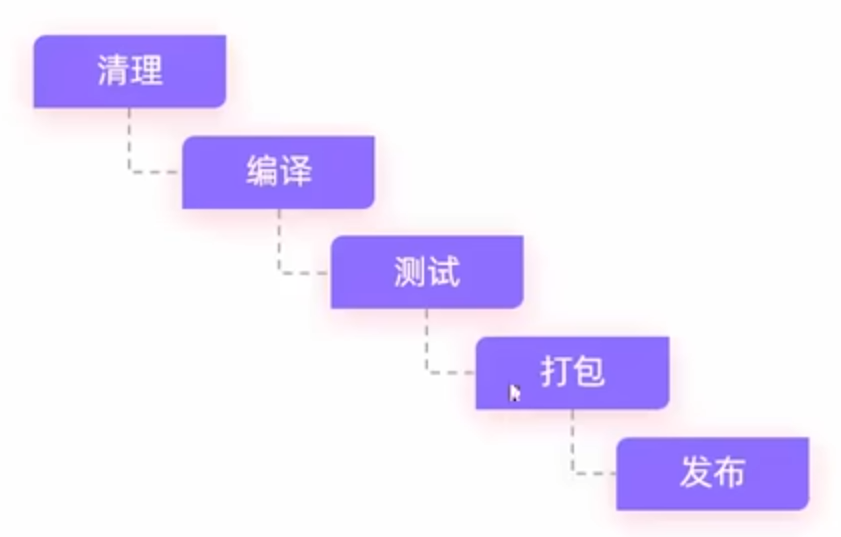
clean:清理工作
default:核心工作,如:编译、测试、打包、安装、部署等
site:生成报告、发布站点等
核心阶段 :
clean:移除上一次构建生的文件
compile:编译项目源代码
test:使用合适的单元测试框架运行测试(junit)
package:将编译后的文件打包,如:jar、war等
install:安装项目到本地仓库
在同一套生命周期中,当运行后面的阶段,前面的阶段都会运行,故而运行package时会运行compile、test,但是不会运行clean。运行install时,前四个阶段都不会运行
执行方式 :
方式一:在Maven侧边栏中运行对应的操作
方式二:在命令行窗口中,进入Maven项目的目录,执行mvn clean/compile/test/package/install即可运行对应的操作
Maven 高级 分模块设计和开发 分模块设计 :将项目按照功能拆分成若干个子模块,方便项目的管理维护、扩展,也方便模块间的相互调用,资源共享
多个模块直接通过pom.xml文件进行导入
继承 继承关系 概念 :继承描述的是两个工程之间的关系,与Java中的继承相似,子工程可以继承父工程中的配置信息,常见于依赖关系的继承
作用 :简化依赖配置,统一管理依赖
实现 :…
继承关系实现的步骤 :
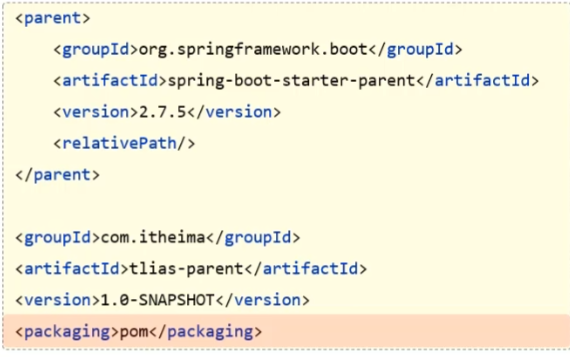
创建Maven模块(父工程),并设置打包方式为pom(默认为jar)
jar:普通模块打包,springboot项目基本都是jar包(内嵌tomcat运行)
war:普通web程序打包,需要部署在外部的tomcat服务器中运行
pom:父工程或聚合工程,该模块不写代码,仅进行依赖管理
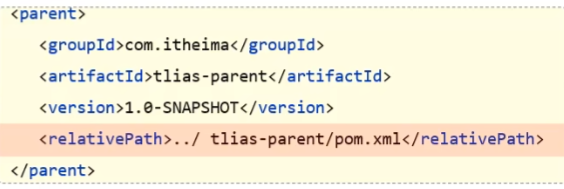
在子工程的pom.xml文件中,配置继承关系
在子工程中,配置了继承关系之后,坐标中的groupId是可以省略,因为会自动继承父工程的
relativePath指定父工程的pom文件的相对位置(如果不指定,将从本地仓库/远程仓库查找该工程)
在父工程中配置各个工程共有的依赖(子工程会自动继承父工程的依赖)
如果父子工程中配置了同一个依赖的不同版本,它会以父工程为主
版本锁定
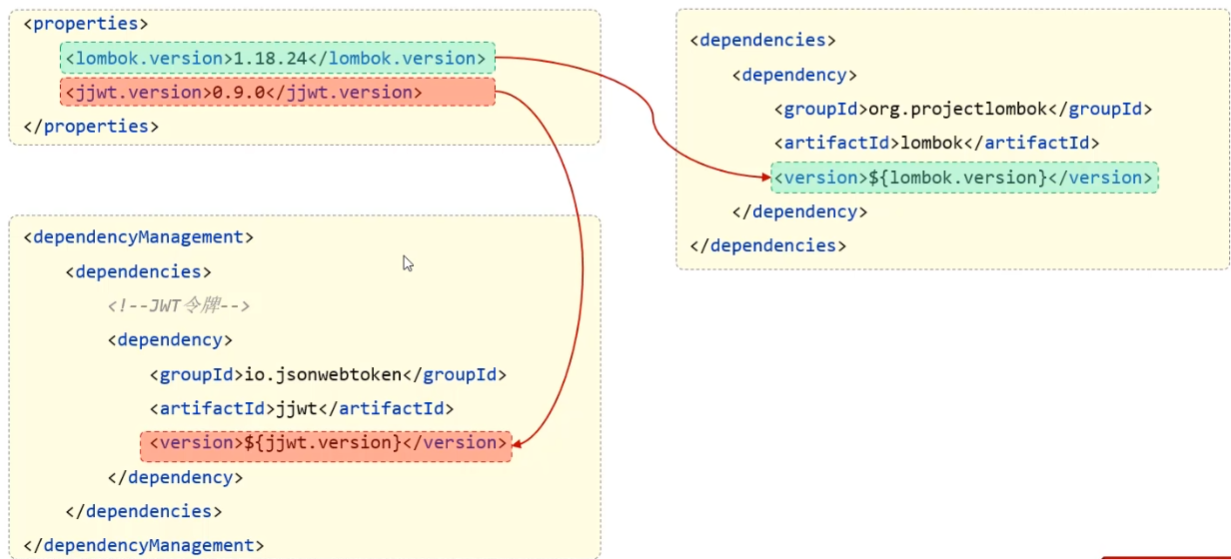
在maven中,可以在父工程的pom文件中通过来统一管理依赖版本(该标签指定的依赖文件不会加载到子工程中,它只是用来管理子工程中的依赖文件的版本号)
子工程引入依赖时,无需指定版本号,父工程统一管理。变更依赖版本,只需在父工程中统一变更
通过自定义属性/引用属性来实现同一个管理版本号(下列图片的代码都是在父工程的pom.xml文件中)
聚合 概念 :将多个模块组织成一个整体,同时进行项目的构建
聚合工程 :一个不具有业务功能的“空”工程(有且仅有一个pom文件)
作用 :快速构建项目(无需根据依赖关系手动构建,直接在聚合工程上构建即可)
maven可以通过设置当前聚合工程所包含的子模块名称(下列代码在父工程中进行定义)
1 2 3 4 5 <modules > <module > ../tlias-pojo</module > <module > ../tlias-utlis</module > <module > ../tlias-web-management</module > </modules >
聚合工程中所包含的模块,在构建时,会自动根据模块间的依赖关系设置构建顺序,与聚合工程中模块的配置书写位置无关。****
Spring Boot Spring Boot 快速构建项目
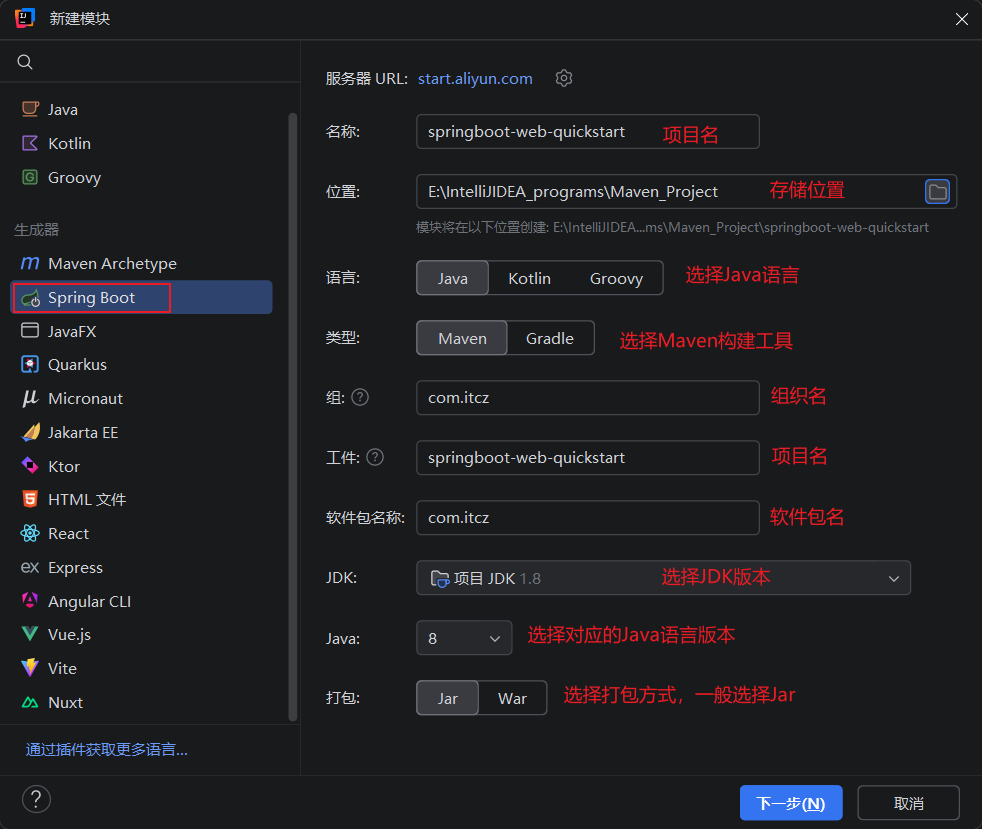
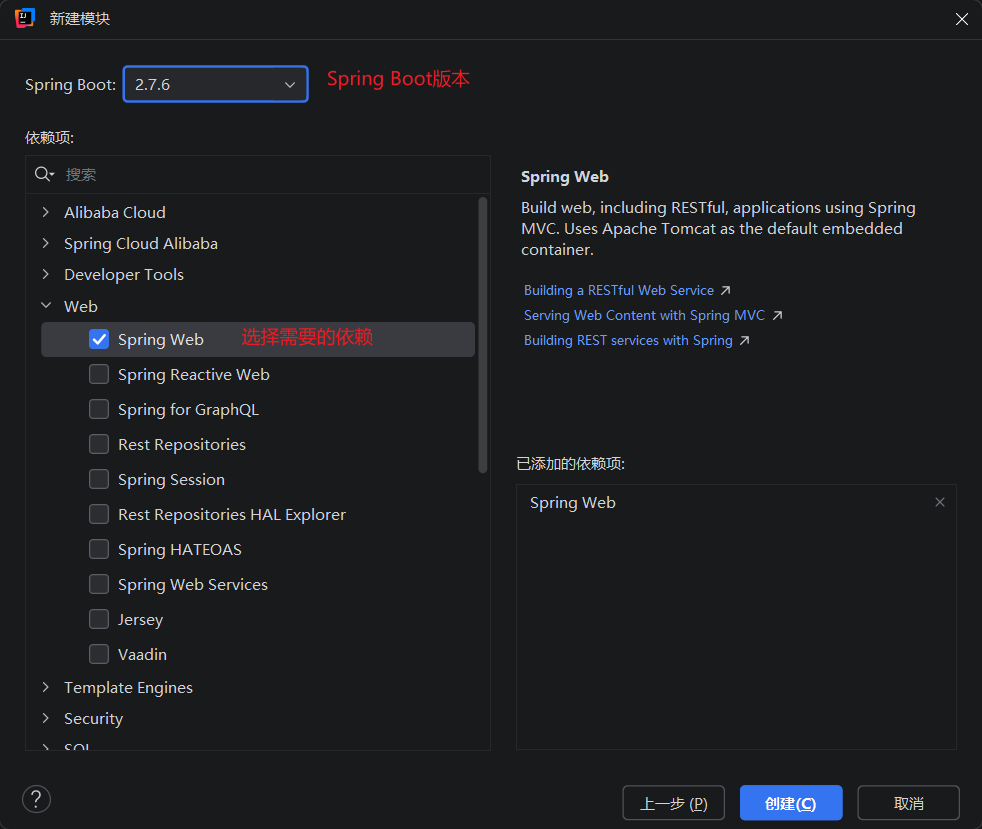
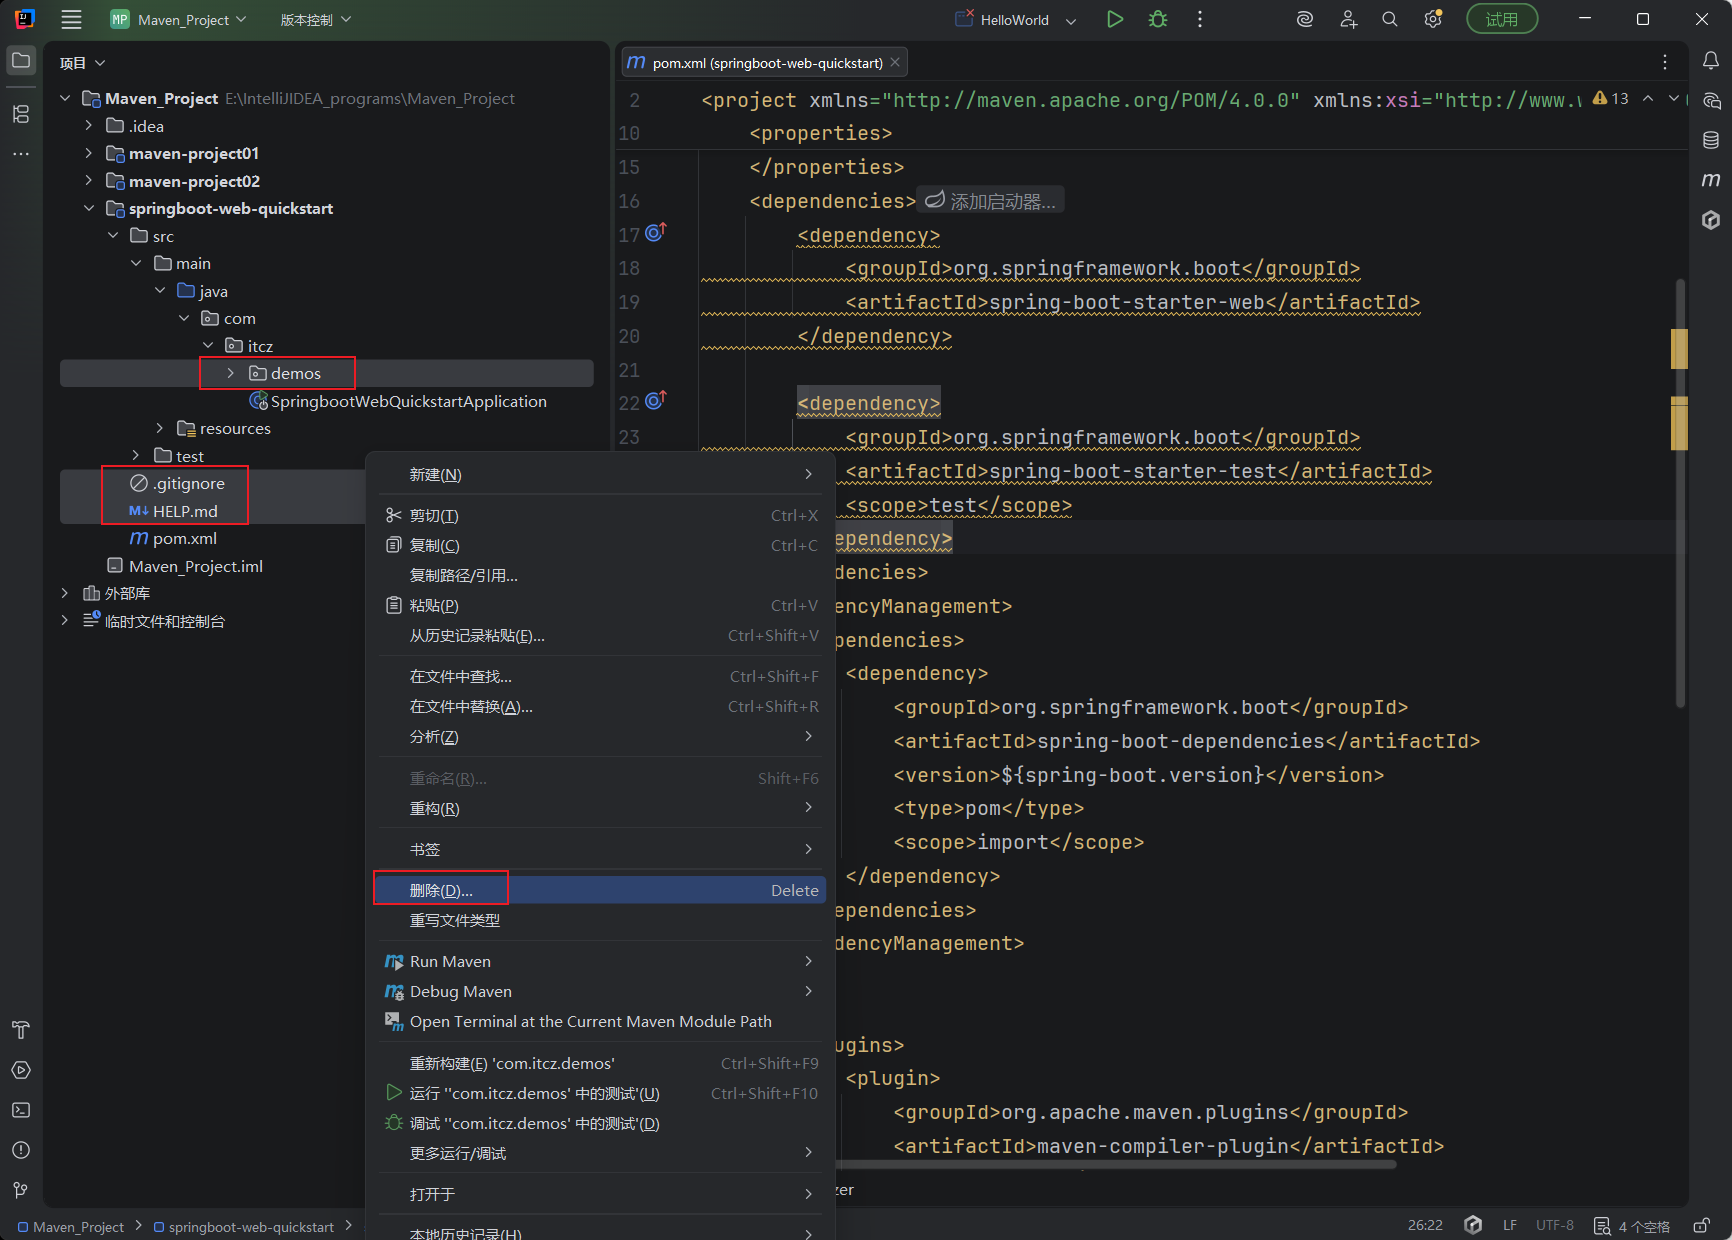
创建SpringBoot工程勾选web开发相关依赖 :
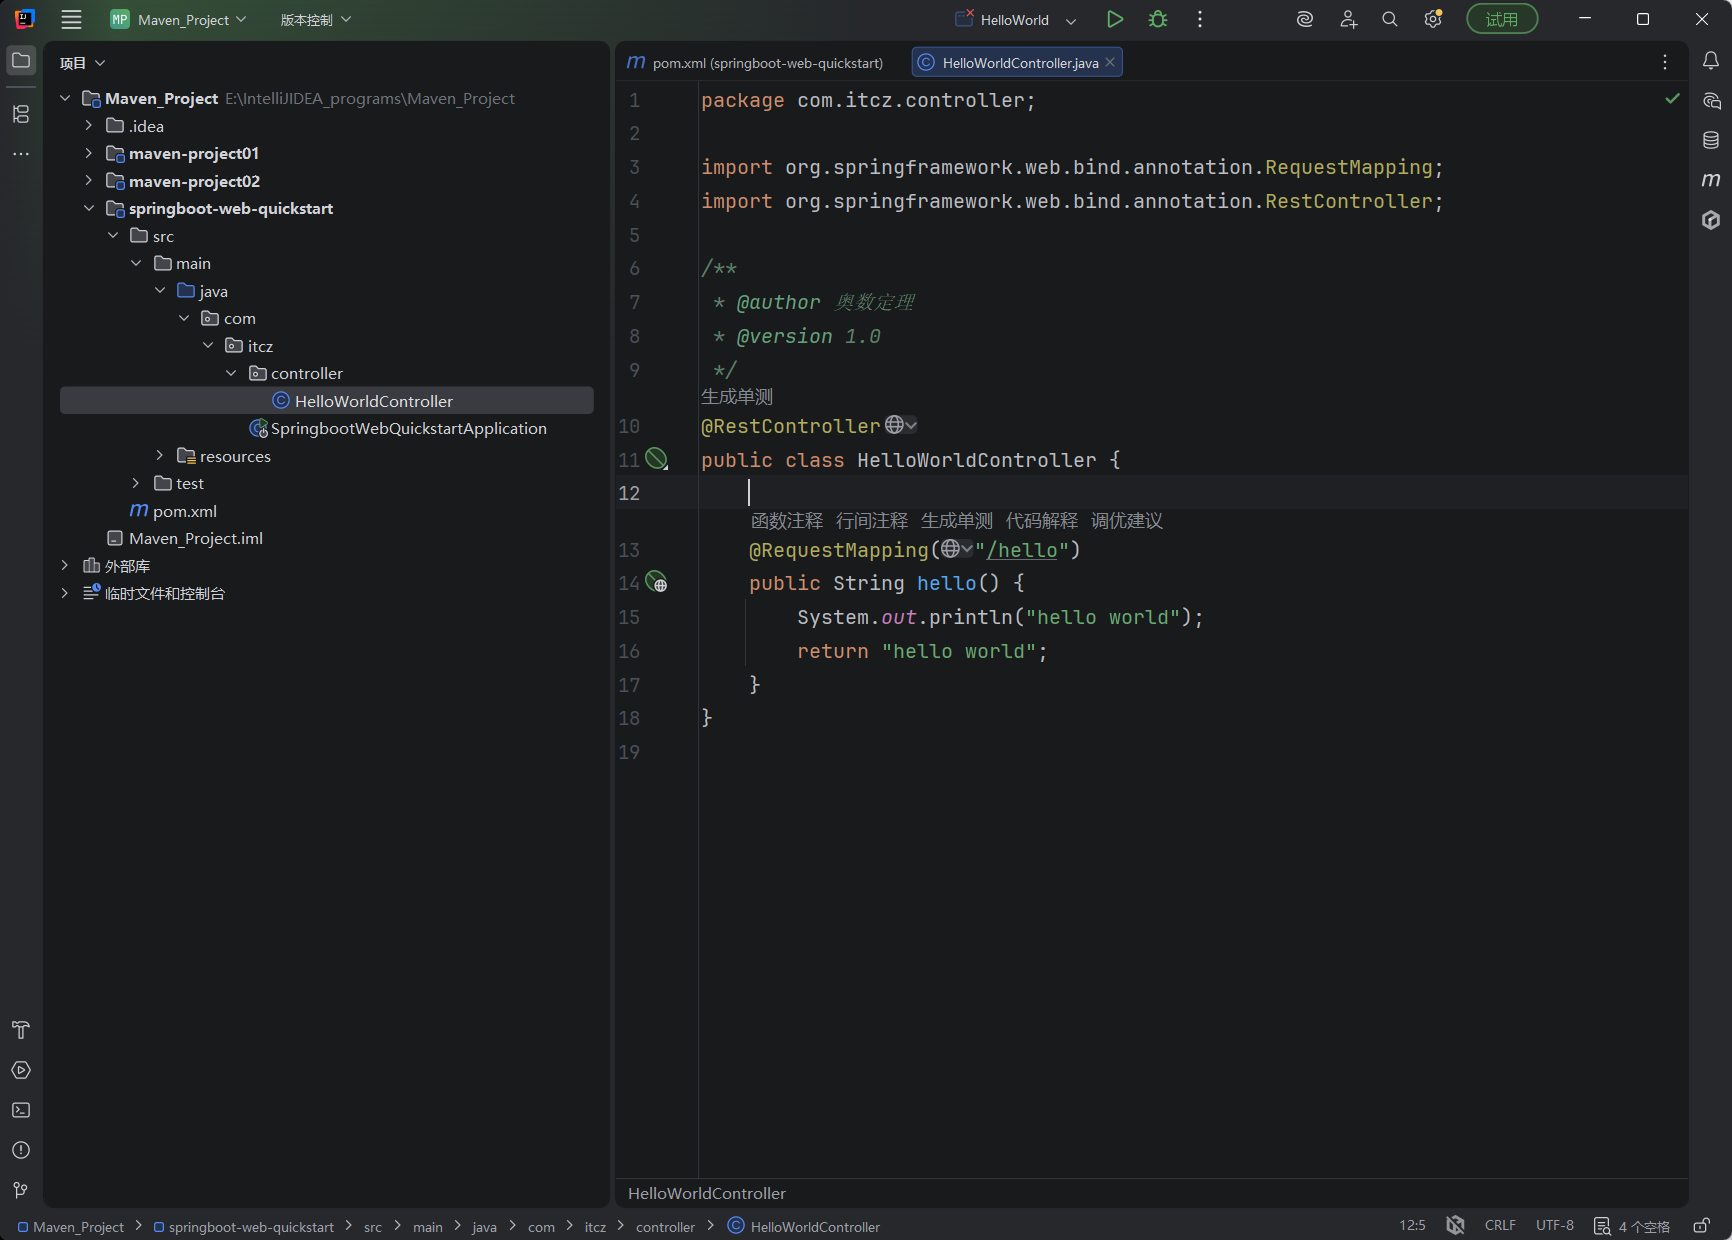
定义HelloController类,添加方法hello,并添加相关的注解 :
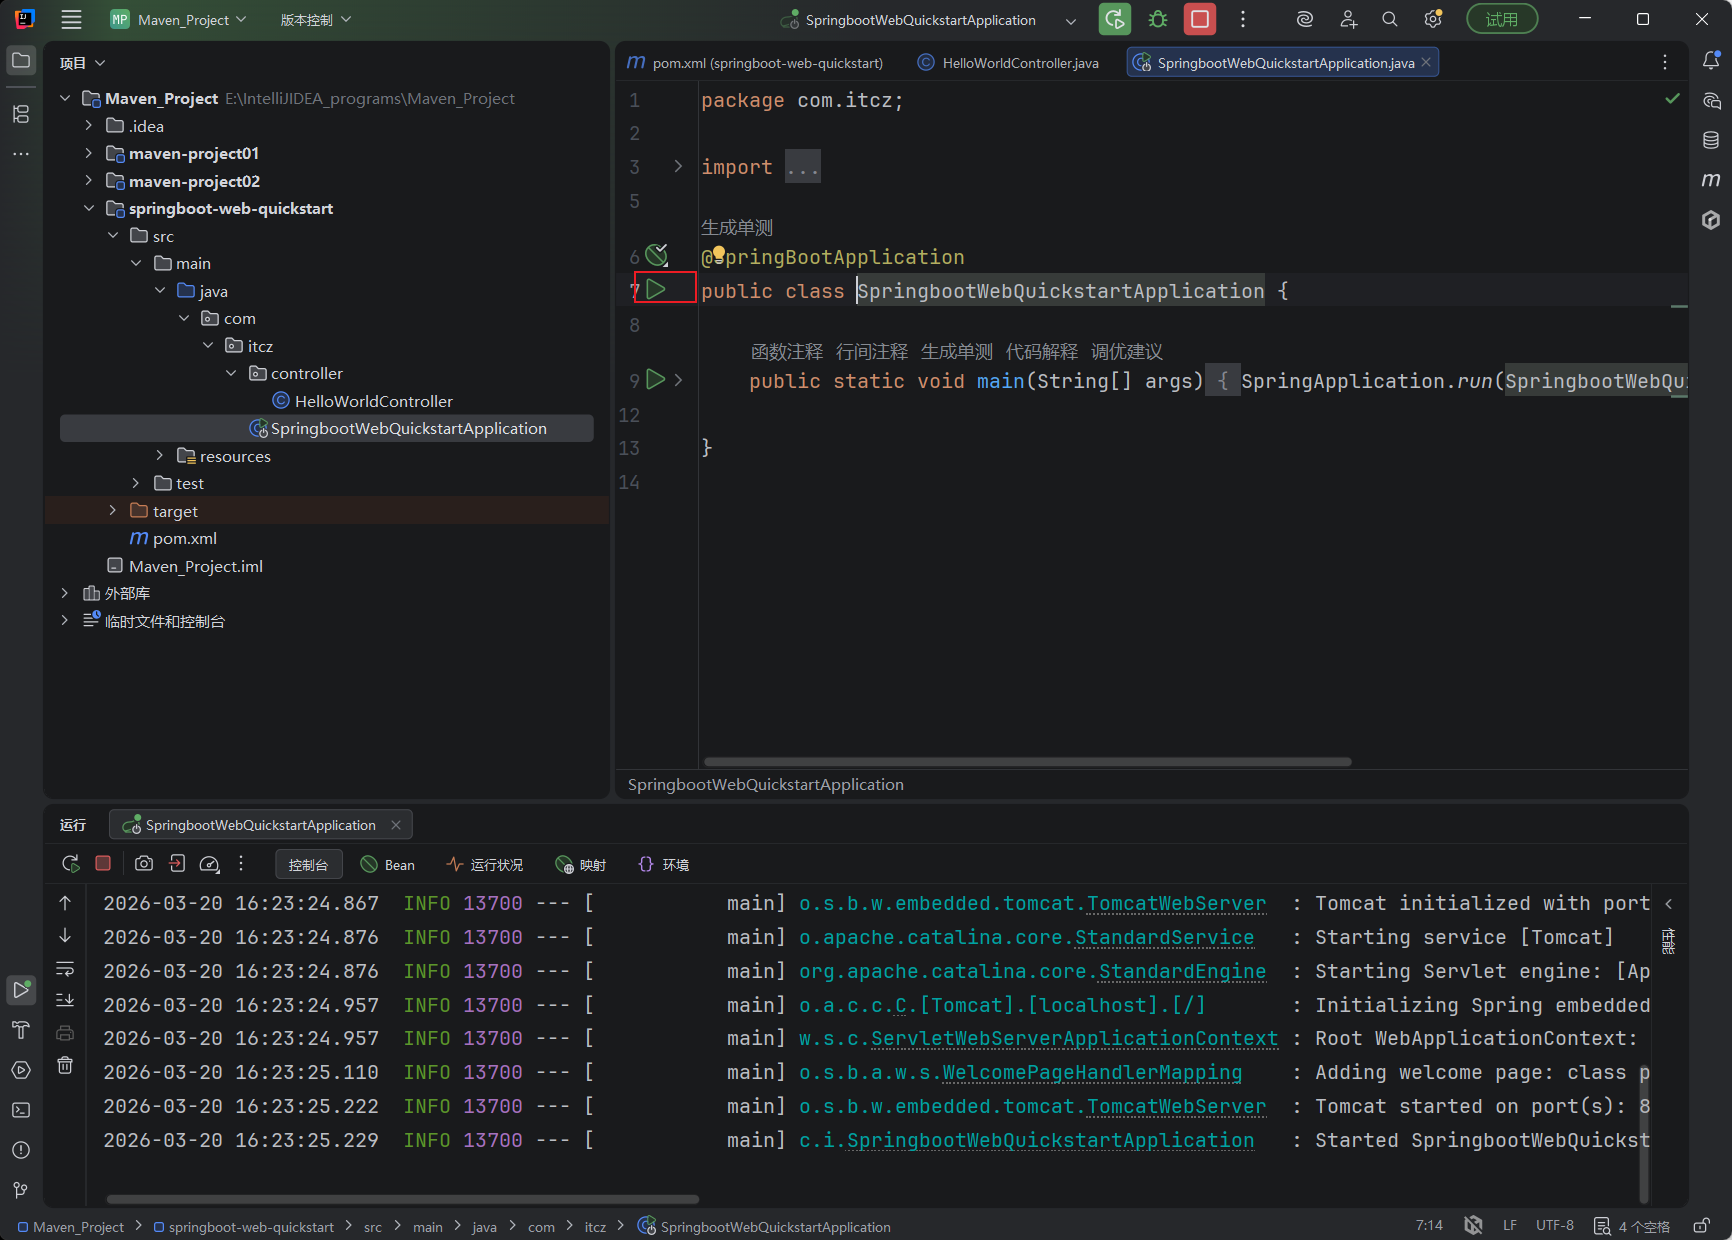
运行测试 :
HTTP 协议 HTTP 概述
概念 :Hyper Text Transfer Protocol,超文本传输协议,规定了浏览器和服务器之间数据传输的规则。特点 :
基于TCP协议:面向连接,安全
基于请求-响应模型的:一次请求对应一次响应
HTTP协议是无状态的协议:对于事务处理没有记忆能力。每次请求-响应都是独立的。
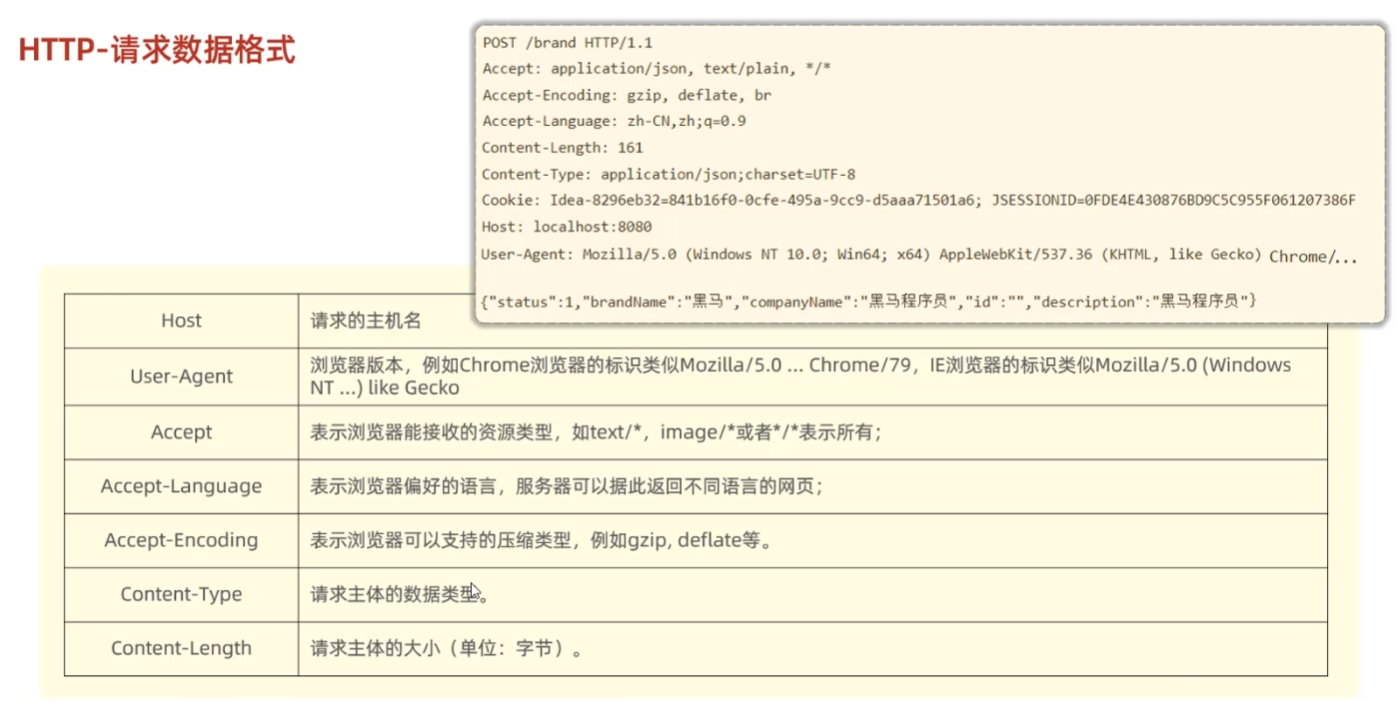
HTTP 请求数据格式
请求行 :一般在请求数据的第一行,请求行分为三类,之间用空格分隔
请求方式:常见的有POST、GET、PUT、DELETE
资源路径:资源在服务器的路径(一般来说是文件在文件管理器中的存储位置)
协议:协议名和版本号
请求头 :从第二行开始到最后一行(如果有请求体,则最后一行为请求体)结束,信息用键值对格式进行传输,各个信息之间通过换行进行分隔
请求体 :
如果请求方式是GET,则该请求没有请求体,请求参数在请求行中,并且请求大小是有限制的
如果请求方式是POST,则请求参数在请求体中,POST请求大小是没有限制的
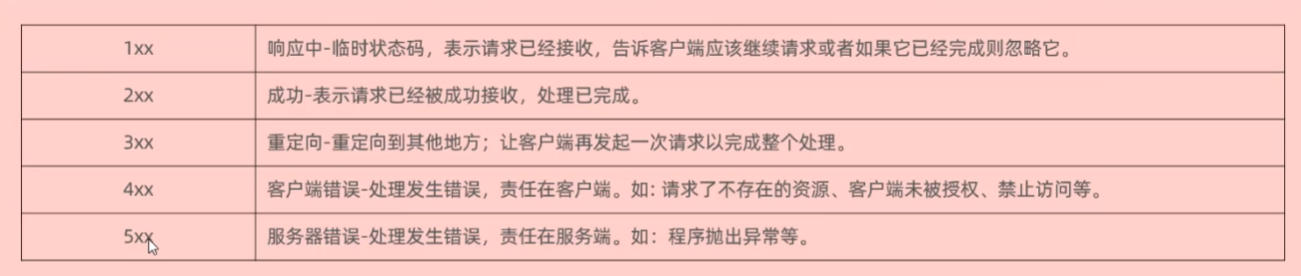
HTTP 响应数据格式
响应行 :响应数据第一行,包括协议、状态码、描述(例如:OK)
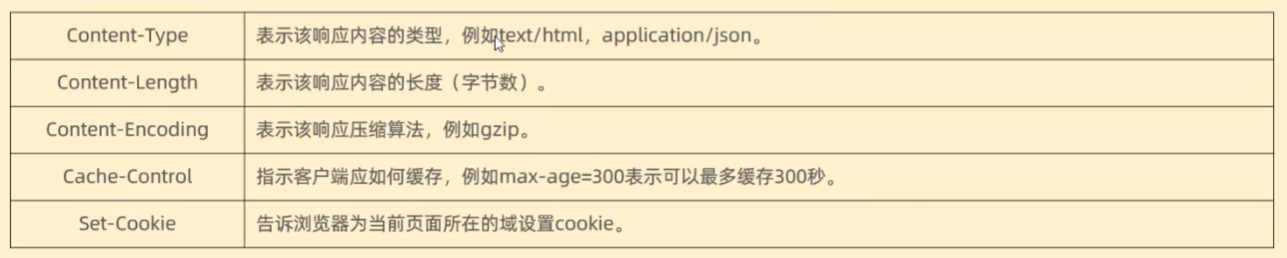
响应头 :从第二行开始到最后一行(如果有响应体,则最后一行为响应体)结束,信息用键值对格式进行传输,各个信息之间通过换行进行分隔
响应体 :最后一部分,存放响应数据
Tomcat Web 服务器 概念 :Web服务器是一个软件程序,对HTTP协议的操作进行封装,使得程序员不必直接对协议进行操作,让Web开发更加便捷。主要功能是“提供网上信息浏览服务”。
简介
概念 :Tomcat是Apache软件基金会一个核心项目,是一个开源免费的轻量级Web服务器,支持Servlet/JSP少量JavaEE规范。JavaEE :Java Enterprise Edition,Java企业版。指Java企业级开发的技术规范总和。包含13项技术规范:JDBC、JNDI、EJB、RMI. JSP. Servlet, XML. JMS, Java IDL, JTS, JTA, JavaMail, JAFTomcat也被称为Web容器、Servlet容器。Servlet程序需要依赖于Tomcat才能运行
官网:https://tomcat.apache.org/
入门程序解析
入门程序中使用Web功能就需要引入spring-boot-starter-web依赖,而springboot项目默认又会引入spring-boot-starter-test依赖
其中spring-boot-starter-web依赖中集成了spring-boot-starter-tomcat依赖,故而启动项目时,程序会启动tomcat服务器,并默认占用8080端口
请求响应 概述
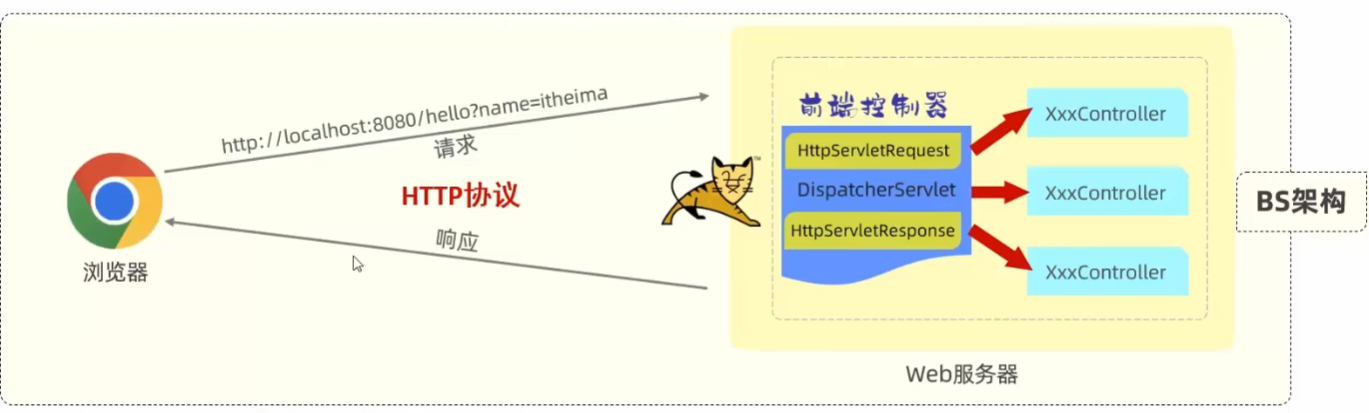
前端在浏览器页面向服务器发送请求时,Tomcat会解析该HTTP请求,并将HTTP请求的数据封装成一个HttpServletRequest的请求对象
SpringBoot底层维护了DispatcherServlet类(前端控制器),该控制器会将HttpServletRequest请求分发给对应的表现层中的类
当表现层将数据处理完成后会将响应结果返回给DispatcherServlet,该控制器会将结果封装成一个标准的HTTP响应的HttpServletResponse的响应对象
Tomcat拿到该响应对象后会将其解析成对应的HTTP响应数据,返回给前端,前端解析数据后,显示到浏览器
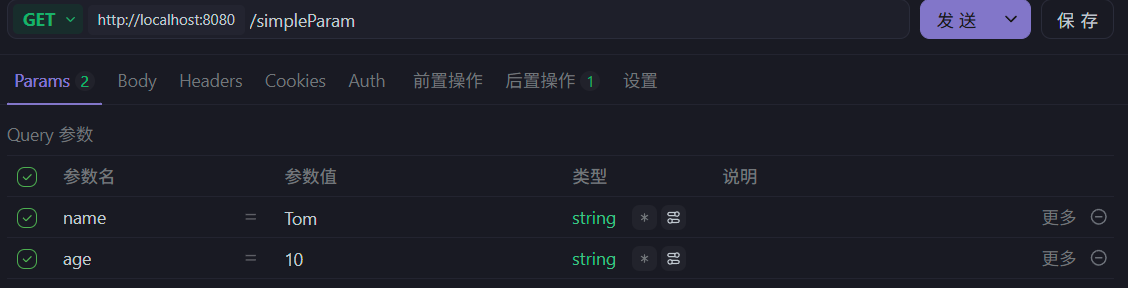
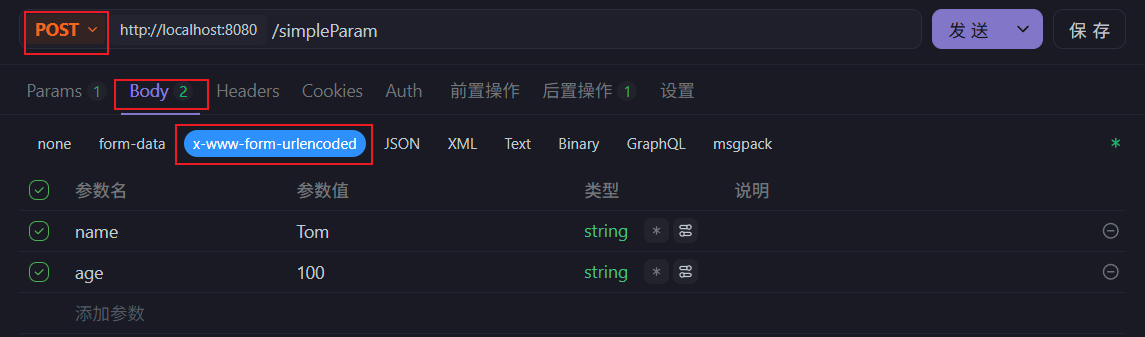
请求 简单参数
这种参数可以在GET请求的请求行中进行传递,也可以在POST请求的请求体中通过Form表单数据格式进行传递
获取方式 :
原始方式:在原始的web程序中,获取请求参数,需要通过HttpServletRequest对象手动获取
1
2
3
4
5
6
7
8
9
10
11
12
13
14
15
16
17
18
19
20
21
22
23
24
25
26
27
package com.itcz.controller;import org.springframework.web.bind.annotation.RequestMapping;import org.springframework.web.bind.annotation.RestController;import javax.servlet.http.HttpServletRequest;@RestController public class RequestController { @RequestMapping("/simpleParam") public String simpleParam (HttpServletRequest request) { String name = request.getParameter("name" ); String ageStr = request.getParameter("age" ); int age = Integer.parseInt(ageStr); System.out.println(name + ":" + age); return "OK" ; } }
SpringBoot方式:参数名和形参变量名相同,定义形参即可接收参数,会自动对类型进行转换
1
2
3
4
5
6
7
8
9
10
11
12
13
14
15
16
17
18
19
20
package com.itcz.controller;import org.springframework.web.bind.annotation.RequestMapping;import org.springframework.web.bind.annotation.RestController;import javax.servlet.http.HttpServletRequest;@RestController public class RequestController { @RequestMapping("/simpleParam") public String simpleParam (String name, Integer age) { System.out.println(name + ":" + age); return "OK" ; } }
- 如果请求参数名和形参变量名不一致,将无法获取到相应的数据
如果方法形参名称与请求参数名称不匹配,可以使用@RequestParam 完成映射。@RequestParam中的required属性默认为true,代表该请求参数必须传递,如果不传递将报错。如果该参数是可选的,可以将required属性设置为false。
1
2
3
4
5
6
7
8
9
10
11
12
13
14
15
16
17
18
import org.springframework.web.bind.annotation.RequestMapping;import org.springframework.web.bind.annotation.RequestParam;import org.springframework.web.bind.annotation.RestController;@RestController public class RequestController { @RequestMapping("/simpleParam") public String simpleParam (@RequestParam(name = "name", required = true) String username, Integer age) { System.out.println(username + ":" + age); return "OK" ; } }
实体参数
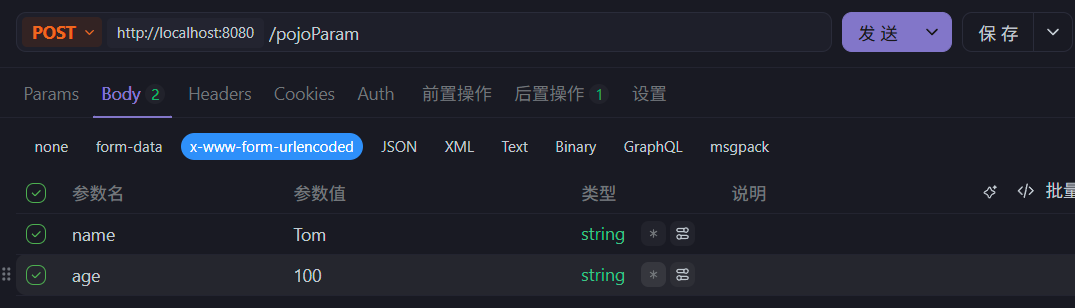
概念 :后端将传递的数据封装到实体类中
这种参数可以在GET请求的请求行中进行传递,也可以在POST请求的请求体中通过Form表单数据格式进行传递
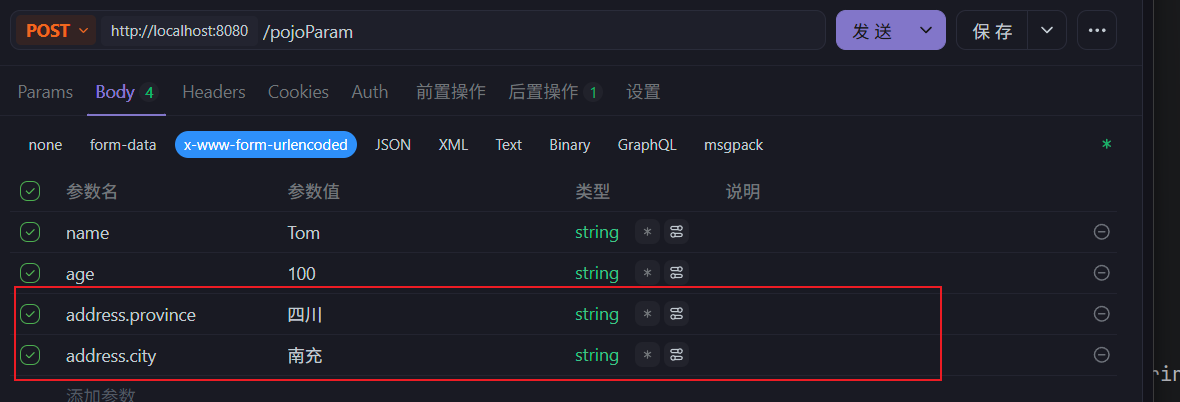
接收方式 :在表现层的方法中形参采用实体对象进行接收,实体类中的属性名要和参数名保持一致
1
2
3
4
5
6
7
8
9
10
11
12
13
14
15
16
17
18
19
20
21
22
package com.itcz.controller;import com.itcz.pojo.User;import org.springframework.web.bind.annotation.RequestMapping;import org.springframework.web.bind.annotation.RequestParam;import org.springframework.web.bind.annotation.RestController;@RestController public class RequestController { @RequestMapping("/pojoParam") public String pojoParam (User user) { System.out.println(user); return "OK" ; } }
1
2
3
4
5
6
7
8
9
10
11
12
13
14
15
16
17
18
19
20
21
22
23
24
25
26
27
28
29
30
31
32
33
34
package com.itcz.pojo;public class User { private String name; private int age; @Override public String toString () { return "User{" + "name='" + name + '\'' + ", age=" + age + '}' ; } public String getName () { return name; } public void setName (String name) { this .name = name; } public int getAge () { return age; } public void setAge (int age) { this .age = age; } }
复杂实体参数:实体类的属性既有基本数据类型又有引用数据类型
1
2
3
4
5
6
7
8
9
10
11
12
13
14
15
16
17
18
19
20
21
22
23
24
25
26
27
28
29
30
31
32
33
34
35
36
37
38
39
40
41
42
43
package com.itcz.pojo; /** * @author 奥数定理 * @version 1.0 */ public class User { private String name; private int age; private Address address; public Address getAddress() { return address; } public void setAddress(Address address) { this.address = address; } @Override public String toString() { return "User{" + "name='" + name + '\'' + ", age=" + age + '}'; } public String getName() { return name; } public void setName(String name) { this.name = name; } public int getAge() { return age; } public void setAge(int age) { this.age = age; } }
1
2
3
4
5
6
7
8
9
10
11
12
13
14
15
16
17
18
19
20
21
22
23
24
25
26
27
28
29
30
31
32
33
34
package com.itcz.pojo;public class Address { private String province; private String city; @Override public String toString () { return "Address{" + "province='" + province + '\'' + ", city='" + city + '\'' + '}' ; } public String getProvince () { return province; } public void setProvince (String province) { this .province = province; } public String getCity () { return city; } public void setCity (String city) { this .city = city; } }
数组集合参数
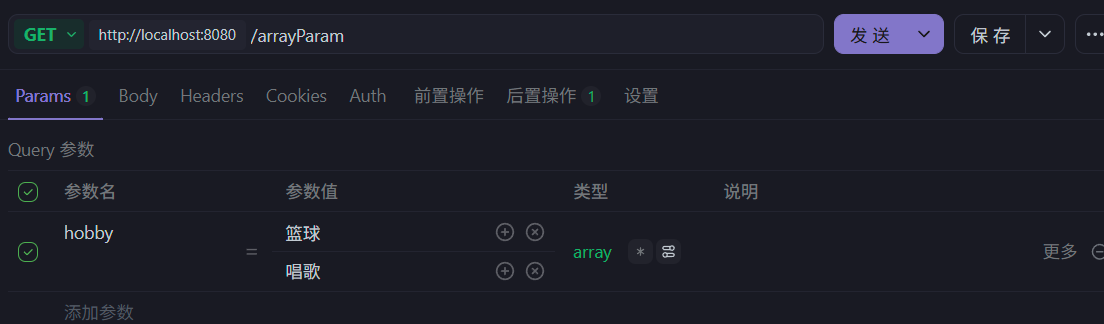
数组参数:请求参数名与形参数组名称相同且请求参数为多个,定义数组类型参数即可接收
1
2
3
4
5
6
7
8
9
10
11
12
13
14
15
16
17
18
19
20
21
22
23
24
package com.itcz.controller;import com.itcz.pojo.User;import org.springframework.web.bind.annotation.RequestMapping;import org.springframework.web.bind.annotation.RequestParam;import org.springframework.web.bind.annotation.RestController;import java.util.Arrays;@RestController public class RequestController { @RequestMapping("/arrayParam") public String arrayParam (String[] hobby) { System.out.println(Arrays.toString(hobby)); return "OK" ; } }
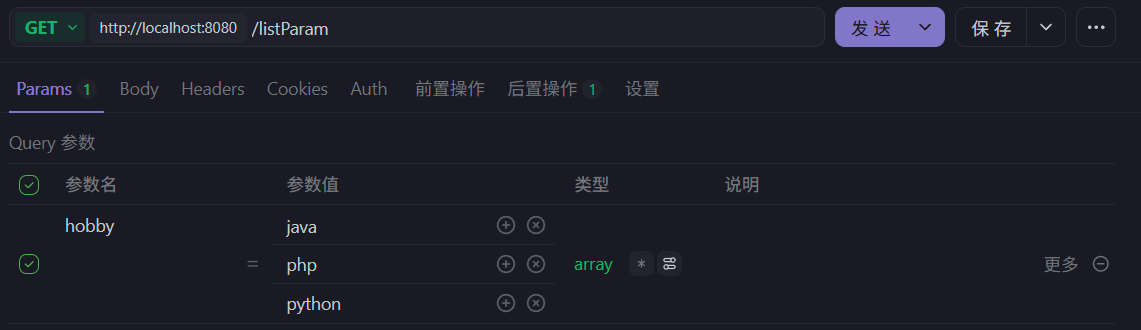
集合参数:请求参数名与形参中集合变量名相同,通过@RequestParam绑定参数关系
1
2
3
4
5
6
7
8
9
10
11
12
13
14
15
16
17
18
19
20
21
22
23
24
25
package com.itcz.controller;import com.itcz.pojo.User;import org.springframework.web.bind.annotation.RequestMapping;import org.springframework.web.bind.annotation.RequestParam;import org.springframework.web.bind.annotation.RestController;import java.util.Arrays;import java.util.List;@RestController public class RequestController { @RequestMapping("/listParam") public String listParam (@RequestParam List<String> hobby) { System.out.println(hobby.toString()); return "OK" ; } }
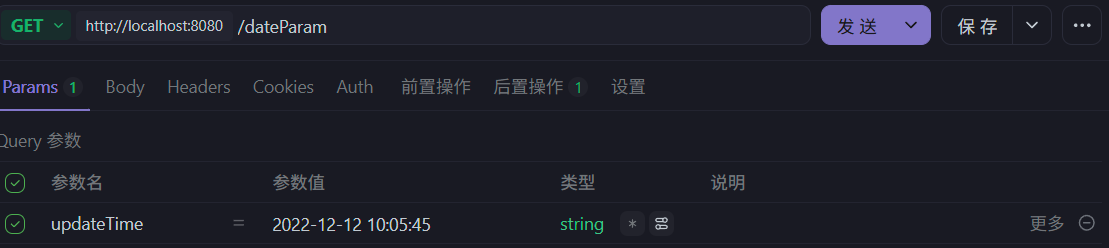
日期参数 需要使用@DateTimeFormat注解完成日期参数格式转换,需要保证日期类型的对象名和请求参数名保持一致
1
2
3
4
5
6
7
8
9
10
11
12
13
14
15
16
17
18
19
20
21
22
23
24
25
26
package com.itcz.controller;import com.itcz.pojo.User;import org.springframework.format.annotation.DateTimeFormat;import org.springframework.web.bind.annotation.RequestMapping;import org.springframework.web.bind.annotation.RequestParam;import org.springframework.web.bind.annotation.RestController;import java.time.LocalDateTime;import java.util.Arrays;import java.util.List;@RestController public class RequestController { @RequestMapping("/dateParam") public String dateParam (@DateTimeFormat(pattern = "yyyy-MM-dd HH:mm:ss") LocalDateTime updateTime) { System.out.println(updateTime); return "OK" ; } }
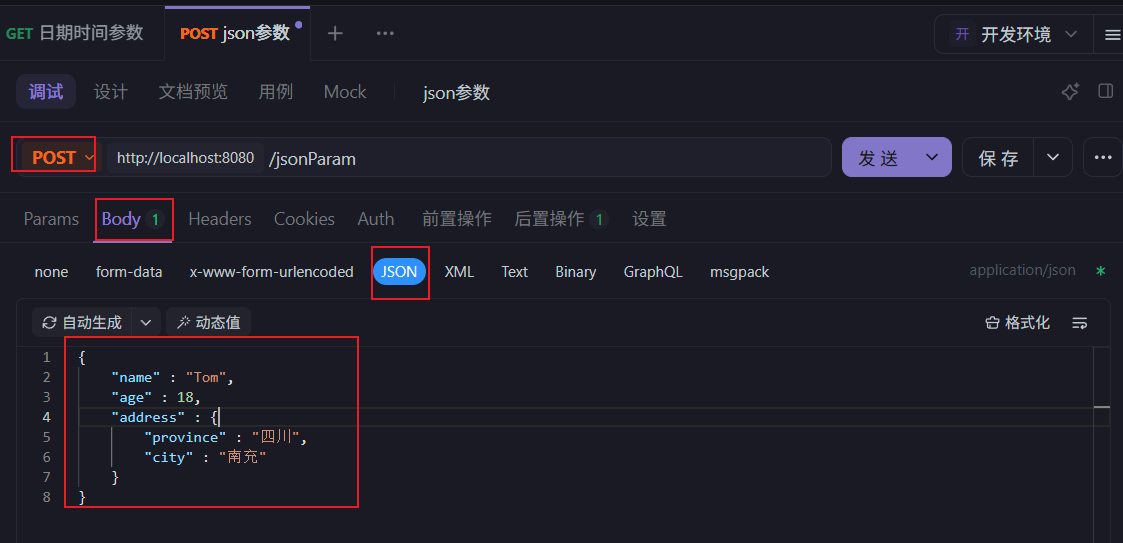
JSON 参数 前端发送请求时,必须设置请求类型为POST,并且设置请求体中的数据格式为JSON,后端使用实体对象接收该JSON格式的数据,并且需要在表现层的方法参数前添加@RequestBody注解,实体对象中的属性名必须和json格式中的键名保持一致
1 2 3 4 5 6 @RequestMapping("/jsonParam") public String jsonParam (@RequestBody User user) { System.out.println(user); return "OK" ; }
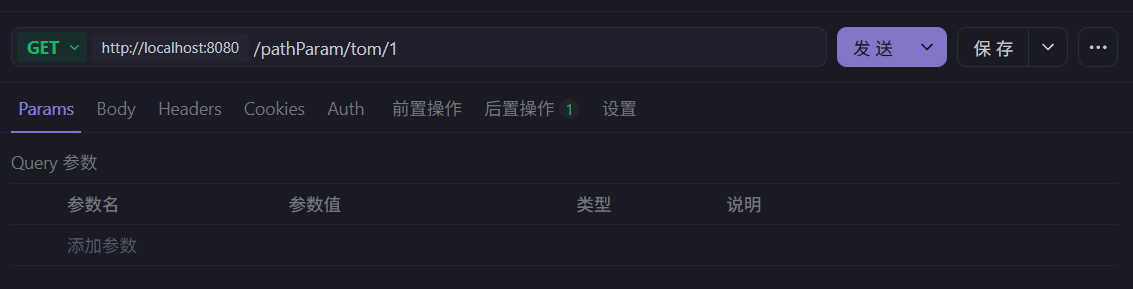
路径参数 概念 :通过请求URL直接传递参数,使用{…}来标识该路径参数,需要使用@PathVariable获取路径参数
支持传递多个路径参数,多个路径参数之间通过/进行分隔
1 2 3 4 5 6 @RequestMapping("/pathParam/{name}/{id}") public String pathParam (@PathVariable int id, @PathVariable String name) { System.out.println(id + ":" + name); return "OK" ; }
响应
@ResponseBody注解:该注解应用于方法或者类上,一般直接写在Controller方法上/类上
如果返回的数据类型是基本数据类型,它可以将方法的返回值直接响应
如果是实体对象/集合,将会转换为JOSN格式响应
@RestController = @Controller + @ResponseBody
统一响应结果
1 2 3 4 5 6 7 8 9 10 11 12 13 14 15 16 17 18 19 20 21 22 23 24 25 26 27 28 29 30 31 32 33 34 35 36 37 38 39 40 41 42 43 44 45 46 47 48 49 50 51 52 53 public class Result { private Integer code ; private String msg; private Object data; public Result () { } public Result (Integer code, String msg, Object data) { this .code = code; this .msg = msg; this .data = data; } public Integer getCode () { return code; } public void setCode (Integer code) { this .code = code; } public String getMsg () { return msg; } public void setMsg (String msg) { this .msg = msg; } public Object getData () { return data; } public void setData (Object data) { this .data = data; } public static Result success (Object data) { return new Result (1 , "success" , data); } public static Result success () { return new Result (1 , "success" , null ); } public static Result error (String msg) { return new Result (0 , msg, null ); } @Override public String toString () { return "Result{" + "code=" + code + ", msg='" + msg + '\'' + ", data=" + data + '}' ; } }
分层解耦 三层架构
controller:控制层,接收前端发送的请求,对请求进行处理,并响应数据
service:业务逻辑层,处理具体的业务逻辑
dao:数据访问层,负责数据访问操作,包括数据的增、删、改、查
分层解耦
内聚 :软件中各个功能模块内部的功能联系耦合 :衡量软件中各个层/模块之间的依赖、关联的程度软件设计原则 :高内聚低耦合控制反转 :Inversion Of Control,简称IOC。对象的创建控制权由程序自身转移到外部(容器),这种思想称之为控制反转依赖注入 :Dependency Injection,简称DI**。**容器为应用程序提供运行时,所依赖的资源,称之为依赖注入Bean对象 :IOC容器中创建、管理的对象,称之为bean。
控制反转 IOC
要把某个对象交给IOC容器管理,需要在对应的类上加上如下注解之一:
注解 说明 位置
@Component
声明bean的基础注解
不属于以下三类时,用此注解
@Controller
@Component 的衍生注解
标注在控制器类上
@Service
@Component 的衍生注解
标注在业务类上
@Repository
@Component 的衍生注解
标注在数据访问类上
声明bean的时候,可以通过value属性指定bean的名字,如果没有指定,默认为类名首字母小写。
使用以上四个注解都可以声明bean,但是在springboot集成web开发中,声明控制器bean只能用@Controller。
Bean管理:
前面声明bean的四大注解,要想生效,还需要被组件扫描注解@ComponentScan扫描。
@ComponentScan注解虽然没有显式配置,但是实际上已经包含在了启动类声明注解@SpringBootApplication中,默认扫描的范围是启动类所在包及其子包。
依赖注入 DI
@Autowired注解,默认是按照类型进行,如果存在多个相同类型的bean,将会报出如下错误:
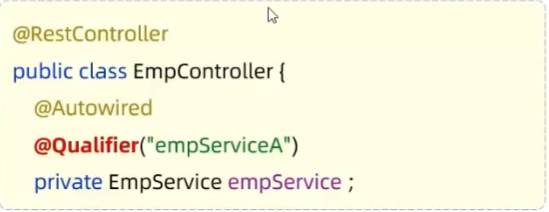
@Qualifier:在需要注入的变量上加上该注解,并在注解中加上需要的bean的对象名
配置文件 参数配置化
将参数写在SpringBoot的默认配置文件中
1
2
3
4
aliyun.oss.endpoint=https://oss-cn-beijing.aliyuncs.com aliyun.oss.accessKeyId=your-access-key-id aliyun.oss.accessKeySecret=your-access-key-secret aliyun.oss.bucketName=talis-web-demo
在需要参数的变量上添加@Value(“${键名}”)注解
1
2
3
4
5
6
7
8
9
10
11
12
13
14
15
16
17
18
19
20
21
22
23
24
25
26
27
28
29
30
31
32
33
34
35
36
37
38
39
40
41
42
43
44
45
46
47
48
49
50
51
52
package com.itcz.utils;import com.aliyun.oss.OSS;import com.aliyun.oss.OSSClientBuilder;import org.springframework.beans.factory.annotation.Value;import org.springframework.stereotype.Component;import org.springframework.web.multipart.MultipartFile;import java.io.*;import java.util.UUID;@Component public class AliOSSUtils { @Value("${aliyun.oss.endpoint}") private String endpoint; @Value("${aliyun.oss.accessKeyId}") private String accessKeyId; @Value("${aliyun.oss.accessKeySecret}") private String accessKeySecret; @Value("${aliyun.oss.bucketName}") private String bucketName; public String upload (MultipartFile file) throws IOException { InputStream inputStream = file.getInputStream(); String originalFilename = file.getOriginalFilename(); String fileName = UUID.randomUUID().toString() + originalFilename.substring(originalFilename.lastIndexOf("." )); OSS ossClient = new OSSClientBuilder ().build(endpoint, accessKeyId, accessKeySecret); ossClient.putObject(bucketName, fileName, inputStream); String url = endpoint.split("//" )[0 ] + "//" + bucketName + "." + endpoint.split("//" )[1 ] + "/" + fileName; ossClient.shutdown(); return url; } }
yml 配置文件
基本语法 :
大小写敏感
数值前边必须有空格,作为分隔符
使用缩进表示层级关系,缩进时,不允许使用Tab键,只能用空格(idea中会自动将Tab转换为空格)
缩进的空格数目不重要,只要相同层级的元素左侧对齐即可
#表示注释,从这个字符一直到行尾,都会被解析器忽略
配置对象/Map集合 :
1
2
3
4
user: name: zhangsan age: 18 password: 123456
配置数组/List/Set集合 :
1
2
3
4
hobby: -java -game -sport
@ConfigurationProperties
当参数配置化时,需要通过@Value注解来注入参数信息,但是如果同类型的配置参数过多时,通过注解注入配置信息会比较繁琐,此时就引入了配置类来简化配置
配置类中的属性名必须和yml文件中的键名保持一致
配置类必须有get和set方法,将该类交给IOC容器管理,并配置@ConfigurationProperties注解
1
2
3
4
5
6
7
8
9
10
11
12
13
14
15
16
17
18
19
20
21
package com.itcz.configuration;import lombok.Data;import org.springframework.beans.factory.annotation.Value;import org.springframework.boot.context.properties.ConfigurationProperties;import org.springframework.stereotype.Component;@Data @Component @ConfigurationProperties(prefix = "aliyun.oss") public class AliOSSProperties { private String endpoint; private String accessKeyId; private String accessKeySecret; private String bucketName; }
在需要使用参数的地方,注入配置类对象
1
2
3
4
5
6
7
8
9
10
11
12
13
14
15
16
17
18
19
20
21
22
23
24
25
26
27
28
29
30
31
32
33
34
35
36
37
38
39
40
41
42
43
44
45
46
47
48
49
package com.itcz.utils;import com.aliyun.oss.OSS;import com.aliyun.oss.OSSClientBuilder;import com.itcz.configuration.AliOSSProperties;import org.springframework.beans.factory.annotation.Autowired;import org.springframework.stereotype.Component;import org.springframework.web.multipart.MultipartFile;import java.io.*;import java.util.UUID;@Component public class AliOSSUtils { @Autowired private AliOSSProperties aliOSSProperties; public String upload (MultipartFile file) throws IOException { String endpoint = aliOSSProperties.getEndpoint(); String accessKeyId = aliOSSProperties.getAccessKeyId(); String accessKeySecret = aliOSSProperties.getAccessKeySecret(); String bucketName = aliOSSProperties.getBucketName(); InputStream inputStream = file.getInputStream(); String originalFilename = file.getOriginalFilename(); String fileName = UUID.randomUUID().toString() + originalFilename.substring(originalFilename.lastIndexOf("." )); OSS ossClient = new OSSClientBuilder ().build(endpoint, accessKeyId, accessKeySecret); ossClient.putObject(bucketName, fileName, inputStream); String url = endpoint.split("//" )[0 ] + "//" + bucketName + "." + endpoint.split("//" )[1 ] + "/" + fileName; ossClient.shutdown(); return url; } }
全局异常处理器
简介 :当前端发送的请求在服务器处理时出现异常,那么服务器会依次将异常往其上级抛,当异常抛给Spring时,Spring会将其异常信息封装成JSON格式的数据并返回给前端,此时该JSON格式的数据并不是前后端统一的格式,故而前端无法解析该JSON格式,这对用户很不友好。故而引出全局异常处理器,它在异常抛出Controller层时,拦截异常,并返回给前端相对友好的提示信息定义格式 :
1
2
3
4
5
6
7
8
9
10
11
12
13
14
15
16
17
18
19
20
21
22
23
package com.itcz.exception;import com.itcz.pojo.Result;import org.springframework.web.bind.annotation.ExceptionHandler;import org.springframework.web.bind.annotation.RestControllerAdvice;@RestControllerAdvice public class GlobalExceptionHandler { @ExceptionHandler(Exception.class) public Result ex (Exception ex) { ex.printStackTrace(); return Result.error("对不起,操作失败,请联系管理员" ); } }
全局消息转换器 例如:当后端给前端返回日期格式(LocalDateTime)的数据时,SpringMVC会自动将日期格式的数据转换为json格式的数据,但是转换的效果是不理想,它会将日期格式的数据转换为数字数组的形式,而不是字符串的形式
1
2
3
4
5
6
7
8
9
10
11
12
13
14
15
16
17
18
19
20
21
22
23
24
25
26
27
28
29
30
31
32
33
34
35
36
37
{ "code" : 1 , "msg" : null , "data" : { "total" : 1 , "records" : [ { "id" : 6 , "username" : "zhangsan" , "name" : "张三" , "password" : "e10adc3949ba59abbe56e057f20f883e" , "phone" : "13532788583" , "sex" : "1" , "idNumber" : "123456789123456789" , "status" : 1 , "createTime" : [ 2026 , 4 , 2 , 14 , 6 , 45 ] , "updateTime" : [ 2026 , 4 , 2 , 14 , 6 , 45 ] , "createUser" : 1 , "updateUser" : 1 } ] } }
方式一 :在返回给前端的实体类的日期属性上添加@JsonFormat注解
1
2
3
4
5
6
7
8
9
10
11
12
13
14
15
16
17
18
19
20
21
22
23
24
25
26
27
28
29
30
31
32
33
34
35
36
37
38
39
40
41
42
43
44
45
46
47
48
49
package com.sky.entity;import com.fasterxml.jackson.annotation.JsonFormat;import io.swagger.annotations.ApiModel;import lombok.AllArgsConstructor;import lombok.Builder;import lombok.Data;import lombok.NoArgsConstructor;import java.io.Serializable;import java.time.LocalDateTime;@Data @Builder @NoArgsConstructor @AllArgsConstructor public class Employee implements Serializable { private static final long serialVersionUID = 1L ; private Long id; private String username; private String name; private String password; private String phone; private String sex; private String idNumber; private Integer status; @JsonFormat(pattern = "yyyy-MM-dd HH:mm:ss") private LocalDateTime createTime; @JsonFormat(pattern = "yyyy-MM-dd HH:mm:ss") private LocalDateTime updateTime; private Long createUser; private Long updateUser; }
方式二 :配置全局消息转换器,来统一处理日期格式转换问题
1
2
3
4
5
6
7
8
9
10
11
12
13
14
15
16
17
18
19
20
21
22
23
24
25
26
27
28
29
30
31
32
33
34
35
36
37
38
39
40
41
42
43
44
45
46
47
48
49
50
51
52
53
54
55
56
57
58
59
60
61
62
63
64
65
66
67
68
69
70
71
72
73
74
75
76
77
78
79
80
81
82
83
84
85
86
87
88
89
90
91
92
package com.sky.config;import com.sky.interceptor.JwtTokenAdminInterceptor;import com.sky.json.JacksonObjectMapper;import lombok.extern.slf4j.Slf4j;import org.springframework.beans.factory.annotation.Autowired;import org.springframework.context.annotation.Bean;import org.springframework.context.annotation.Configuration;import org.springframework.http.converter.HttpMessageConverter;import org.springframework.http.converter.json.MappingJackson2HttpMessageConverter;import org.springframework.web.servlet.config.annotation.InterceptorRegistry;import org.springframework.web.servlet.config.annotation.ResourceHandlerRegistry;import org.springframework.web.servlet.config.annotation.WebMvcConfigurationSupport;import springfox.documentation.builders.ApiInfoBuilder;import springfox.documentation.builders.PathSelectors;import springfox.documentation.builders.RequestHandlerSelectors;import springfox.documentation.service.ApiInfo;import springfox.documentation.spi.DocumentationType;import springfox.documentation.spring.web.plugins.Docket;import java.util.List;@Configuration @Slf4j public class WebMvcConfiguration extends WebMvcConfigurationSupport { @Autowired private JwtTokenAdminInterceptor jwtTokenAdminInterceptor; @Override protected void addInterceptors (InterceptorRegistry registry) { log.info("开始注册自定义拦截器..." ); registry.addInterceptor(jwtTokenAdminInterceptor) .addPathPatterns("/admin/**" ) .excludePathPatterns("/admin/employee/login" ); } @Bean public Docket docket () { ApiInfo apiInfo = new ApiInfoBuilder () .title("苍穹外卖项目接口文档" ) .version("2.0" ) .description("苍穹外卖项目接口文档" ) .build(); Docket docket = new Docket (DocumentationType.SWAGGER_2) .apiInfo(apiInfo) .select() .apis(RequestHandlerSelectors.basePackage("com.sky.controller" )) .paths(PathSelectors.any()) .build(); return docket; } @Override protected void addResourceHandlers (ResourceHandlerRegistry registry) { log.info("设置静态资源映射...." ); registry.addResourceHandler("/doc.html" ).addResourceLocations("classpath:/META-INF/resources/" ); registry.addResourceHandler("/webjars/**" ).addResourceLocations("classpath:/META-INF/resources/webjars/" ); } @Override protected void extendMessageConverters (List<HttpMessageConverter<?>> converters) { log.info("扩展消息转换器...." ); MappingJackson2HttpMessageConverter converter = new MappingJackson2HttpMessageConverter (); converter.setObjectMapper(new JacksonObjectMapper ()); converters.add(0 , converter); } }
1
2
3
4
5
6
7
8
9
10
11
12
13
14
15
16
17
18
19
20
21
22
23
24
25
26
27
28
29
30
31
32
33
34
35
36
37
38
39
40
41
42
43
44
45
46
47
48
49
50
51
package com.sky.json;import com.fasterxml.jackson.databind.DeserializationFeature;import com.fasterxml.jackson.databind.ObjectMapper;import com.fasterxml.jackson.databind.module .SimpleModule;import com.fasterxml.jackson.datatype.jsr310.deser.LocalDateDeserializer;import com.fasterxml.jackson.datatype.jsr310.deser.LocalDateTimeDeserializer;import com.fasterxml.jackson.datatype.jsr310.deser.LocalTimeDeserializer;import com.fasterxml.jackson.datatype.jsr310.ser.LocalDateSerializer;import com.fasterxml.jackson.datatype.jsr310.ser.LocalDateTimeSerializer;import com.fasterxml.jackson.datatype.jsr310.ser.LocalTimeSerializer;import java.time.LocalDate;import java.time.LocalDateTime;import java.time.LocalTime;import java.time.format.DateTimeFormatter;import static com.fasterxml.jackson.databind.DeserializationFeature.FAIL_ON_UNKNOWN_PROPERTIES;public class JacksonObjectMapper extends ObjectMapper { public static final String DEFAULT_DATE_FORMAT = "yyyy-MM-dd" ; public static final String DEFAULT_DATE_TIME_FORMAT = "yyyy-MM-dd HH:mm" ; public static final String DEFAULT_TIME_FORMAT = "HH:mm:ss" ; public JacksonObjectMapper () { super (); this .configure(FAIL_ON_UNKNOWN_PROPERTIES, false ); this .getDeserializationConfig().withoutFeatures(DeserializationFeature.FAIL_ON_UNKNOWN_PROPERTIES); SimpleModule simpleModule = new SimpleModule () .addDeserializer(LocalDateTime.class, new LocalDateTimeDeserializer (DateTimeFormatter.ofPattern(DEFAULT_DATE_TIME_FORMAT))) .addDeserializer(LocalDate.class, new LocalDateDeserializer (DateTimeFormatter.ofPattern(DEFAULT_DATE_FORMAT))) .addDeserializer(LocalTime.class, new LocalTimeDeserializer (DateTimeFormatter.ofPattern(DEFAULT_TIME_FORMAT))) .addSerializer(LocalDateTime.class, new LocalDateTimeSerializer (DateTimeFormatter.ofPattern(DEFAULT_DATE_TIME_FORMAT))) .addSerializer(LocalDate.class, new LocalDateSerializer (DateTimeFormatter.ofPattern(DEFAULT_DATE_FORMAT))) .addSerializer(LocalTime.class, new LocalTimeSerializer (DateTimeFormatter.ofPattern(DEFAULT_TIME_FORMAT))); this .registerModule(simpleModule); } }
对象转换器需要导入第三方依赖
1
2
3
4
<dependency> <groupId>com.alibaba</groupId> <artifactId>fastjson</artifactId> </dependency>
事务管理 简介
事务 :一组操作的集合,它是一个不可分隔的工作单位,这些操作要么同时成功,要么同时失败事务的流程 :
开启事务(一组操作开始前,开启事务):start transaction / begin
提交事务(这组操作全部成功后,提交事务):commit
回滚事务(中间任何一个操作出现异常,回顾事务):rollback
Spring 事务管理
注解 :@Transactional位置 :业务(service)层的方法上、类上、接口上作用 :将当前方法交给spring进行事务管理,方法执行前开启事务;成功执行完毕,提交事务;出现异常,回滚事务
1 2 3 4 logging: level: org.springframework.jdbc.support.JdbcTransactionManager: debug
需要在启动类上添加@EnableTransactionManagement注解,即支持注解方式的事务管理
事务进阶
rollbackFor 属性 :默认情况下,只有出现RuntimeException异常才会回滚事务,rollbackFor属性用于控制出现何种异常类型,回滚事务。
1 @Transactional(rollbackFor = Exception.class)
propagation 属性 :用来指定事务的传播行为
事务传播行为:当一个事务方法被另一个事务方法调用时,这个事务应该如何进行事务控制
属性值 含义
REQUIRED 【默认值】需要事务,有则加入,无则创建新事务
REQUIRES_NEW 需要新事务,无论有无,总是创建新事务
SUPPORTS
支持事务,有则加入,无则在无事务状态中运行
NOT_SUPPORTED
不支持事务,在无事务状态下运行,如果当前存在已有事务,则挂起当前事务
MANDATORY
必须有事务,否则抛异常
NEVER
必须没事务,否则抛异常
例如:当执行某个操作后,需要记录日志,而记录日志的操作也是一个事务,如果没有配置propagation 属性,那么当某个操作执行过程中出现异常,事务会回滚,该日志就无法记录(因为默认配置是加入当前事务)
1 2 3 @Transactional(propagation = Propagation.REQUIRES_NEW)
AOP 面向切面编程 AOP 基础 AOP 概述 AOP :基于动态代理技术,旨在管理bean对象的过程中,主要通过底层的动态代理机制,对特定的方法进行编程
AOP 快速入门 需求:统计业务层中每个方法的执行时间
引入AOP依赖
1 2 3 4 <dependency > <groupId > org.springframework.boot</groupId > <artifactId > spring-boot-starter-aop</artifactId > </dependency >
编写AOP类,并编写相关的方法,需要将该类交给IOC容器管理
1
2
3
4
5
6
7
8
9
10
11
12
13
14
15
16
17
18
19
20
21
22
23
24
25
26
27
28
29
30
31
32
33
34
35
36
37
package com.itcz.aop;import lombok.extern.slf4j.Slf4j;import org.aspectj.lang.ProceedingJoinPoint;import org.aspectj.lang.annotation.Around;import org.aspectj.lang.annotation.Aspect;import org.springframework.stereotype.Component;@Slf4j @Component @Aspect public class TimeAspect { @Around("execution(* com.itcz.service.*.*(..))") public Object recordTime (ProceedingJoinPoint joinPoint) throws Throwable { long start = System.currentTimeMillis(); Object result = joinPoint.proceed(); long end = System.currentTimeMillis(); log.info("{}方法执行耗时为{}ms" , joinPoint.getSignature(), end - start); return result; } }
AOP 核心概念
连接点 :JoinPoint,可以被AOP控制的方法(暗含方法执行时的相关信息)通知 :Advice,指那些重复的逻辑,也就是共性功能(最终体现为一个方法)切入点 :PointCut,匹配连接点的条件,通知仅会在切入点方法执行时被应用切面 :Aspect,描述通知与切入点的对应关系(通知+切入点)目标对象 :Target,通知所应用的对象
AOP 进阶 通知类型
@Around :环绕通知,此注解标注的通知方法在目标方法前、后都被执行@Before :前置通知,此注解标注的通知方法在目标方法前被执行@After :后置通知,此注解标注的通知方法在目标方法后被执行,无论是否有异常都会执行@AfterReturning : 返回后通知,此注解标注的通知方法在目标方法后被执行,有异常不会执行@AfterThrowing :异常后通知,此注解标注的通知方法发生异常后执行@PointCut :该注解的作用是将公共的切点表达式抽取出来,需要用到时再引用该切点表达式即可
@Around环绕通知需要自己调用 ProceedingJoinPoint proceed()来让原始方法执行,其他通知不需要考虑目标方法执行
@Around环绕通知方法的返回值,必须指定为Object,来接收原始方法的返回值。
切入点方法访问修饰符为private,仅能再当前切面类中引用该表达式,访问修饰符为public时,在其他外部的切面类中也可以引用该表达式
1
2
3
4
5
6
7
8
9
10
11
12
13
14
15
16
17
18
19
20
21
22
23
24
25
26
27
28
29
30
31
32
33
34
35
36
37
38
39
40
41
42
43
44
45
46
47
48
49
package com.itcz.aop;import lombok.extern.slf4j.Slf4j;import org.aspectj.lang.ProceedingJoinPoint;import org.aspectj.lang.annotation.*;import org.springframework.stereotype.Component;@Slf4j @Aspect @Component public class MyAspect { @Pointcut("execution(* com.itcz.service.impl.DeptServiceImpl.*(..))") private void pt () {} @Before("pt()") public void before () { System.out.println("before ...." ); } @After("pt()") public void after () { System.out.println("after ..." ); } @Around("pt()") public Object around (ProceedingJoinPoint joinPoint) throws Throwable { System.out.println("around before...." ); Object result = joinPoint.proceed(); System.out.println("around after...." ); return result; } @AfterReturning("pt()") public void afterReturning () { System.out.println("afterReturning ...." ); } @AfterThrowing("pt()") public void afterThrowing () { System.out.println("afterThrowing ...." ); } }
通知顺序 概念 :当有多个切面的切入点都匹配到目标方法,目标方法运行时,多个通知方法都会执行
执行顺序 :
不同切面类中,默认按照切面类的类名字母排序:
目标方法前的通知方法:字母排名靠前的先执行
目标方法后的通知方法:字母排名靠前的后执行
用@Order(数字)加在切面类上来控制顺序:
目标方法前的通知方法:数字小的先执行
目标方法后的通知方法:数字小的后执行
切入点表达式
execution :主要根据方法的返回值、包名、类名、方法名、方法参数等信息来匹配
1 execution(访问修饰符? 返回值 包名.类名.?方法名(方法参数) throws 异常?)
其中带?的表示可以省略的部分 :
访问修饰符:可省略(比如:public、protected)
包名.类名:可省略,但是不建议省略
throws 异常:可省略(注意是方法上声明抛出的异常,不是实际抛出的异常)
可以使用通配符描述切入点 :
*:单个独立的任意符号,可以统配任意返回值、包名、类名、方法名、任意类型的一个参数,也可以通配包、类、方法名的一部分
1 execution(* com.*.service.*.update*(*))
..:多个连续的任意符号,可以统配任意层级的包,或任意类型、任意个数的参数
1 execution(* com.itcz..DeptService.*(..))
根据业务需要,可以使用 且(&&)、或(||)、非(!)来组合比较复杂的切入点表达式
@annotation :切入点表达式,用于匹配标识有特定注解的方法
首先自定义注解,并配置好@Retention和@Target注解
1
2
3
4
5
6
7
8
9
10
11
12
13
14
15
16
package com.itcz.anno;import java.lang.annotation.ElementType;import java.lang.annotation.Retention;import java.lang.annotation.RetentionPolicy;import java.lang.annotation.Target;@Retention(RetentionPolicy.RUNTIME) @Target(ElementType.METHOD) public @interface MyLog {}
1
2
3
4
5
6
7
8
9
10
11
12
13
14
15
16
17
@MyLog @Transactional @Override public void deleteById (Integer id) { deptMapper.deleteById(id); empMapper.deleteByDeptId(id); } @MyLog @Override public void add (Dept dept) { dept.setUpdateTime(LocalDateTime.now()); dept.setCreateTime(LocalDateTime.now()); deptMapper.add(dept); }
1
2
3
4
5
6
7
8
9
10
11
12
13
14
15
16
17
18
19
20
21
22
23
24
25
26
27
28
29
30
31
32
33
34
35
36
37
38
39
40
41
42
43
44
45
46
47
48
49
50
51
52
53
54
55
56
57
58
package com.itcz.aop;import lombok.extern.slf4j.Slf4j;import org.aspectj.lang.ProceedingJoinPoint;import org.aspectj.lang.annotation.*;import org.springframework.stereotype.Component;import com.itcz.anno.MyLog;@Slf4j @Aspect @Component public class MyAspect { @Pointcut("@annotation(com.itcz.anno.MyLog)") private void pt () {} @Before("pt()") public void before () { System.out.println("before ...." ); } @After("pt()") public void after () { System.out.println("after ..." ); } @Around("pt()") public Object around (ProceedingJoinPoint joinPoint) throws Throwable { System.out.println("around before...." ); Object result = joinPoint.proceed(); System.out.println("around after...." ); return result; } @AfterReturning("pt()") public void afterReturning () { System.out.println("afterReturning ...." ); } @AfterThrowing("pt()") public void afterThrowing () { System.out.println("afterThrowing ...." ); } }
连接点 概念:在Spring中用JoinPoint抽象了连接点,用它可以获得方法执行时的相关信息,如目标类名、方法名、方法参数等。
对于 @Around 通知,获取连接点信息只能使用 ProceedingJoinPoint
对于其他四种通知,获取连接点信息只能使用 JoinPoint,它是ProceedingJoinPoint 的父类型
方法名 含义
joinPoint.getTarget().getClass().getName()
获取目标类名
joinPoint.getSignature()
获取目标方法签名
joinPoint.getSignature.getName()
获取目标方法名
joinPoint.getArgs()
获取目标方法运行参数
proceedingJoinPoint.proceed()
执行目标方法,该方法执行完毕后有返回值,需要将返回值返回
配置和Bean 配置优先级 配置形式 :SpringBoot 出了支持配置文件属性配置,还支持Java系统属性和命令行参数的方式进行属性配置
配置优先级 :从低到高
application.yaml(忽略)
application.yml
application.properties
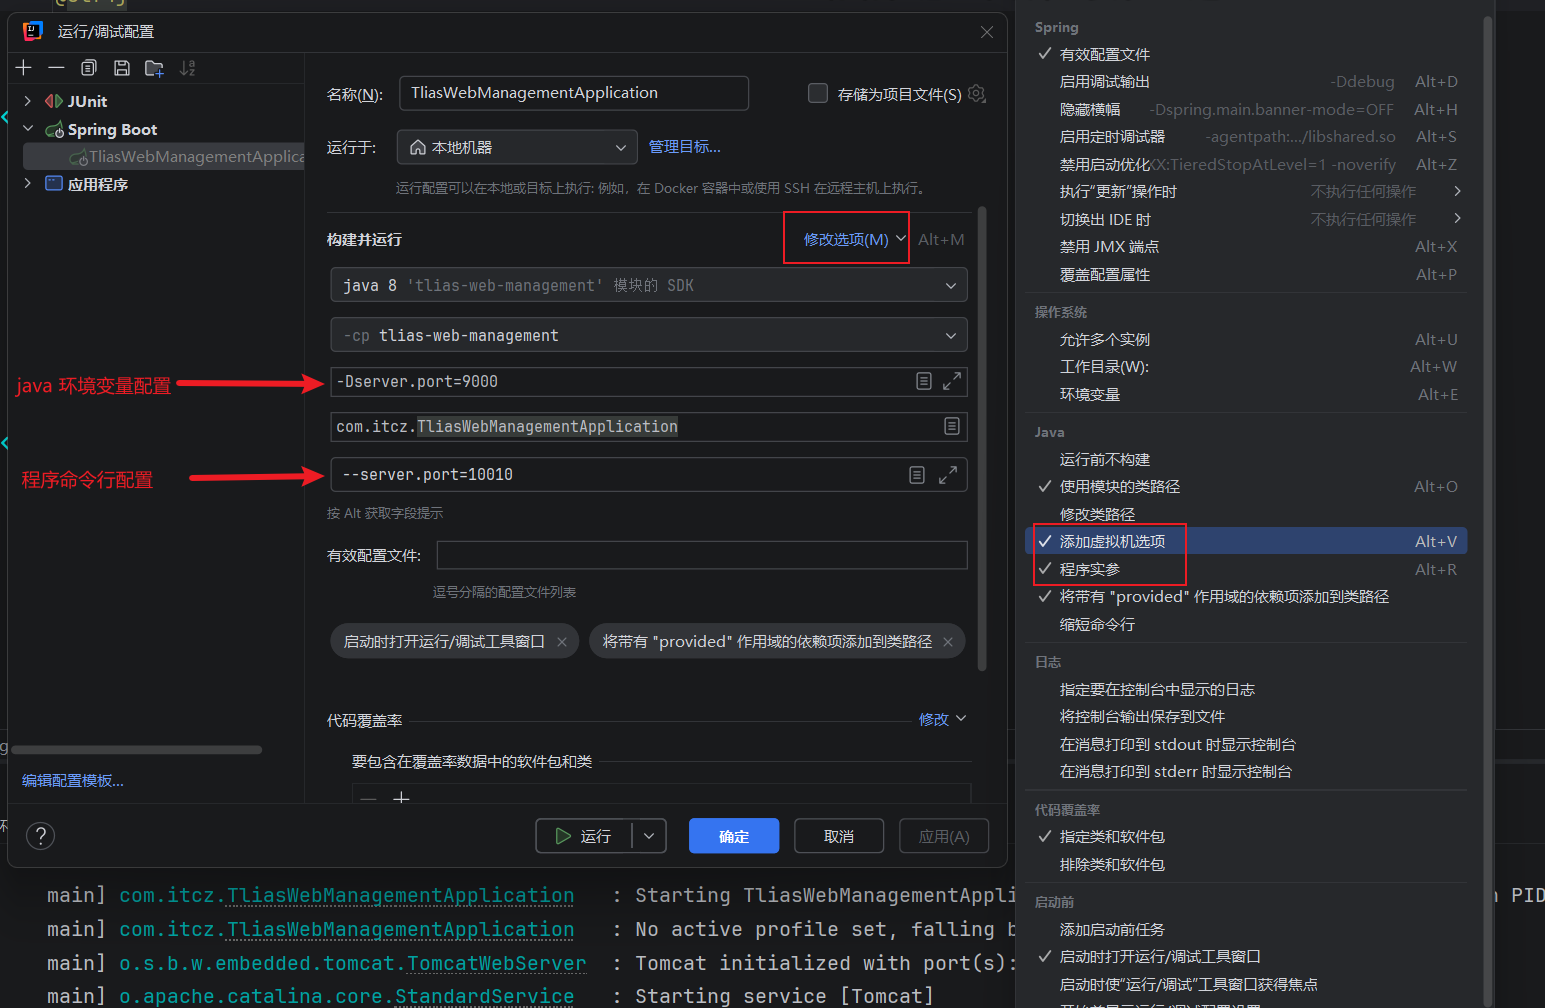
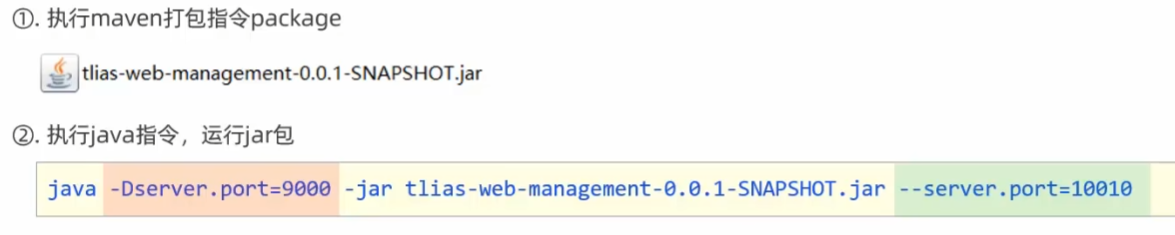
java系统属性(-Dxxx=xxx)
命令行参数( – xxx=xxx)
Bean 管理
获取 bean :默认情况下,Spring项目启动时,会把bean都创建好放在IOC容器中,如果想要主动获取这些bean,可以通过如下方式:
根据name获取bean:Object getBean (String name)
根据类型获取bean: T getBean (Class requiredType)
根据name获取bean(带类型转换): T getBean (String name, Class requiredType)
上述所说的【Spring项目启动时,会把其中的bean都创建好】还会受到作用域及延迟初始化影响,这里主要针对于 默认的单例非延迟加载 的bean而言。
1
2
3
4
5
6
7
8
9
10
11
12
13
14
15
16
17
18
19
20
21
22
23
24
25
26
27
28
29
package com.itcz;import com.itcz.controller.DeptController;import org.junit.jupiter.api.Test;import org.springframework.beans.factory.annotation.Autowired;import org.springframework.boot.test.context.SpringBootTest;import org.springframework.context.ApplicationContext;@SpringBootTest class TliasWebManagementApplicationTests { @Autowired private ApplicationContext applicationContext; @Test public void test () { DeptController bean1 = (DeptController) applicationContext.getBean("deptController" ); System.out.println(bean1); DeptController bean2 = applicationContext.getBean(DeptController.class); System.out.println(bean2); DeptController bean3 = applicationContext.getBean("deptController" , DeptController.class); System.out.println(bean3); } }
bean 作用域 :可以通过@Scope注解来进行配置作用域
1
2
3
4
5
@Scope("prototype") @RestController public class DeptController { }
默认singleton的bean,在容器启动时被创建,可以使用@Lazy注解来延迟初始化(延迟到第一次使用时)
prototype的bean,每一次使用该bean的时候都会创建一个新的实例。
实际开发当中,绝大部分的Bean是单例的,也就是说绝大部分Bean不需要配置scope属性。
第三方 bean :
如果要管理的bean对象来自于第三方(不是自定义的),是无法用@Component及衍生注解声明bean的,就需要用到@Bean注解。
若要管理的第三方bean对象,建议对这些bean进行集中分类配置,可以通过@Configuration注解声明一个配置类。
1
2
3
4
5
6
7
8
9
10
11
12
13
14
15
16
17
18
19
20
21
22
package com.itcz;import com.alibaba.fastjson.JSONObject;import org.springframework.boot.SpringApplication;import org.springframework.boot.autoconfigure.SpringBootApplication;import org.springframework.boot.web.servlet.ServletComponentScan;import org.springframework.context.annotation.Bean;@ServletComponentScan @SpringBootApplication public class TliasWebManagementApplication { public static void main (String[] args) { SpringApplication.run(TliasWebManagementApplication.class, args); } @Bean public JSONObject jsonObject () { return new JSONObject (); } }
1
2
3
4
5
6
7
8
9
10
11
12
13
14
15
16
17
18
19
20
21
22
23
package com.itcz.config;import com.alibaba.fastjson.JSONObject;import com.itcz.controller.DeptController;import org.springframework.context.annotation.Bean;import org.springframework.context.annotation.Configuration;@Configuration public class CommonConfig { @Bean public JSONObject jsonObject (DeptController deptController) { System.out.println(deptController); return new JSONObject (); } }
可以在启动类中配置(不建议)
通过@Bean注解的name或value属性可以声明bean的名称,如果不指定,默认bean的名称就是方法名。
如果第三方bean需要依赖其它bean对象,直接在bean定义方法中设置形参即可,容器会根据类型自动装配。
Spring Task 介绍
概念 :Spring Task 是 Spring 框架提供的任务调度工具,可以按照约定的时间自动执行某个代码逻辑作用 :定时自动执行某段Java代码应用场景 :
信用卡每月还款提醒
银行贷款每月还款提醒
火车票售票系统处理未支付订单
cron 表达式 概念 :cron表达式其实就是一个字符串,通过cron表达式可以定义任务触发的时间
构成规则 :分为6或7个域,由空格分隔开,每个域代表一个含义
每个域的含义分别为 :秒、分钟、小时、日、月、周、年(可选)
例如:2022年10月12日上午9点整对应的cron表达式为:0 0 9 12 10 ? 2022
入门案例 Spring Task使用步骤:
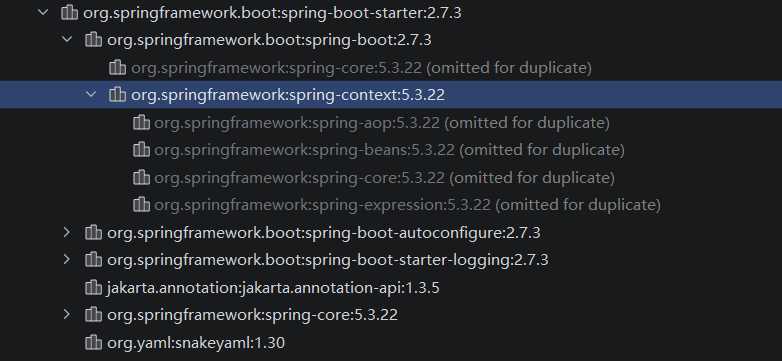
导入 Maven 坐标 spring-context(Spring-boot-starter起步依赖自带)
1
2
3
4
5
6
7
8
9
10
11
12
13
14
15
16
17
18
19
20
21
22
23
24
package com.sky.task;import lombok.extern.slf4j.Slf4j;import org.springframework.scheduling.annotation.Scheduled;import org.springframework.stereotype.Component;import java.util.Date;@Component @Slf4j public class MyTask { @Scheduled(cron = "0/5 * * * * ?") public void executeTask () { log.info("定时任务开始执行:{}" , new Date ()); } }
MyBatis 概念 :MyBatis是一款优秀的持久层框架,用于简化JDBC的开发
Mybatis 入门 快速入门
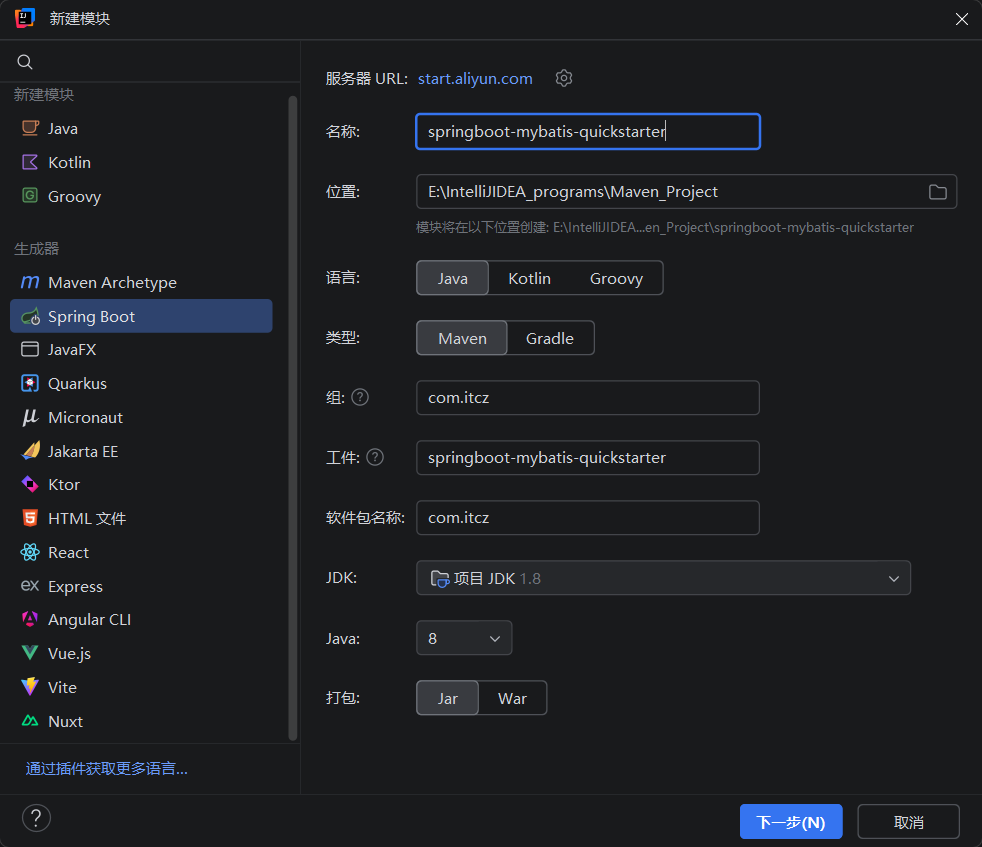
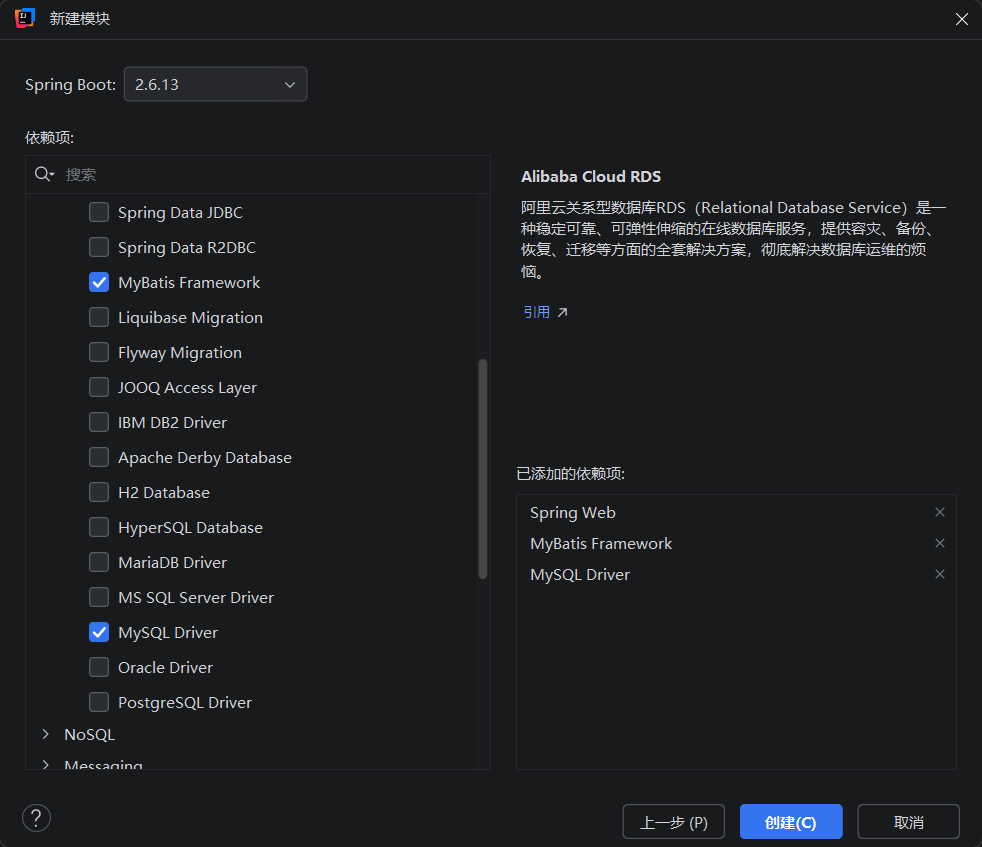
新建模块->导入相应的依赖
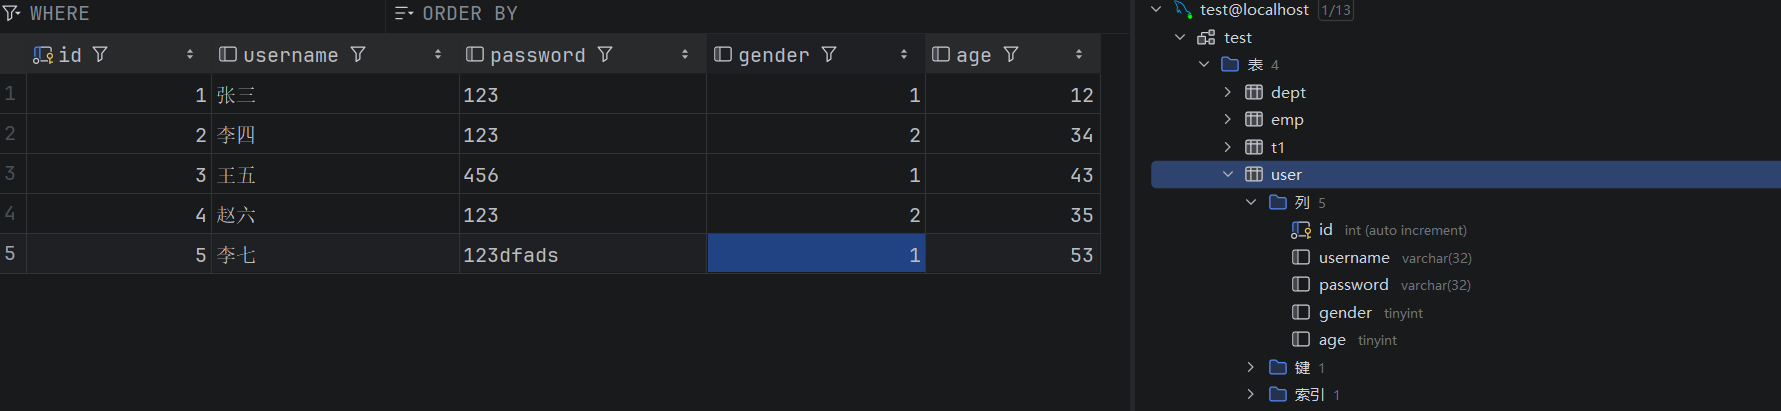
创建user表和User实体类
1
2
3
4
5
6
7
8
9
10
11
12
13
14
15
16
17
18
19
20
21
22
23
24
25
26
27
28
29
30
31
32
33
34
35
36
37
38
39
40
41
42
43
44
45
46
47
48
49
50
51
52
53
54
55
56
57
58
59
60
61
62
63
64
65
66
67
68
69
70
71
72
73
74
75
76
package com.itcz.pojo;public class User { private Integer id; private String username; private String password; private Short gender; private Short age; public User () { } public User (Integer id, String username, String password, Short gender, Short age) { this .id = id; this .username = username; this .password = password; this .gender = gender; this .age = age; } public Integer getId () { return id; } public void setId (Integer id) { this .id = id; } public String getUsername () { return username; } public void setUsername (String username) { this .username = username; } public String getPassword () { return password; } public void setPassword (String password) { this .password = password; } public Short getGender () { return gender; } public void setGender (Short gender) { this .gender = gender; } public Short getAge () { return age; } public void setAge (Short age) { this .age = age; } @Override public String toString () { return "User{" + "id=" + id + ", username='" + username + '\'' + ", password='" + password + '\'' + ", gender=" + gender + ", age=" + age + '}' ; } }
在application.propertiest配置文件中编写JDBC连接配置信息
1 2 3 4 5 6 7 8 spring.datasource.driver-class-name =com.mysql.cj.jdbc.Driver spring.datasource.url =jdbc:mysql://localhost:3306/test spring.datasource.username =root spring.datasource.password =123456
编写Mapper接口操作user表
1
2
3
4
5
6
7
8
9
10
11
12
13
14
15
16
17
18
package com.itcz.mapper;import com.itcz.pojo.User;import org.apache.ibatis.annotations.Mapper;import org.apache.ibatis.annotations.Select;import java.util.List;@Mapper public interface UserMapper { @Select("select * from user") public List<User> getUserList () ; }
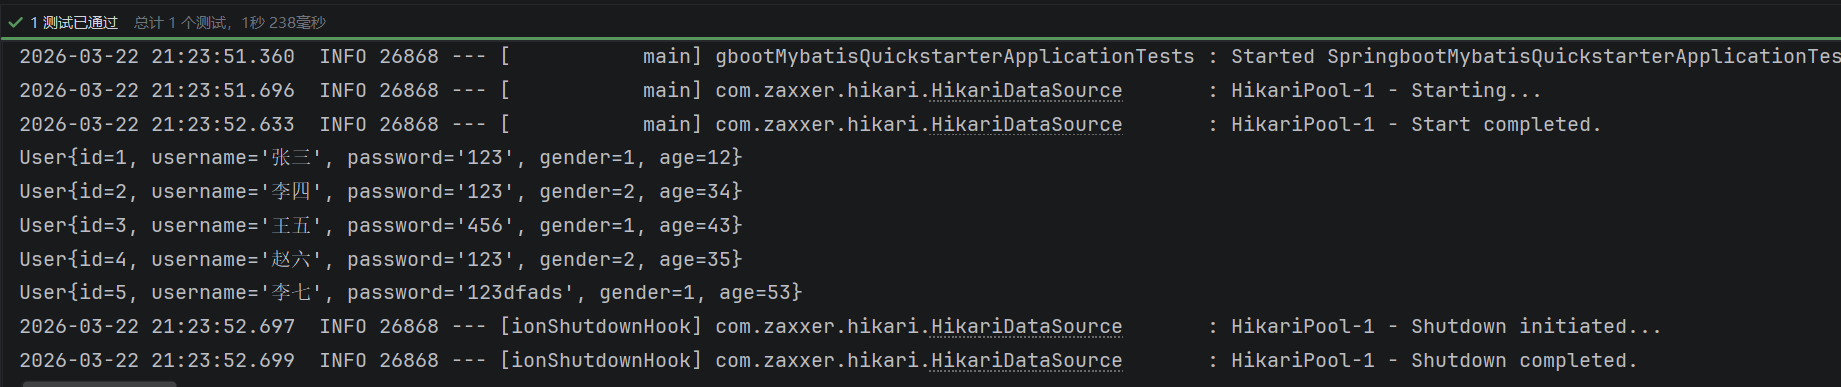
在测试类中编写测试代码,查看访问结果
1
2
3
4
5
6
7
8
9
10
11
12
13
14
15
16
17
18
19
20
21
22
23
package com.itcz;import com.itcz.mapper.UserMapper;import com.itcz.pojo.User;import org.junit.jupiter.api.Test;import org.springframework.beans.factory.annotation.Autowired;import org.springframework.boot.test.context.SpringBootTest;import java.util.List;@SpringBootTest class SpringbootMybatisQuickstarterApplicationTests { @Autowired private UserMapper userMapper; @Test public void getUserList () { List<User> userList = userMapper.getUserList(); userList.forEach(System.out::println); } }
JDBC 介绍 概念 :JDBC:(Java DataBase Connectivity),就是使用Java语言操作关系型数据库的一套API。
本质 :
sun公司官方定义的一套操作所有关系型数据库的规范,即接口。
各个数据库厂商去实现这套接口,提供数据库驱动jar包。
我们可以使用这套接口(JDBC)编程,真正执行的代码是驱动jar包中的实现类。
数据库连接池 概念 :
数据库连接池是个容器,负责分配、管理数据库连接(Connection),该连接对象是JDBC中连接数据库的连接对象
它允许应用程序重复使用一个现有的数据库连接,而不是再重新建立一个
释放空闲时间超过最大空闲时间的连接,来避免因为没有释放连接而引起的数据库连接遗漏
Lombok 概念 :Lombok是一个实用的Java类库,能通过注解的形式自动生成构造器、getter/setter、equals、hashcode、toString等方法,并可以自动化生成日志变量,简化java开发、提高效率。
注解 作用
@Getter/@Setter
为所有的属性提供get/set方法
@ToString
会给类自动生成易阅读的toString 方法
@EqualsAndHashCode
根据类所拥有的非静态字段自动重写equals 方法和hashCode方法
@Data 提供了更综合的生成代码功能(@Getter+@Setter+@ToString+@EqualsAndHashCode)
@NoArgsConstructor 为实体类生成无参的构造器方法
@AllArgsConstructor 为实体类生成除了static修饰的字段之外带有各参数的构造器方法。
在SpringBoot中使用Lombok注解需要引入对应的依赖
1 2 3 4 <dependency > <groupld > org.projectlombok</groupld > <artifactld > lombok</artifactld > </dependency >
Mybatis 基础操作 参数占位符
#{…}:执行SQL时,会将#{…}替换为?,生成预编译SQL,会自动设置参数值,一般在使用参数传递时使用
${…}:拼接SQL。直接将参数拼接在SQL语句中,存在SQL注入问题,一般在对表名、列表进行动态设置时使用
删除 根据id进行删除操作 :
1 delete from table_name where id = id_value;
1
2
3
4
5
6
7
8
9
10
11
12
13
14
15
16
17
package com.itcz.mapper;import org.apache.ibatis.annotations.Mapper;import org.apache.ibatis.annotations.Select;@Mapper public interface EmpMapper { @Select("delete from emp where id = #{id}") public void delete (Integer id) ; }
如果mapper接口方法形参只有一个普通类型的参数,# .. }里面的属性名可以随便写,如:#[id}、#{value}。
新增
新增数据 :
1 insert into table_name(字段列表) VALUES (#{实体类的属性}...)
1
2
3
4
5
6
7
8
9
10
11
12
13
14
15
16
17
package com.itcz.mapper;import com.itcz.pojo.Emp;import org.apache.ibatis.annotations.Delete;import org.apache.ibatis.annotations.Insert;import org.apache.ibatis.annotations.Mapper;@Mapper public interface EmpMapper { @Insert("insert into emp(username, name, gender, image, job, entrydate, dept_id, create_time, update_time) " + "VALUES (#{username}, #{name}, #{gender}, #{image}, #{job}, #{entrydate}, #{deptId}, #{createTime}, #{updateTime})") public void insert (Emp emp) ; }
新增数据后返回主键id值 :
1
2
3
4
5
6
7
8
9
10
11
12
13
14
15
16
17
18
19
package com.itcz.mapper;import com.itcz.pojo.Emp;import org.apache.ibatis.annotations.Delete;import org.apache.ibatis.annotations.Insert;import org.apache.ibatis.annotations.Mapper;@Mapper public interface EmpMapper { @Options(useGeneratedKeys = true, keyProperty = "id") @Insert("insert into emp(username, name, gender, image, job, entrydate, dept_id, create_time, update_time) " + "VALUES (#{username}, #{name}, #{gender}, #{image}, #{job}, #{entrydate}, #{deptId}, #{createTime}, #{updateTime})") public void insert (Emp emp) ; }
更新 根据id更新数据 :
1 update table_name set column_name1 = column_value1, ..... where id = id_value;
1
2
3
4
5
6
7
8
9
10
11
12
13
14
15
package com.itcz.mapper;import com.itcz.pojo.Emp;import org.apache.ibatis.annotations.*;@Mapper public interface EmpMapper { @Update("update emp set username = #{username}, name = #{name}, gender = #{gender}, image = #{image}, job = #{job}, " + "entrydate = #{entrydate}, dept_id = #{deptId}, update_time = #{updateTime} where id = #{id}") public void update (Emp emp) ; }
查询
根据id进行查询 :
1 select * from table_name where id = id_value;
1
2
3
4
5
6
7
8
9
10
11
12
13
14
15
16
17
18
19
20
21
22
23
24
25
26
27
28
29
package com.itcz.mapper;import com.itcz.pojo.Emp;import org.apache.ibatis.annotations.*;@Mapper public interface EmpMapper { @Select("select * from emp where id = #{id}") public Emp getById (Integer id) ; }
1 2 3 4 5 6 7 8 9 10 11 12 13 14 spring.datasource.driver-class-name =com.mysql.cj.jdbc.Driver spring.datasource.url =jdbc:mysql://localhost:3306/mybatis spring.datasource.username =root spring.datasource.password =123456 mybatis.configuration.log-impl =org.apache.ibatis.logging.stdout.StdOutImpl mybatis.configuration.map-underscore-to-camel-case =true
实体类属性名 和 数据库表查询返回的字段名一致,mybatis会自动封装。
如果实体类属性名 和数据库表查询返回的字段名不一致,不能自动封装。
根据条件进行查询 :
1 select * from table_name where where_difinition;
1
2
3
4
5
6
7
8
9
10
11
12
13
14
15
16
17
18
package com.itcz.mapper;import com.itcz.pojo.Emp;import org.apache.ibatis.annotations.*;import java.time.LocalDate;import java.util.List;@Mapper public interface EmpMapper { @Select("select * from emp where name like concat('%', #{name}, '%') and gender = #{gender} and entrydate between #{begin} and #{end} order by update_time desc") public List<Emp> list (@Param("name") String name, @Param("gender") Short gender, @Param("begin") LocalDate begin, @Param("end") LocalDate end) ; }
对于多个条件查询,建议带上@Param注解,防止编译后变量名丢失
对于like模糊查询,建议使用concat函数进行字符串拼接处理
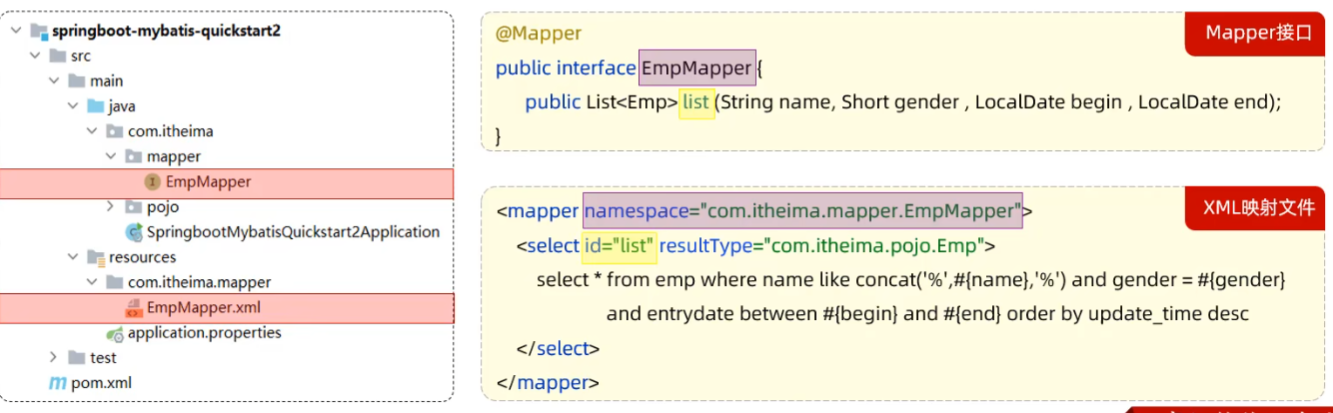
XML 映射文件
规范 :
XML映射文件的名称与Mapper接口名称一致,并且将XML映射文件和Mapper接口放置在相同包下(同包同名)。
XML映射文件的namespace属性为Mapper接口全限定名一致。
XML映射文件中sql语句的id与Mapper接口中的方法名一致,并保持返回类型一致。
如果是比较简单的操作,建议通过注解进行处理。若操作比较复杂,建议通过XML配置文件进行处理
1
2
3
4
5
6
7
8
9
10
<?xml version="1.0" encoding="UTF-8" ?> <!DOCTYPE mapper PUBLIC "-//mybatis.org//DTD Mapper 3.0//EN" "http://mybatis.org/dtd/mybatis-3-mapper.dtd" > <mapper namespace ="com.itcz.mapper.EmpMapper" > <select id ="list" resultType ="com.itcz.pojo.Emp" > select * from emp where name like concat('%', #{name}, '%') and gender = #{gender} and entrydate between #{begin} and #{end} order by update_time desc </select > </mapper >
动态 SQL
collection:集合名称
item:集合遍历出来的元素/项(用在SQL语句中的变量名)
separator:每一次遍历使用的分隔符
open:遍历开始前拼接的片段
close:遍历结束后拼接的片段
1
2
3
4
5
6
7
8
9
10
11
12
13
14
15
16
17
18
19
20
21
22
23
24
25
26
27
28
29
30
31
32
33
34
35
36
<?xml version="1.0" encoding="UTF-8" ?> <!DOCTYPE mapper PUBLIC "-//mybatis.org//DTD Mapper 3.0//EN" "http://mybatis.org/dtd/mybatis-3-mapper.dtd" > <mapper namespace ="com.itcz.mapper.EmpMapper" > <select id ="list" resultType ="com.itcz.pojo.Emp" > select * from emp <where > <if test ="name != null" > name like concat('%', #{name}, '%') </if > <if test ="gender != null" > and gender = #{gender} </if > <if test ="begin != null and end != null" > and entrydate between #{begin} and #{end} </if > </where > order by update_time desc </select > <update id ="update" > update emp <set > <if test ="username != null" > username = #{username},</if > <if test ="name != null" > name = #{name},</if > <if test ="gender != null" > gender = #{gender},</if > <if test ="image != null" > image = #{image},</if > <if test ="job != null" > job = #{job},</if > <if test ="entrydate != null" > entrydate = #{entrydate},</if > <if test ="dept_id != null" > dept_id = #{deptId},</if > <if test ="update_time != null" > update_time = #{updateTime}</if > </set > where id = #{id} </update > </mapper >
分页查询插件
在pom.xml中导入PageHelper插件依赖 :
1 2 3 4 5 <dependency > <groupId > com.github.pagehelper</groupId > <artifactId > pagehelper-spring-boot-starter</artifactId > <version > 1.4.2</version > </dependency >
在持久层中执行普通查询 :
1
2
3
4
5
6
7
8
9
10
11
12
13
14
15
16
17
18
19
20
21
22
23
24
25
26
27
package com.itcz.mapper;import com.itcz.pojo.Emp;import com.itcz.pojo.PageBean;import org.apache.ibatis.annotations.Mapper;import org.apache.ibatis.annotations.Param;import org.apache.ibatis.annotations.Select;import java.util.List;@Mapper public interface EmpMapper { @Select("select * from emp") List<Emp> list () ; }
在业务成中通过PageHelper类简化分页查询 :
1
2
3
4
5
6
7
8
9
10
11
12
13
14
15
16
17
18
19
20
21
22
23
24
25
26
27
28
29
30
31
32
33
34
35
36
package com.itcz.service.impl;import com.github.pagehelper.Page;import com.github.pagehelper.PageHelper;import com.itcz.mapper.EmpMapper;import com.itcz.pojo.Emp;import com.itcz.pojo.PageBean;import com.itcz.service.EmpService;import org.springframework.beans.factory.annotation.Autowired;import org.springframework.stereotype.Service;import java.util.List;@Service public class EmpServiceImpl implements EmpService { @Autowired private EmpMapper empMapper; @Override public PageBean page (Integer page, Integer pageSize) { PageHelper.startPage(page, pageSize); List<Emp> list = empMapper.list(); Page<Emp> p = (Page<Emp>) list; return new PageBean (p.getTotal(), p.getResult()); } }
登录校验 由于HTTP协议是无状态的,故而浏览器无法知道当前操作时用户是否已经登录,此时需要在后端存储一个登录标志,每次前端请求时都会携带该登录标志,因此后端接收一个请求就要判断该请求携带的登录标志,这就会导致后端代码臃肿,故而引出了后端统一拦截技术
会话技术
会话 :用户打开浏览器,访问web服务器,会话建立,直到有一方断开连接,会话结束。在依次会话中可以包含多次请求和响应。会话跟踪 :一种维护浏览器状态的方法,服务器需要识别多次请求是否来自同一浏览器,以便在同一次会话的多次请求间共享数据。会话跟踪方案 :
客户端会话跟踪技术:Cookie
服务端会话跟踪技术:Sesssion
令牌技术
Cookie
当前端请求被服务器响应后,服务器可以给前端一个set-cookie的响应头,并且set-cookie的值为键值对
当前端获取到该cookie值时,会将键值对存储到浏览器本地,当前端再次发送请求给服务器时会携带该cookie信息,这样就保证了多次请求属于同一浏览器,即同一次会话
1
2
3
4
5
6
7
8
9
10
11
12
13
14
15
16
17
18
19
20
21
22
23
24
25
26
27
28
29
30
31
32
33
34
35
36
37
package com.itcz.controller;import com.itcz.pojo.Result;import org.springframework.beans.factory.annotation.Autowired;import org.springframework.web.bind.annotation.GetMapping;import org.springframework.web.bind.annotation.RestController;import javax.servlet.http.Cookie;import javax.servlet.http.HttpServletRequest;import javax.servlet.http.HttpServletResponse;@RestController public class CookieController { @GetMapping("c1") public Result c1 (HttpServletResponse response) { response.addCookie(new Cookie ("login_name" , "itcz" )); return Result.success(); } @GetMapping("c2") public Result c2 (HttpServletRequest request) { Cookie[] cookies = request.getCookies(); for (Cookie cookie : cookies) { if (cookie.getName().equals("login_name" )) { System.out.println("login_name : " + cookie.getValue()); } } return Result.success(); } }
优点:HTTP协议中支持的技术
缺点:
移动端APP无法使用Cookie
不安全,用户可以自己禁用Cookie
Cookie不能跨域
Session Session是存储在服务器中的,但是需要浏览器存储Session的ID值,用来标识多个请求属于同一个会话
当前端请求被服务器响应后,服务器可以给前端一个set-cookie的响应头,并且set-cookie的值为键值对,此时存储的键值对就是SessionID值
当前端获取到该cookie值时,会将键值对存储到浏览器本地,当前端再次发送请求给服务器时会携带该cookie信息,服务器收到该请求后,会解析SessionID值,这样就保证了多次请求属于同一浏览器,即同一次会话
1
2
3
4
5
6
7
8
9
10
11
12
13
14
15
16
17
18
19
20
21
22
23
24
25
26
27
28
29
30
31
32
33
34
35
36
37
38
39
40
41
package com.itcz.controller;import com.itcz.pojo.Result;import lombok.extern.slf4j.Slf4j;import org.springframework.web.bind.annotation.GetMapping;import org.springframework.web.bind.annotation.RestController;import javax.servlet.http.HttpServletRequest;import javax.servlet.http.HttpSession;@RestController @Slf4j public class SessionController { @GetMapping("s1") public Result s1 (HttpSession session) { log.info("HttpSession-s1:{}" , session.hashCode()); session.setAttribute("login_user" , "tom" ); return Result.success(); } @GetMapping("s2") public Result s2 (HttpServletRequest request) { HttpSession session = request.getSession(); log.info("HttpSession-s2:{}" , session.hashCode()); Object loginUser = session.getAttribute("login_user" ); log.info("login_user:{}" , loginUser); return Result.success(loginUser); } }
优点:信息存储在服务器中,安全
缺点:
Cookie的缺点
当web程序部署在多个服务器时,两次请求可能被不同的服务器解析,此时两次请求找到的Session不一样,就会导致服务器认为这两次请求不是同一个会话,影响用户体验
令牌技术
当用户登录后,服务器会给该用户生成一个JWT令牌,返回给前端,前端拿到JWT令牌后,可以将该令牌存储在浏览器的Cookie中或者其他存储空间中,后续当用户再次发起请求时携带该令牌即可
多次请求之间需要共享数据时,可以将数据存储在JWT令牌中
优点:
支持PC端,移动端
解决集群环境下的认证问题
减轻服务器端存储压力
缺点:具体逻辑需要自己实现
JWT 令牌 简介 :
全称:JSON Web Token (https://jwt.io/) )
定义了一种简洁的、自包含的格式,用于在通信双方以json数据格式安全的传输信息。由于数字签名的存在,这些信息是可靠的。
组成:
第一部分:Header(头),记录令牌类型、签名算法等。例如:{“alg”:”HS256”,”type”:”]WT”}
第二部分:Payload(有效载荷),携带一些自定义信息、默认信息等。例如:{“id”:”1”,”username”:”Tom”}
第三部分:Signature(签名),防止Token被篡改、确保安全性。将header、payload,并加入指定秘钥,通过指定签名算法计算而来。
Base64:是一种基于64个可打印字符(A-Z a-z 0-9+/)来表示二进制数据的编码方式
JWT 生成
导入依赖 :
1 2 3 4 5 <dependency > <groupId > io.jsonwebtoken</groupId > <artifactId > jjwt</artifactId > <version > 0.9.1</version > </dependency >
编写代码 :
1 2 3 4 5 6 7 8 9 10 11 12 13 public void testGenJwt () { Map<String, Object> claims = new HashMap <>(); claims.put("id" , 1 ); claims.put("name" , "tom" ); String jwt = Jwts.builder() .signWith(SignatureAlgorithm.HS256, "itcz" ) .setClaims(claims) .setExpiration(new Date (System.currentTimeMillis() + 3600 * 1000 )) .compact(); System.out.println(jwt); }
JWT 校验 1 2 3 4 5 6 7 8 // 解析JWT令牌 public void parseJwt() { Claims claims = Jwts.parser() .setSigningKey("itcz") .parseClaimsJws("eyJhbGciOiJIUzI1NiJ9.eyJuYW1lIjoidG9tIiwiaWQiOjEsImV4cCI6MTc3NDYxNDU5N30.sF4saIw97vnGC55WVjbsM7EMmr7BVHkl3dU7B_vMJRs") .getBody(); System.out.println(claims); }
JWT校验时使用的签名密钥,必须和生成JWT令牌时使用的密钥是配套的
如果JWT令牌解析校验时报错,则说明JWT令牌被篡改或失效了,令牌非法
过滤器 Filter 简介 :
概念:Filter过滤器,是JavaWeb三大组件(Servlet、Filter、Listener)之一。
过滤器可以把对资源的请求拦截下来,从而实现一些特殊的功能。
过滤器一般完成一些通用的操作,比如:登录校验、统一编码处理、敏感字符处理等。
快速入门
定义Filter:定义一个类,实现Filter接口,并重写其所有方法
配置Filter:Filter类上加@WebFilter注解,配置拦截资源的路径。在引导类上加@ServletComponentScan开启Servlet组件支持
1 2 3 4 5 6 7 8 9 10 11 12 13 14 15 16 17 18 19 20 21 22 23 24 25 26 27 28 package com.itcz.filter;import javax.servlet.*;import javax.servlet.annotation.WebFilter;import java.io.IOException;@WebFilter("/*") public class DemoFilter implements Filter { @Override public void init (FilterConfig filterConfig) throws ServletException { System.out.println("init 初始化方法执行了" ); } @Override public void doFilter (ServletRequest servletRequest, ServletResponse servletResponse, FilterChain filterChain) throws IOException, ServletException { System.out.println("拦截到了请求" ); filterChain.doFilter(servletRequest, servletResponse); } @Override public void destroy () { System.out.println("destroy 销毁方法执行了" ); } }
1 2 3 4 5 6 7 8 9 10 11 12 13 14 15 package com.itcz;import org.springframework.boot.SpringApplication;import org.springframework.boot.autoconfigure.SpringBootApplication;import org.springframework.boot.web.servlet.ServletComponentScan;@ServletComponentScan @SpringBootApplication public class TliasWebManagementApplication { public static void main (String[] args) { SpringApplication.run(TliasWebManagementApplication.class, args); } }
详解
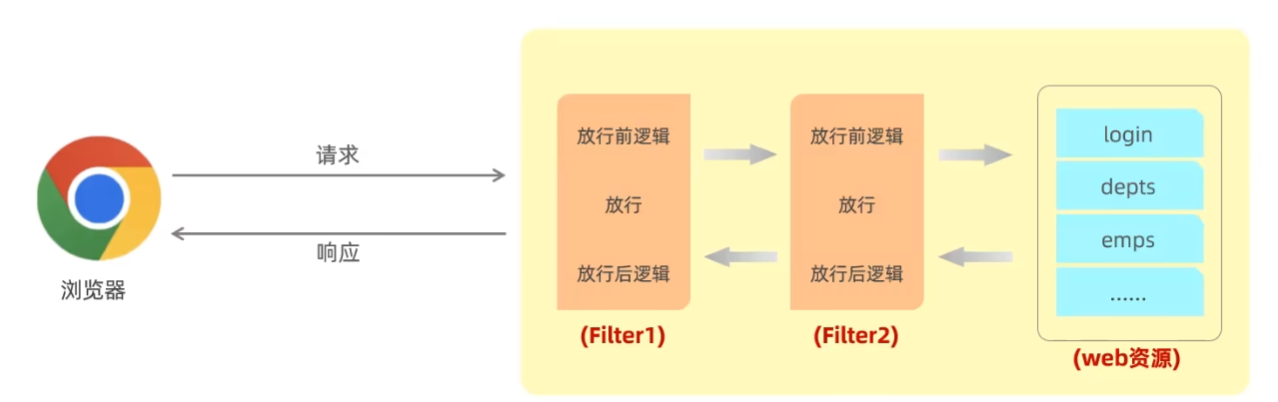
Filter 执行流程 :
放行后访问对应资源,资源访问完成后,会回到Filter中
回到Filter中时,会执行放行后的逻辑
Filter 拦截路径 :
拦截路径 urlPatterns值 含义
拦截具体路径
/login
只有访问/login路径时,才会被拦截
目录拦截
/emps/*
访问/emps下的所有资源,都会被拦截
拦截所有
/*
访问所有资源,都会被拦截
过滤器链 :一个web应用中,可以配置多个过滤器,这多个过滤器就形成了一个过滤器链
登录校验过滤器 1 2 3 4 5 6 7 8 9 10 11 12 13 14 15 16 17 18 19 20 21 22 23 24 25 26 27 28 29 30 31 32 33 34 35 36 37 38 39 40 41 42 43 44 45 46 47 48 49 50 51 52 53 54 55 56 57 58 59 60 61 62 63 64 65 66 67 68 69 package com.itcz.filter;import com.alibaba.fastjson.JSONObject;import com.itcz.pojo.Result;import com.itcz.utils.JwtUtils;import lombok.extern.slf4j.Slf4j;import javax.servlet.*;import javax.servlet.annotation.WebFilter;import javax.servlet.http.HttpServletRequest;import javax.servlet.http.HttpServletResponse;import java.io.IOException;@Slf4j @WebFilter("/*") public class LoginCheckFilter implements Filter { @Override public void doFilter (ServletRequest servletRequest, ServletResponse servletResponse, FilterChain filterChain) throws IOException, ServletException { HttpServletRequest request = (HttpServletRequest) servletRequest; HttpServletResponse response = (HttpServletResponse) servletResponse; String url = request.getRequestURL().toString(); log.info("url:{}" , url); if (url.contains("login" )) { log.info("登录操作,放行" ); filterChain.doFilter(servletRequest, servletResponse); return ; } String jwt = request.getHeader("token" ); if (jwt == null || jwt.isEmpty()) { log.info("jwt令牌为空" ); Result notLogin = Result.error("NOT_LOGIN" ); String json = JSONObject.toJSONString(notLogin); response.getWriter().write(json); return ; } try { JwtUtils.parseJWT(jwt); } catch (Exception e) { e.printStackTrace(); log.info("jwt令牌解析失败,返回未登录错误信息" ); Result notLogin = Result.error("NOT_LOGIN" ); String json = JSONObject.toJSONString(notLogin); response.getWriter().write(json); return ; } filterChain.doFilter(servletRequest, servletResponse); } }
拦截器 Interceptor 快速入门
定义拦截器,实现HandlerInterceptor接口,并重写其所有方法,并将该拦截器交给SpringIOC容器管理
1 2 3 4 5 6 7 8 9 10 11 12 13 14 15 16 17 18 19 20 21 22 23 24 25 26 27 28 29 30 31 32 33 34 35 36 37 38 39 40 41 42 43 44 45 46 47 48 49 50 51 52 53 54 55 56 57 58 59 60 61 62 package com.itcz.interceptor;import org.springframework.lang.Nullable;import org.springframework.stereotype.Component;import org.springframework.web.servlet.HandlerInterceptor;import org.springframework.web.servlet.ModelAndView;import javax.servlet.http.HttpServletRequest;import javax.servlet.http.HttpServletResponse;@Component public class LoginCheckInterceptor implements HandlerInterceptor { @Override public boolean preHandle (HttpServletRequest request, HttpServletResponse response, Object handler) throws Exception { System.out.println("preHandler 方法执行了" ); return true ; } @Override public void postHandle (HttpServletRequest request, HttpServletResponse response, Object handler, @Nullable ModelAndView modelAndView) throws Exception { System.out.println("postHandler 方法执行了" ); } @Override public void afterCompletion (HttpServletRequest request, HttpServletResponse response, Object handler, @Nullable Exception ex) throws Exception { System.out.println("afterCompletion 方法执行了" ); } }
注册拦截器
1 2 3 4 5 6 7 8 9 10 11 12 13 14 15 16 17 18 19 20 21 22 23 24 package com.itcz.config;import com.itcz.interceptor.LoginCheckInterceptor;import org.springframework.beans.factory.annotation.Autowired;import org.springframework.context.annotation.Configuration;import org.springframework.web.servlet.config.annotation.InterceptorRegistry;import org.springframework.web.servlet.config.annotation.WebMvcConfigurer;@Configuration public class WebConfig implements WebMvcConfigurer { @Autowired private LoginCheckInterceptor loginCheckInterceptor; @Override public void addInterceptors (InterceptorRegistry registry) { registry.addInterceptor(loginCheckInterceptor).addPathPatterns("/**" ); } }
详解 拦截路径 拦截器可以根据需求,配置不同的拦截路径:
1 2 3 4 5 @Override public void addInterceptors (InterceptorRegistry registry) { registry.addInterceptor(loginCheckInterceptor).addPathPatterns("/**" ).excludePathPatterns("/login" ); }
拦截路径 含义 举例
/*
一级路径
能匹配/depts,/emps,/login,不能匹配/depts/1
/**
任意级路径
能匹配/depts,/depts/1,/depts/1/2
/depts/*
/depts下的一级路径
能匹配/depts/1,不能匹配/depts/1/2,/depts
/depts/ **
/depts下的任意级路径
能匹配/depts,/depts/1,/depts/1/2,不能匹配/emps/1
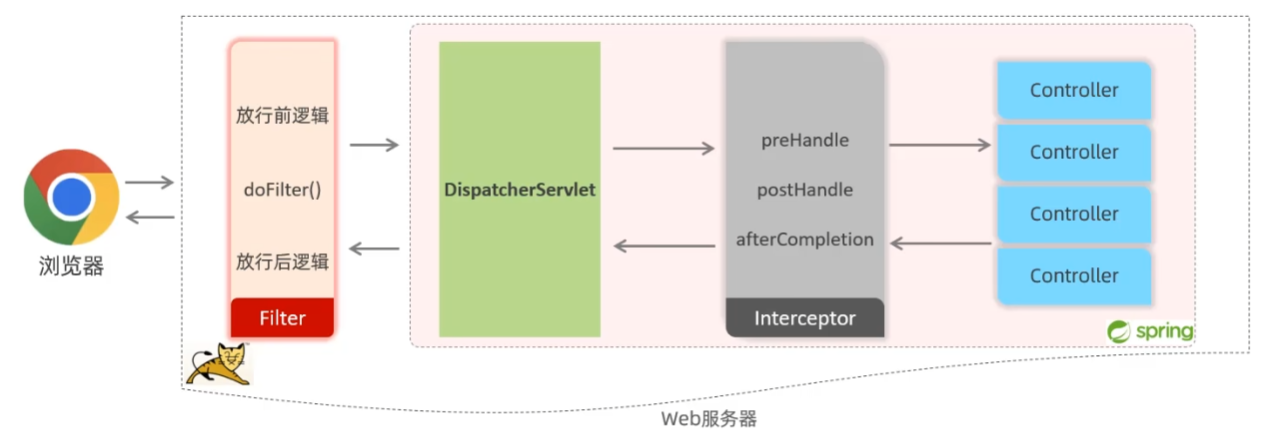
执行流程
接口规范不同:过滤器需要实现Filter接口,而拦截器需要实现Handlerlnterceptor接口。
拦截范围不同:过滤器Filter会拦截所有的资源,而Interceptor只会拦截Spring环境中的资源。
登录校验 1 2 3 4 5 6 7 8 9 10 11 12 13 14 15 16 17 18 19 20 21 22 23 24 25 26 27 28 29 30 31 32 33 34 35 36 37 38 39 40 41 42 43 44 45 46 47 48 49 50 51 52 53 54 55 56 57 58 59 60 61 62 63 64 65 66 67 68 69 70 71 72 73 74 75 76 77 78 79 80 81 82 83 84 85 86 87 88 89 90 91 92 93 94 95 96 97 98 99 100 101 102 103 104 105 106 package com.itcz.interceptor;import com.alibaba.fastjson.JSONObject;import com.itcz.pojo.Result;import com.itcz.utils.JwtUtils;import lombok.extern.slf4j.Slf4j;import org.springframework.lang.Nullable;import org.springframework.stereotype.Component;import org.springframework.web.servlet.HandlerInterceptor;import org.springframework.web.servlet.ModelAndView;import javax.servlet.http.HttpServletRequest;import javax.servlet.http.HttpServletResponse;@Slf4j @Component public class LoginCheckInterceptor implements HandlerInterceptor { @Override public boolean preHandle (HttpServletRequest request, HttpServletResponse response, Object handler) throws Exception { String url = request.getRequestURL().toString(); log.info("url:{}" , url); if (url.contains("login" )) { log.info("登录操作,放行" ); return true ; } String jwt = request.getHeader("token" ); if (jwt == null || jwt.isEmpty()) { log.info("jwt令牌为空" ); Result notLogin = Result.error("NOT_LOGIN" ); String json = JSONObject.toJSONString(notLogin); response.getWriter().write(json); return true ; } try { JwtUtils.parseJWT(jwt); } catch (Exception e) { e.printStackTrace(); log.info("jwt令牌解析失败,返回未登录错误信息" ); Result notLogin = Result.error("NOT_LOGIN" ); String json = JSONObject.toJSONString(notLogin); response.getWriter().write(json); return true ; } return true ; } @Override public void postHandle (HttpServletRequest request, HttpServletResponse response, Object handler, @Nullable ModelAndView modelAndView) throws Exception { System.out.println("postHandler 方法执行了" ); } @Override public void afterCompletion (HttpServletRequest request, HttpServletResponse response, Object handler, @Nullable Exception ex) throws Exception { System.out.println("afterCompletion 方法执行了" ); } }
HttpClient
概念 :HttpClient 是Apache Jakarta Common 下的子项目,可以用来提供高效的、最新的、功能丰富的支持HTTP协议的客户端编程工具包,并且它支持HTTP协议最新的版本和建议。Maven 依赖配置如下 :
1 2 3 4 5 <dependency > <groupId > org. apache. httpcomponents</groupId > <artifactId > httpclient</artifactId > <version > 4.5.13</version > </dependency >
核心API :
HttpClient
HttpClients
CloseableHttpClient
HttpGet
HttpPost
发送请求步骤 :
创建HttpClient对象
创建Http请求对象
调用HttpClient的execute方法发送请求
1 2 3 4 5 6 7 8 9 10 11 12 13 14 15 16 17 18 19 20 21 22 23 24 25 26 27 28 29 30 31 32 33 34 35 36 37 38 39 40 41 42 43 44 45 46 47 48 49 50 51 52 53 54 55 56 57 58 59 60 61 62 63 64 65 66 67 68 69 70 71 72 73 74 75 76 77 78 79 80 81 82 83 84 85 package com.sky;import com.alibaba.fastjson.JSONObject;import org.apache.http.HttpEntity;import org.apache.http.client.methods.CloseableHttpResponse;import org.apache.http.client.methods.HttpGet;import org.apache.http.client.methods.HttpPost;import org.apache.http.entity.StringEntity;import org.apache.http.impl.client.CloseableHttpClient;import org.apache.http.impl.client.HttpClients;import org.apache.http.util.EntityUtils;import org.junit.jupiter.api.Test;import org.springframework.boot.test.context.SpringBootTest;import java.io.IOException;@SpringBootTest public class HttpClientTest { @Test public void testGet () throws IOException { CloseableHttpClient httpClient = HttpClients.createDefault(); HttpGet httpGet = new HttpGet ("http://localhost:8080/user/shop/status" ); CloseableHttpResponse response = httpClient.execute(httpGet); int statusCode = response.getStatusLine().getStatusCode(); System.out.println("服务器返回的状态码:" + statusCode); HttpEntity entity = response.getEntity(); String body = EntityUtils.toString(entity); System.out.println("服务器返回的数据:" + body); httpClient.close(); response.close(); } @Test public void testPost () throws Exception { CloseableHttpClient httpClient = HttpClients.createDefault(); HttpPost httpPost = new HttpPost ("http://localhost:8080/admin/employee/login" ); JSONObject jsonObject = new JSONObject (); jsonObject.put("username" , "admin" ); jsonObject.put("password" , "123456" ); StringEntity stringEntity = new StringEntity (jsonObject.toString()); stringEntity.setContentEncoding("utf-8" ); stringEntity.setContentType("application/json" ); httpPost.setEntity(stringEntity); CloseableHttpResponse response = httpClient.execute(httpPost); int statusCode = response.getStatusLine().getStatusCode(); System.out.println("响应码为:" + statusCode); HttpEntity entity = response.getEntity(); String body = EntityUtils.toString(entity); System.out.println("响应体为" + body); httpClient.close(); httpPost.clone(); } }




 2. 此时可以通过以下三个注解进行处理:
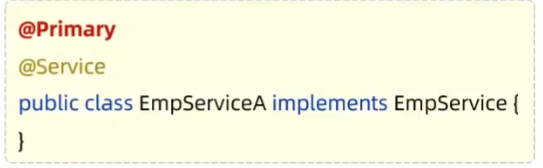
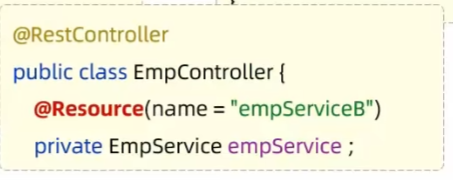
+ @Primary:在需要生效的bean上加上该注解即可,这时SpringBoot程序启动时只会将该注解标注的bean注入给对应的变量
2. 此时可以通过以下三个注解进行处理:
+ @Primary:在需要生效的bean上加上该注解即可,这时SpringBoot程序启动时只会将该注解标注的bean注入给对应的变量
 + 启动类添加注解 @EnableScheduling 开启任务调度
+ 自定义定时任务类
+ 启动类添加注解 @EnableScheduling 开启任务调度
+ 自定义定时任务类