Vue 快速上手
快速使用
- 准备容器
- 引包(官网)
- 创建 Vue 实例:new Vue()
- 指定配置项 el data => 渲染数据
1
2
3
4
5
6
7
8
9
10
11
12
13
14
15
16
17
18
19
20
21
22
23
24
25
26
27
28
29
30
31
| <!doctype html>
<html lang="en">
<head>
<meta charset="UTF-8">
<meta name="viewport"
content="width=device-width, user-scalable=no, initial-scale=1.0, maximum-scale=1.0, minimum-scale=1.0">
<meta http-equiv="X-UA-Compatible" content="ie=edge">
<title>Document</title>
</head>
<body>
<div id="app">
<h1>{{ msg }}</h1>
</div>
<script src="https://cdn.jsdelivr.net/npm/vue@2/dist/vue.js"></script>
<script>
const app = new Vue({
el: '#app',
data: {
msg: 'hello, vue'
}
})
</script>
</body>
</html>
|
vue2官网:https://v2.cn.vuejs.org/
插值表达式
插值表达式是一种 Vue 的模板语法
- 作用:利用表达式进行插值,渲染到页面中
表达式:是可以被求值的代码,Js引擎会将其计算出一个结果
- 语法:{{ 表达式 }}
- 注意点
- 使用的数据必须存在,即必须在data配置中出现
- 支持的是表达式,而非语句,比如:if for ….
- 不能在标签属性中使用{{ }}插值
1
| <p title="{{ username }}">我是p标签</p>
|
响应式特性
响应式定义:数据改变,视图自动更新
修改数据:实例名.属性名 = 新值
访问数据:实例名.属性名
data中的数据,最终会被添加到实例上
Vue 指令
定义
指令就是带有v-前缀 的特殊 属性,不同属性 对应 不同的功能
v-html 指令
v-html=”表达式”:动态设置元素(类似JS中的innerHTML)
1
2
3
4
5
6
7
8
9
10
11
12
13
14
15
16
17
18
19
20
21
22
23
24
25
26
27
28
29
30
31
| <!DOCTYPE html>
<html lang="en">
<head>
<meta charset="UTF-8">
<meta http-equiv="X-UA-Compatible" content="IE=edge">
<meta name="viewport" content="width=device-width, initial-scale=1.0">
<title>Document</title>
</head>
<body>
<div id="app" >
<div v-html="msg"></div>
</div>
<script src="https://cdn.jsdelivr.net/npm/vue@2/dist/vue.js"></script>
<script>
const app = new Vue({
el: '#app',
data: {
msg: `
<a href="http://www.itcast.cn">学it, 来黑马</a>
`
}
})
</script>
</body>
</html>
|
v-show 和 v-if
v-show
- 作用:控制元素显示隐藏
- 语法:v-show = “表达式” 表达式值为true时显示元素,false时隐藏元素
- 原理:切换 display: none 控制显示隐藏
- 场景:频繁切换显示隐藏的场景
v-if
- 作用:控制元素显示隐藏
- 语法:v-if = “表达式” 表达式值为true时显示元素,false时隐藏元素
- 原理:基于条件判断,是否 创建 或 移除 元素节点
- 场景:要么显示,要么隐藏,不频繁切换的场景
1
2
3
4
5
6
7
8
9
10
11
12
13
14
15
16
17
18
19
20
21
22
23
24
25
26
27
28
29
30
31
32
33
34
35
36
37
38
39
40
41
| <!DOCTYPE html>
<html lang="en">
<head>
<meta charset="UTF-8">
<meta http-equiv="X-UA-Compatible" content="IE=edge">
<meta name="viewport" content="width=device-width, initial-scale=1.0">
<title>Document</title>
<style>
.box {
width: 200px;
height: 100px;
line-height: 100px;
margin: 10px;
border: 3px solid #000;
text-align: center;
border-radius: 5px;
box-shadow: 2px 2px 2px #ccc;
}
</style>
</head>
<body>
<div id="app">
<div class="box" v-show="flag">我是v-show控制的盒子</div>
<div class="box" v-if="flag">我是v-if控制的盒子</div>
</div>
<script src="https://cdn.jsdelivr.net/npm/vue@2/dist/vue.js"></script>
<script>
const app = new Vue({
el: '#app',
data: {
flag: true
}
})
</script>
</body>
</html>
|
v-else 和 v-else-if
作用:辅助 v-if 进行判断渲染
语法:v-else 和 v-else-if = “表达式”
注意:需要紧挨着 v-if 一起使用
1
2
3
4
5
6
7
8
9
10
11
12
13
14
15
16
17
18
19
20
21
22
23
24
25
26
27
28
29
30
31
32
33
34
35
| <!DOCTYPE html>
<html lang="en">
<head>
<meta charset="UTF-8">
<meta http-equiv="X-UA-Compatible" content="IE=edge">
<meta name="viewport" content="width=device-width, initial-scale=1.0">
<title>Document</title>
</head>
<body>
<div id="app">
<p v-if="gender === 1">性别:♂ 男</p>
<p v-else>性别:♀ 女</p>
<hr>
<p v-if="score >= 90">成绩评定A:奖励电脑一台</p>
<p v-else-if="score >= 80">成绩评定B:奖励周末郊游</p>
<p v-else-if="score >= 70">成绩评定C:奖励零食礼包</p>
<p v-else>成绩评定D:惩罚一周不能玩手机</p>
</div>
<script src="https://cdn.jsdelivr.net/npm/vue@2/dist/vue.js"></script>
<script>
const app = new Vue({
el: '#app',
data: {
gender: 1,
score: 78
}
})
</script>
</body>
</html>
|
v-on
作用:注册时间 = 添加监听 + 提供处理逻辑
语法:
1
2
3
4
5
6
7
8
9
10
11
12
13
14
15
16
17
18
19
20
21
22
23
24
25
26
27
| <!DOCTYPE html>
<html lang="en">
<head>
<meta charset="UTF-8">
<meta http-equiv="X-UA-Compatible" content="IE=edge">
<meta name="viewport" content="width=device-width, initial-scale=1.0">
<title>Document</title>
</head>
<body>
<div id="app">
<button @click="count--">-</button>
<span>{{ count }}</span>
<button v-on:click="count++">+</button>
</div>
<script src="https://cdn.jsdelivr.net/npm/vue@2/dist/vue.js"></script>
<script>
const app = new Vue({
el: '#app',
data: {
count: 100
}
})
</script>
</body>
</html>
|
- v-on:事件名 = “methods中的函数名”
1
2
3
4
5
6
7
8
9
10
11
12
13
14
15
16
17
18
19
20
21
22
23
24
25
26
27
28
29
30
| <!DOCTYPE html>
<html lang="en">
<head>
<meta charset="UTF-8">
<meta http-equiv="X-UA-Compatible" content="IE=edge">
<meta name="viewport" content="width=device-width, initial-scale=1.0">
<title>Document</title>
</head>
<body>
<div id="app">
<button @click="fn">切换显示隐藏</button>
<h1 v-show="flag">黑马程序员</h1>
</div>
<script src="./vue.js"></script>
<script>
const app = new Vue({
el: '#app',
data: {
flag: true
},
methods: {
fn() {
this.flag = !this.flag
}
}
})
</script>
</body>
</html>
|
简写:@事件名
v-on 调用传参
- v-on:事件名 = “methods中的函数名”
上述语法中可以在函数名中传递实际参数
1
2
3
4
5
6
7
8
9
10
11
12
13
14
15
16
17
18
19
20
21
22
23
24
25
26
27
28
29
30
31
32
33
34
35
36
37
38
39
40
41
42
43
44
45
46
47
48
49
50
| <!DOCTYPE html>
<html lang="en">
<head>
<meta charset="UTF-8">
<meta http-equiv="X-UA-Compatible" content="IE=edge">
<meta name="viewport" content="width=device-width, initial-scale=1.0">
<title>Document</title>
<style>
.box {
border: 3px solid #000000;
border-radius: 10px;
padding: 20px;
margin: 20px;
width: 200px;
}
h3 {
margin: 10px 0 20px 0;
}
p {
margin: 20px;
}
</style>
</head>
<body>
<div id="app">
<div class="box">
<h3>小黑自动售货机</h3>
<button @click="fn(5)">可乐5元</button>
<button v-on:click="fn(10)">咖啡10元</button>
</div>
<p>银行卡余额:{{ money }}元</p>
</div>
<script src="./vue.js"></script>
<script>
const app = new Vue({
el: '#app',
data: {
money: 100
},
methods: {
fn(price) {
this.money -= price
}
}
})
</script>
</body>
</html>
|
v-bind
作用:动态地设置html的标签属性
语法:v-bind:属性名 = “表达式”
简写形式 :属性名 = “表达式”
1
2
3
4
5
6
7
8
9
10
11
12
13
14
15
16
17
18
19
20
21
22
23
24
25
26
27
| <!DOCTYPE html>
<html lang="en">
<head>
<meta charset="UTF-8">
<meta http-equiv="X-UA-Compatible" content="IE=edge">
<meta name="viewport" content="width=device-width, initial-scale=1.0">
<title>Document</title>
</head>
<body>
<div id="app">
<img v-bind:src="picture" v-bind:alt="msg">
<img :src="picture" :alt="msg">
</div>
<script src="https://cdn.jsdelivr.net/npm/vue@2/dist/vue.js"></script>
<script>
const app = new Vue({
el: '#app',
data: {
picture: './imgs/10-01.png',
msg: 'hello 波仔'
}
})
</script>
</body>
</html>
|
v-for
作用:基于数据循环,多次渲染整个元素
1
| <p v-for="...">我是一个内容</p>
|
遍历数组语法:v-for = “(item, index) in 数组名”
- item 每一项,index 下标
- 省略 index:v-for = “item in 数组名”
1
2
3
4
5
6
7
8
9
10
11
12
13
14
15
16
17
18
19
20
21
22
23
24
25
26
27
28
29
30
31
32
33
34
35
36
37
38
39
40
41
42
43
44
| <!DOCTYPE html>
<html lang="en">
<head>
<meta charset="UTF-8">
<meta http-equiv="X-UA-Compatible" content="IE=edge">
<meta name="viewport" content="width=device-width, initial-scale=1.0">
<title>Document</title>
</head>
<body>
<div id="app">
<h3>小黑的书架</h3>
<ul>
<li v-for="(item, index) in booksList" :key="item.id">
<span>{{ item.name }}</span>
<span>{{ item.author }}</span>
<button @click="del(item.id)">删除</button>
</li>
</ul>
</div>
<script src="https://cdn.jsdelivr.net/npm/vue@2/dist/vue.js"></script>
<script>
const app = new Vue({
el: '#app',
data: {
booksList: [
{ id: 1, name: '《红楼梦》', author: '曹雪芹' },
{ id: 2, name: '《西游记》', author: '吴承恩' },
{ id: 3, name: '《水浒传》', author: '施耐庵' },
{ id: 4, name: '《三国演义》', author: '罗贯中' }
]
},
methods: {
del (id) {
this.booksList = this.booksList.filter(item => item.id !== id)
}
}
})
</script>
</body>
</html>
|
v-for 中的 key
key作用:给元素添加唯一标识,便于Vue进行列表项的正确排序复用
例如:上述代码中有四个li,如果在第一个li中添加背景颜色为pink的样式,在不加key属性的条件下,删除第一个元素,第一个li的样式保留,只是更替了内容,最后一个li为空。加了key属性的条件下,会真正删除第一个li
注意点:
- key 的值只能是 字符串 或 数字类型
- key 的值必须具有 唯一性
- 推荐使用 id 作为 key(唯一),不推荐使用 index 作为 key(会变化,不对应)
1
| <li v-for="(item, index) in xxx" :key="唯一值"></li>
|
v-model
作用:给表单元素使用,双向数据绑定,以快速获取或设置表单元素内容
- 数据变化时,视图自动更新
- 视图变化时,数据自动更新
语法:v-model = ‘变量’
1
2
3
4
5
6
7
8
9
10
11
12
13
14
15
16
17
18
19
20
21
22
23
24
25
26
27
28
29
30
31
32
33
34
35
36
37
| <!DOCTYPE html>
<html lang="en">
<head>
<meta charset="UTF-8">
<meta http-equiv="X-UA-Compatible" content="IE=edge">
<meta name="viewport" content="width=device-width, initial-scale=1.0">
<title>Document</title>
</head>
<body>
<div id="app">
账户:<input type="text" v-model="username"> <br><br>
密码:<input type="password" v-model="password"> <br><br>
<button @click="login()">登录</button>
<button @click="reset()">重置</button>
</div>
<script src="./vue.js"></script>
<script>
const app = new Vue({
el: '#app',
data: {
username: '',
password: ''
},
methods: {
login () {
console.log(this.username, this.password)
},
reset () {
this.username = ''
this.password = ''
}
}
})
</script>
</body>
</html>
|
指令修饰符
通过 “.” 指明一些指令后缀,不同后缀封装了不同的处理操作,以简化代码
- 按键修饰符
1
2
3
4
5
6
7
8
9
10
11
12
13
14
15
16
17
18
19
20
21
22
23
24
25
26
27
28
29
30
31
32
33
34
35
36
37
| <!DOCTYPE html>
<html lang="en">
<head>
<meta charset="UTF-8">
<meta http-equiv="X-UA-Compatible" content="IE=edge">
<meta name="viewport" content="width=device-width, initial-scale=1.0">
<title>Document</title>
</head>
<body>
<div id="app">
<h3>@keyup.enter → 监听键盘回车事件</h3>
<input v-model="username1" type="text" @keyup="fn1">
<input v-model="username2" type="text" @keyup.enter="fn2">
</div>
<script src="https://cdn.jsdelivr.net/npm/vue@2/dist/vue.js"></script>
<script>
const app = new Vue({
el: '#app',
data: {
username1: '',
username2: ''
},
methods: {
fn1 (e) {
if (e.key === 'Enter') {
console.log('键盘回车被按下,打印username:', this.username1)
}
},
fn2 () {
console.log('键盘回车被按下,打印username:', this.username2)
}
}
})
</script>
</body>
</html>
|
- v-model 修饰符
- v-model.trim:去除首尾空格
- v-model.number:转成数字类型
- 事件修饰符
- @事件名.stop:阻止冒泡
- @事件名.prevent:阻止默认行为
1
2
3
4
5
6
7
8
9
10
11
12
13
14
15
16
17
18
19
20
21
22
23
24
25
26
27
28
29
30
31
32
33
34
35
36
37
38
39
40
41
42
43
44
45
46
47
48
49
50
51
52
53
54
55
56
57
| <!DOCTYPE html>
<html lang="en">
<head>
<meta charset="UTF-8">
<meta http-equiv="X-UA-Compatible" content="IE=edge">
<meta name="viewport" content="width=device-width, initial-scale=1.0">
<title>Document</title>
<style>
.father {
width: 200px;
height: 200px;
background-color: pink;
margin-top: 20px;
}
.son {
width: 100px;
height: 100px;
background-color: skyblue;
}
</style>
</head>
<body>
<div id="app">
<h3>v-model修饰符 .trim .number</h3>
姓名:<input v-model.trim="username" type="text"><br>
年纪:<input v-model.number="age" type="text"><br>
<h3>@事件名.stop → 阻止冒泡</h3>
<div @click="fatherFn" class="father">
<div @click.stop="sonFn" class="son">儿子</div>
</div>
<h3>@事件名.prevent → 阻止默认行为</h3>
<a @click.prevent="" href="http://www.baidu.com">阻止默认行为</a>
</div>
<script src="https://cdn.jsdelivr.net/npm/vue@2/dist/vue.js"></script>
<script>
const app = new Vue({
el: '#app',
data: {
username: '',
age: '',
},
methods: {
fatherFn () {
alert('老父亲被点击了')
},
sonFn () {
alert('儿子被点击了')
}
}
})
</script>
</body>
</html>
|
v-bind 对于样式控制的增强 - 操作class
语法::class=”对象/数组”
- 对象:键就是类名,值是布尔值。如果值为true,有这个类,否则没有这个类
1
| <div class="box" :class="{ 类名1: 布尔值, 类名2: 布尔值}"></div>
|
适用场景:一个类名,来回切换
- 数组:数组中素有的类,都会添加到盒子上,本质就是一个class列表
1
| <div class="box" :class="[ 类名1, 类名2, 类名3] "></div>
|
适用场景:批量添加或删除类
1
2
3
4
5
6
7
8
9
10
11
12
13
14
15
16
17
18
19
20
21
22
23
24
25
26
27
28
29
30
31
32
33
34
35
36
37
38
39
40
41
42
| <!DOCTYPE html>
<html lang="en">
<head>
<meta charset="UTF-8">
<meta http-equiv="X-UA-Compatible" content="IE=edge">
<meta name="viewport" content="width=device-width, initial-scale=1.0">
<title>Document</title>
<style>
.box {
width: 200px;
height: 200px;
border: 3px solid #000;
font-size: 30px;
margin-top: 10px;
}
.pink {
background-color: pink;
}
.big {
width: 300px;
height: 300px;
}
</style>
</head>
<body>
<div id="app">
<div class="box" :class="{ pink: true, big: false}">黑马程序员</div>
<div class="box" :class="['pink', 'big']">黑马程序员</div>
</div>
<script src="https://cdn.jsdelivr.net/npm/vue@2/dist/vue.js"></script>
<script>
const app = new Vue({
el: '#app',
data: {
}
})
</script>
</body>
</html>
|
1
2
3
4
5
6
7
8
9
10
11
12
13
14
15
16
17
18
19
20
21
22
23
24
25
26
27
28
29
30
31
32
33
34
35
36
37
38
39
40
41
42
43
44
45
46
47
48
49
50
51
52
53
54
55
56
57
58
59
60
61
62
63
64
| <!DOCTYPE html>
<html lang="en">
<head>
<meta charset="UTF-8">
<meta http-equiv="X-UA-Compatible" content="IE=edge">
<meta name="viewport" content="width=device-width, initial-scale=1.0">
<title>Document</title>
<style>
* {
margin: 0;
padding: 0;
}
ul {
display: flex;
border-bottom: 2px solid #e01222;
padding: 0 10px;
}
li {
width: 100px;
height: 50px;
line-height: 50px;
list-style: none;
text-align: center;
}
li a {
display: block;
text-decoration: none;
font-weight: bold;
color: #333333;
}
li a.active {
background-color: #e01222;
color: #fff;
}
</style>
</head>
<body>
<div id="app">
<ul>
<li v-for="(item, index) in list" :key="item.id" @click="activeIndex = index">
<a :class="{active: activeIndex === index}" href="#">{{ item.name }}</a>
</li>
</ul>
</div>
<script src="https://cdn.jsdelivr.net/npm/vue@2/dist/vue.js"></script>
<script>
const app = new Vue({
el: '#app',
data: {
activeIndex: 0,
list: [
{ id: 1, name: '京东秒杀' },
{ id: 2, name: '每日特价' },
{ id: 3, name: '品类秒杀' }
]
}
})
</script>
</body>
</html>
|
v-bind 对于样式控制的增强 - 操作style
语法::style=”样式对象”
1
| <div class="box" :style="{ css属性名1: css属性值, css属性名2: css属性值}"></div>
|
适用场景:某个具体属性的动态设置
1
2
3
4
5
6
7
8
9
10
11
12
13
14
15
16
17
18
19
20
21
22
23
24
25
26
27
28
29
30
31
32
33
34
35
36
37
38
39
40
41
42
43
44
45
46
47
48
49
50
51
52
53
54
55
56
57
58
59
60
61
62
63
64
65
66
67
68
69
70
71
72
73
| <!DOCTYPE html>
<html lang="en">
<head>
<meta charset="UTF-8">
<meta http-equiv="X-UA-Compatible" content="IE=edge">
<meta name="viewport" content="width=device-width, initial-scale=1.0">
<title>Document</title>
<style>
.progress {
height: 25px;
width: 400px;
border-radius: 15px;
background-color: #272425;
border: 3px solid #272425;
box-sizing: border-box;
margin-bottom: 30px;
}
.inner {
width: 50%;
height: 20px;
border-radius: 10px;
text-align: right;
position: relative;
background-color: #409eff;
background-size: 20px 20px;
box-sizing: border-box;
transition: all 1s;
}
.inner span {
position: absolute;
right: -20px;
bottom: -25px;
}
</style>
</head>
<body>
<div id="app">
<div class="progress">
<div class="inner" :style="{ width: length + '%' }">
<span>{{ length }}%</span>
</div>
</div>
<button @click="fn1">设置25%</button>
<button @click="fn2">设置50%</button>
<button @click="fn3">设置75%</button>
<button @click="fn4">设置100%</button>
</div>
<script src="https://cdn.jsdelivr.net/npm/vue@2/dist/vue.js"></script>
<script>
const app = new Vue({
el: '#app',
data: {
length: 0
},
methods: {
fn1 () {
this.length = 25
},
fn2 () {
this.length = 50
},
fn3 () {
this.length = 75
},
fn4 () {
this.length = 100
}
}
})
</script>
</body>
</html>
|
v-model 应用于其他表单元素
常见的表单元素都可以用 v-model 绑定关联,以快速获取或设置表单元素的值
1
2
3
4
5
6
7
8
9
10
11
12
13
14
15
16
17
18
19
20
21
22
23
24
25
26
27
28
29
30
31
32
33
34
35
36
37
38
39
40
41
42
43
44
45
46
47
48
49
50
51
52
53
54
55
56
57
58
59
60
61
62
63
64
65
66
67
68
69
70
71
72
73
74
75
76
| <!DOCTYPE html>
<html lang="en">
<head>
<meta charset="UTF-8">
<meta http-equiv="X-UA-Compatible" content="IE=edge">
<meta name="viewport" content="width=device-width, initial-scale=1.0">
<title>Document</title>
<style>
textarea {
display: block;
width: 240px;
height: 100px;
margin: 10px 0;
}
</style>
</head>
<body>
<div id="app">
<h3>小黑学习网</h3>
姓名:
<input type="text" v-model="username">
<br><br>
是否单身:
<input type="checkbox" v-model="isSingle">
<br><br>
性别:
<input v-model="gender" type="radio" name="gender" value="1">男
<input v-model="gender" type="radio" name="gender" value="2">女
<br><br>
所在城市:
<select v-model="cityId">
<option value="101">北京</option>
<option value="102">上海</option>
<option value="103">成都</option>
<option value="104">南京</option>
</select>
<br><br>
自我描述:
<textarea v-model="desc"></textarea>
<button>立即注册</button>
</div>
<script src="https://cdn.jsdelivr.net/npm/vue@2/dist/vue.js"></script>
<script>
const app = new Vue({
el: '#app',
data: {
username: '',
isSingle: true,
gender: '1',
cityId: '102',
desc: ''
}
})
</script>
</body>
</html>
|
computed 计算属性
计算属性
概念:基于现有数据,计算出来的新属性。依赖数据变化,自动重新计算
语法:
- 声明在computed配置项中,一个计算属性对应一个函数
- 适用起来和普通属性一样使用 {{ 计算属性名 }}
1
2
3
4
5
6
7
8
9
10
11
12
13
14
15
16
17
18
19
20
21
22
23
24
25
26
27
28
29
30
31
32
33
34
35
36
37
38
39
40
41
42
43
44
45
46
47
48
49
50
51
52
53
54
55
56
57
58
59
60
61
62
| <!DOCTYPE html>
<html lang="en">
<head>
<meta charset="UTF-8">
<meta http-equiv="X-UA-Compatible" content="IE=edge">
<meta name="viewport" content="width=device-width, initial-scale=1.0">
<title>Document</title>
<style>
table {
border: 1px solid #000;
text-align: center;
width: 240px;
}
th,td {
border: 1px solid #000;
}
h3 {
position: relative;
}
</style>
</head>
<body>
<div id="app">
<h3>小黑的礼物清单</h3>
<table>
<tr>
<th>名字</th>
<th>数量</th>
</tr>
<tr v-for="(item, index) in list" :key="item.id">
<td>{{ item.name }}</td>
<td>{{ item.num }}个</td>
</tr>
</table>
<p>礼物总数:{{ count }} 个</p>
</div>
<script src="https://cdn.jsdelivr.net/npm/vue@2/dist/vue.js"></script>
<script>
const app = new Vue({
el: '#app',
data: {
list: [
{ id: 1, name: '篮球', num: 1 },
{ id: 2, name: '玩具', num: 2 },
{ id: 3, name: '铅笔', num: 5 },
]
},
computed: {
count () {
let total = this.list.reduce((sum, item) => sum + item.num, 0)
return total
}
}
})
</script>
</body>
</html>
|
计算属性 和 方法的区别
- computed 计算属性
作用:封装了一段对于数据的处理求得一个结果
语法:
- 写在 computed 配置项中
- 作为属性,直接使用,即 this.计算属性 或者 {{ 计算属性 }}
缓存特性(提升性能):计算属性会对计算出来的结果缓存,再次使用直接读取缓存,依赖项变化了,会自动重新计算并再出缓存
- methods 方法
作用:给实例提供一个方法,调用以处理业务逻辑
语法:
- 写在 methods 配置项中
- 作为方法,需要调用,即 this.方法名() 或 {{ 方法名() }} 或 @事件名=””方法名
计算属性完整写法
计算属性默认的简写,只能读取访问,不能修改,若要修改,需写计算属性的完整写法
1
2
3
4
5
6
7
8
9
10
11
| computed: {
计算属性名: {
get () {
一段代码逻辑(计算逻辑)
return 结果
},
set (修改的值) {
一段代码逻辑(修改逻辑)
}
}
}
|
1
2
3
4
5
6
7
8
9
10
11
12
13
14
15
16
17
18
19
20
21
22
23
24
25
26
27
28
29
30
31
32
33
34
35
36
37
38
39
40
41
42
43
44
45
| <!DOCTYPE html>
<html lang="en">
<head>
<meta charset="UTF-8">
<meta http-equiv="X-UA-Compatible" content="IE=edge">
<meta name="viewport" content="width=device-width, initial-scale=1.0">
<title>Document</title>
</head>
<body>
<div id="app">
姓:<input type="text" v-model="firstName"><br>
名:<input type="text" v-model="lastName"><br>
<p>姓名:{{ countName }}</p>
<button @click="update">修改姓名</button>
</div>
<script src="https://cdn.jsdelivr.net/npm/vue@2/dist/vue.js"></script>
<script>
const app = new Vue({
el: '#app',
data: {
firstName: '刘',
lastName: '备'
},
computed: {
countName: {
get () {
return this.firstName + this.lastName
},
set (value) {
this.firstName = value.slice(0, 1)
this.lastName = value.slice(1)
}
}
},
methods: {
update () {
this.countName = '张飞'
}
}
})
</script>
</body>
</html>
|
watch 侦听器
watch 侦听器 - 简写
作用:监视数据变化,执行一些 业务逻辑 或 异步操作
1
2
3
4
5
6
7
8
9
10
11
12
13
14
15
| data: {
words: '苹果',
obj: {
words: '苹果'
}
},
watch: {
数据属性名 (newValue, oldValue) {
一些业务逻辑 或 异步操作
},
'对象名.属性名' (newValue, oldValue) {
一些业务逻辑 或 异步操作
}
}
|
1
2
3
4
5
6
7
8
9
10
11
12
13
14
15
16
17
18
19
20
21
22
23
24
25
26
27
28
29
30
31
32
33
34
35
36
37
38
39
40
41
42
43
44
45
46
47
48
49
50
51
52
53
54
55
56
57
58
59
60
61
62
63
64
65
66
67
68
69
70
71
72
73
74
75
76
77
78
79
80
81
82
83
84
85
86
87
88
89
90
91
92
93
94
95
96
97
98
99
100
101
102
103
104
105
106
107
108
109
110
111
112
113
114
115
116
117
118
119
120
121
122
123
124
125
126
127
128
129
130
131
132
133
134
135
136
137
| <!DOCTYPE html>
<html lang="en">
<head>
<meta charset="UTF-8" />
<meta http-equiv="X-UA-Compatible" content="IE=edge" />
<meta name="viewport" content="width=device-width, initial-scale=1.0" />
<title>Document</title>
<style>
* {
margin: 0;
padding: 0;
box-sizing: border-box;
font-size: 18px;
}
#app {
padding: 10px 20px;
}
.query {
margin: 10px 0;
}
.box {
display: flex;
}
textarea {
width: 300px;
height: 160px;
font-size: 18px;
border: 1px solid #dedede;
outline: none;
resize: none;
padding: 10px;
}
textarea:hover {
border: 1px solid #1589f5;
}
.transbox {
width: 300px;
height: 160px;
background-color: #f0f0f0;
padding: 10px;
border: none;
}
.tip-box {
width: 300px;
height: 25px;
line-height: 25px;
display: flex;
}
.tip-box span {
flex: 1;
text-align: center;
}
.query span {
font-size: 18px;
}
.input-wrap {
position: relative;
}
.input-wrap span {
position: absolute;
right: 15px;
bottom: 15px;
font-size: 12px;
}
.input-wrap i {
font-size: 20px;
font-style: normal;
}
</style>
</head>
<body>
<div id="app">
<div class="query">
<span>翻译成的语言:</span>
<select>
<option value="italy">意大利</option>
<option value="english">英语</option>
<option value="german">德语</option>
</select>
</div>
<div class="box">
<div class="input-wrap">
<textarea v-model="obj.words"></textarea>
<span><i>⌨️</i>文档翻译</span>
</div>
<div class="output-wrap">
<div class="transbox">{{ result }}</div>
</div>
</div>
</div>
<script src="https://cdn.jsdelivr.net/npm/vue@2/dist/vue.js"></script>
<script src="https://cdn.jsdelivr.net/npm/axios/dist/axios.min.js"></script>
<script>
const app = new Vue({
el: '#app',
data: {
obj: {
words: ''
},
result: ''
},
watch: {
'obj.words' (newValue) {
clearTimeout(this.timer)
this.timer = setTimeout(async () => {
const result = await axios({
url: 'https://applet-base-api-t.itheima.net/api/translate',
params: {
words: newValue
}
})
this.result = result.data.data
}, 300)
}
}
})
</script>
</body>
</html>
|
watch 侦听器 - 完整写法
1
2
3
4
5
6
7
8
9
10
11
12
13
14
15
| data: {
obj: {
words: '苹果',
lang: 'italy'
}
},
watch: {
数据属性名: {
deep: true,
immediate: true,
handler (newValue, oldValue) {
console.log(newValue)
}
}
}
|
1
2
3
4
5
6
7
8
9
10
11
12
13
14
15
16
17
18
19
20
21
22
23
24
25
26
27
28
29
30
31
32
33
34
35
36
37
38
39
40
41
42
43
44
45
46
47
48
49
50
51
52
53
54
55
56
57
58
59
60
61
62
63
64
65
66
67
68
69
70
71
72
73
74
75
76
77
78
79
80
81
82
83
84
85
86
87
88
89
90
91
92
93
94
95
96
97
98
99
100
101
102
103
104
105
106
107
108
109
110
111
112
113
114
115
116
117
118
119
120
121
122
123
124
125
126
127
128
129
130
131
132
133
134
135
136
137
138
139
140
141
142
143
144
145
146
147
148
149
150
151
152
153
154
| <!DOCTYPE html>
<html lang="en">
<head>
<meta charset="UTF-8" />
<meta http-equiv="X-UA-Compatible" content="IE=edge" />
<meta name="viewport" content="width=device-width, initial-scale=1.0" />
<title>Document</title>
<style>
* {
margin: 0;
padding: 0;
box-sizing: border-box;
font-size: 18px;
}
#app {
padding: 10px 20px;
}
.query {
margin: 10px 0;
}
.box {
display: flex;
}
textarea {
width: 300px;
height: 160px;
font-size: 18px;
border: 1px solid #dedede;
outline: none;
resize: none;
padding: 10px;
}
textarea:hover {
border: 1px solid #1589f5;
}
.transbox {
width: 300px;
height: 160px;
background-color: #f0f0f0;
padding: 10px;
border: none;
}
.tip-box {
width: 300px;
height: 25px;
line-height: 25px;
display: flex;
}
.tip-box span {
flex: 1;
text-align: center;
}
.query span {
font-size: 18px;
}
.input-wrap {
position: relative;
}
.input-wrap span {
position: absolute;
right: 15px;
bottom: 15px;
font-size: 12px;
}
.input-wrap i {
font-size: 20px;
font-style: normal;
}
</style>
</head>
<body>
<div id="app">
<div class="query">
<span>翻译成的语言:</span>
<select v-model="obj.lang">
<option value="italy">意大利</option>
<option value="english">英语</option>
<option value="german">德语</option>
</select>
</div>
<div class="box">
<div class="input-wrap">
<textarea v-model="obj.words"></textarea>
<span><i>⌨️</i>文档翻译</span>
</div>
<div class="output-wrap">
<div class="transbox">{{ result }}</div>
</div>
</div>
</div>
<script src="https://cdn.jsdelivr.net/npm/vue@2/dist/vue.js"></script>
<script src="https://cdn.jsdelivr.net/npm/axios/dist/axios.min.js"></script>
<script>
const app = new Vue({
el: '#app',
data: {
obj: {
words: '小黑',
lang: 'italy'
},
result: ''
},
watch: {
obj: {
deep: true,
immediate: true,
handler (newValue) {
clearTimeout(this.timer)
this.timer = setTimeout(async () => {
const result = await axios({
url: 'https://applet-base-api-t.itheima.net/api/translate',
params: {
words: newValue
}
})
this.result = result.data.data
}, 300)
}
}
}
})
</script>
</body>
</html>
|
生命周期
四个阶段
声明周期四个阶段
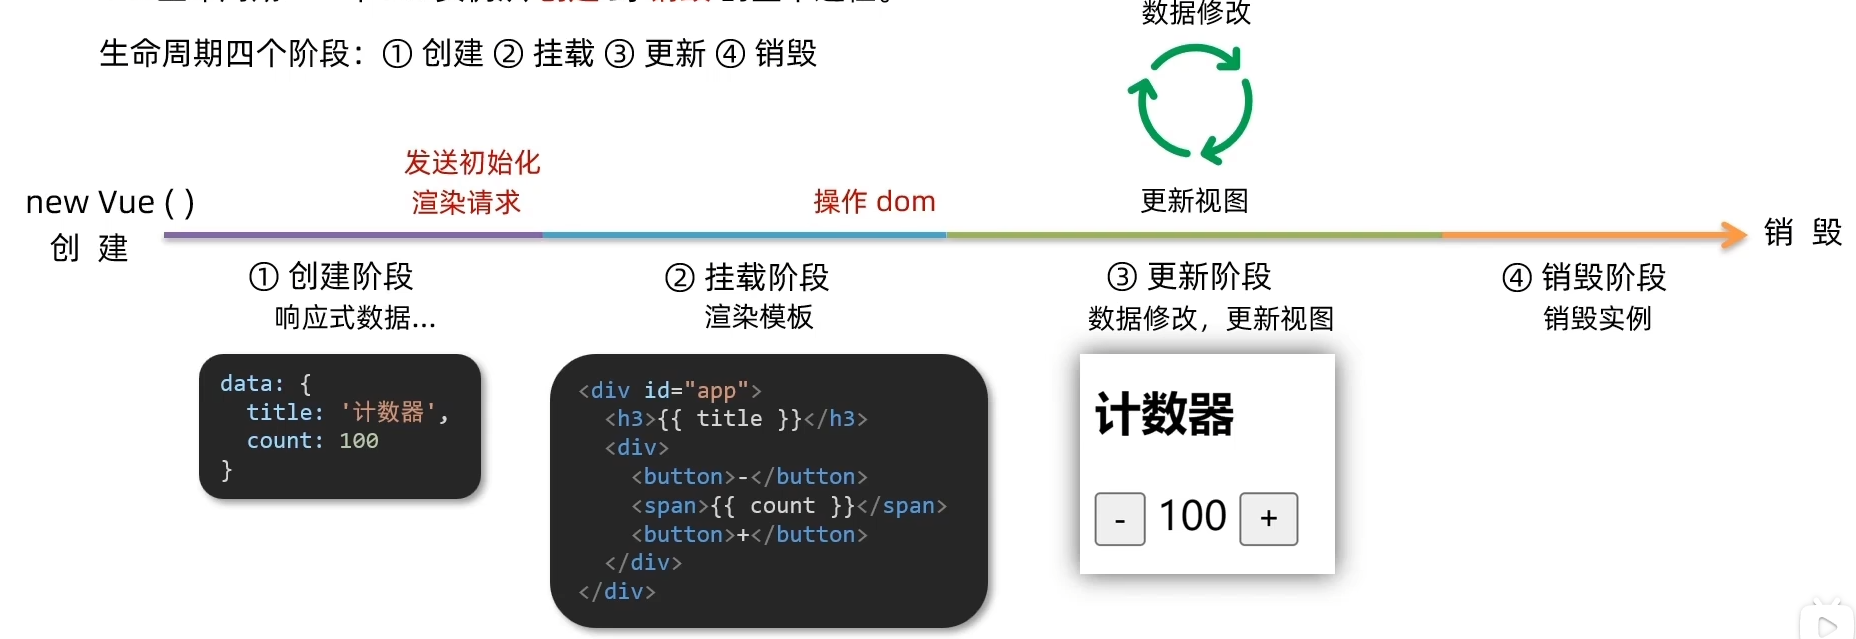
生命周期钩子
Vue生命周期过程中,会自动运行一些函数,被称为【生命周期钩子】→ 让开发者可以在【特定阶段】运行自己的代码。
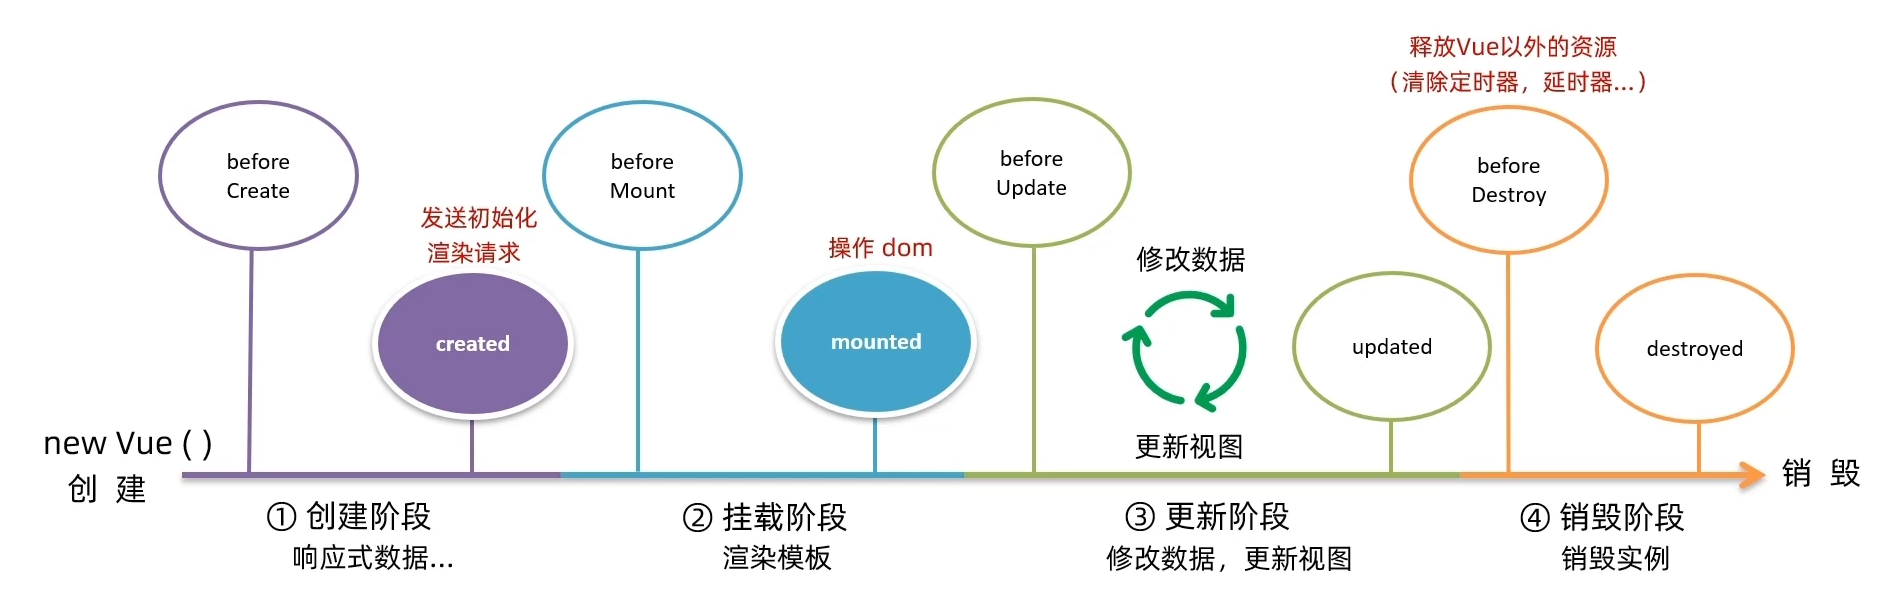
1
2
3
4
5
6
7
8
9
10
11
12
13
14
15
16
17
18
19
20
21
22
23
24
25
26
27
28
29
30
31
32
33
34
35
36
37
38
39
40
41
42
43
44
45
46
47
48
49
50
51
52
53
54
55
56
57
58
| <!DOCTYPE html>
<html lang="en">
<head>
<meta charset="UTF-8">
<meta http-equiv="X-UA-Compatible" content="IE=edge">
<meta name="viewport" content="width=device-width, initial-scale=1.0">
<title>Document</title>
</head>
<body>
<div id="app">
<h3>{{ title }}</h3>
<div>
<button @click="count--">-</button>
<span>{{ count }}</span>
<button @click="count++">+</button>
</div>
</div>
<script src="./vue.js"></script>
<script>
const app = new Vue({
el: '#app',
data: {
count: 100,
title: '计数器'
},
beforeCreate () {
console.log('响应式数据创建之前', this.count)
},
created () {
console.log('响应式数据创建之后', this.count)
},
beforeMount () {
console.log('数据挂载之前', document.querySelector('h3').innerHTML)
},
mounted () {
console.log('数据挂载之后', document.querySelector('h3').innerHTML)
},
beforeUpdate () {
console.log('数据更新完成,但是视图还未渲染', document.querySelector('span').innerHTML)
},
updated () {
console.log('数据更新完成,视图已经渲染', document.querySelector('span').innerHTML)
},
beforeDestroy () {
console.log('vue卸载之前')
},
destroyed () {
console.log('vue卸载之后')
}
})
</script>
</body>
</html>
|
工程化开发
Vue CLI
Vue CLI 是 Vue 官方提供的一个全局命令工具,可以快速创建一个开发 Vue 项目的标准化基础架子(集成了 webpack 配置)
使用步骤:
- 全局安装(一次)
1
2
3
| yarn global add @Vue/cli
或
npm i @vue/cli -g
|
- 查看 Vue 版本
- 创建项目架子
1
| vue create project-name (项目名不能用中文)
|
- 启动项目
1
2
3
| yarn serve
或
npm run serve (找package.json)
|
脚手架目录文件介绍
目录文件简介:
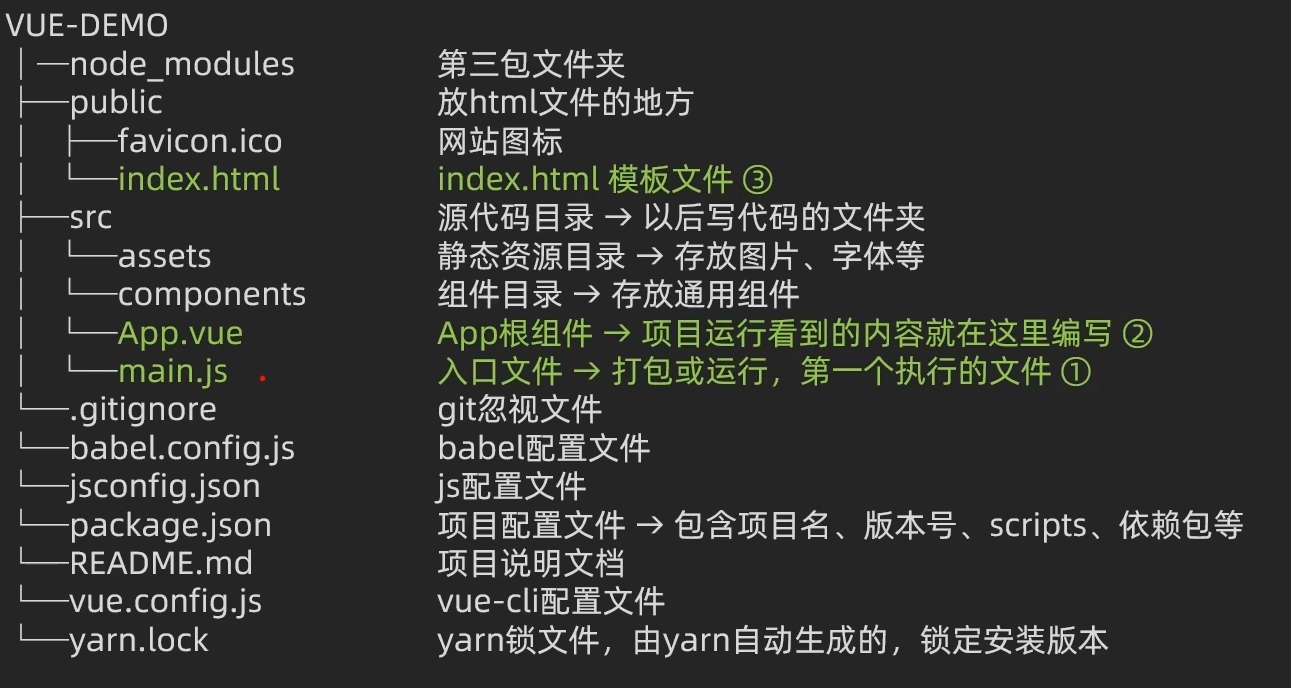
1
2
3
4
5
6
7
8
9
10
11
12
13
14
15
16
17
18
19
20
21
22
23
| <!DOCTYPE html>
<html lang="">
<head>
<meta charset="utf-8">
<meta http-equiv="X-UA-Compatible" content="IE=edge">
<meta name="viewport" content="width=device-width,initial-scale=1.0">
<link rel="icon" href="<%= BASE_URL %>favicon.ico">
<title><%= htmlWebpackPlugin.options.title %></title>
</head>
<body>
<noscript>
<strong>We're sorry but <%= htmlWebpackPlugin.options.title %> doesn't work properly without JavaScript enabled. Please enable it to continue.</strong>
</noscript>
<div id="app">
</div>
</body>
</html>
|
1
2
3
4
5
6
7
8
9
10
11
12
13
14
15
16
17
18
19
20
|
import Vue from 'vue'
import App from './App.vue'
Vue.config.productionTip = false
new Vue({
render: (createElement) => {
return createElement(App)
}
}).$mount('#app')
|
组件化
定义:一个页面可以拆分成一个个组件,每个组件有着自己独立的结构、样式、行为。
好处:便于维护,利于复用,提升开发效率
组件分类:根组件和普通组件
根组件:App.vue 根组件就是整个应用最上层的组件,包裹所有普通组件
- template 结构(只能有一个根节点)
- style 样式(可以支持less,需要装包 less 和 less-loader)
- script 行为
1
2
3
4
5
6
7
8
9
10
11
12
13
14
15
16
17
18
19
20
21
22
23
24
25
26
27
28
29
30
31
32
33
34
35
| <template>
<div class="app">
<div class="box" @click="fn">
</div>
</div>
</template>
<script>
// 导出当前组件的配置项
// 支持data(特殊)、methods、computed、生命周期八大钩子
export default {
methods: {
fn () {
alert('你好')
}
}
}
</script>
<style lang="less">
/* 让style支持less格式的步骤
1.添加lang="less"
2.安装less依赖包 yarn add less less-loader -D(只在开发环境使用) */
.app {
width: 400px;
height: 400px;
background-color: pink;
.box {
width: 100px;
height: 100px;
background-color: skyblue;
}
}
</style>
|
普通组件的注册使用
组件注册的两种方式:
- 局部注册:只能在注册的组件内使用
- 创建.vue文件(三个组成部分)
- 在使用的组件内导入并注册
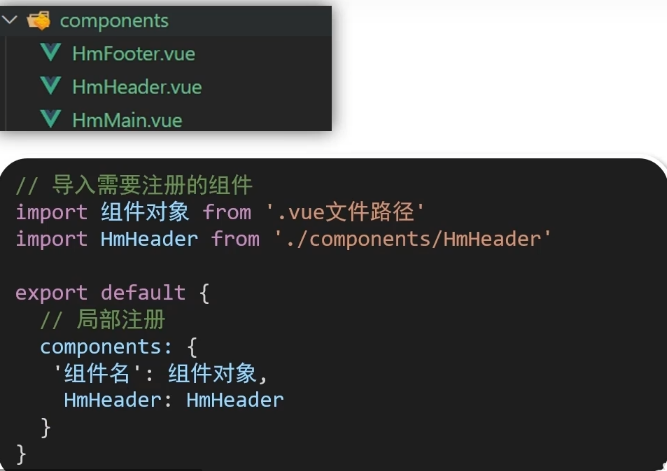
- 全局注册:所有组件内都能使用
- 创建. vue 文件(三个组成部分)
- main.js 中进行全局注册
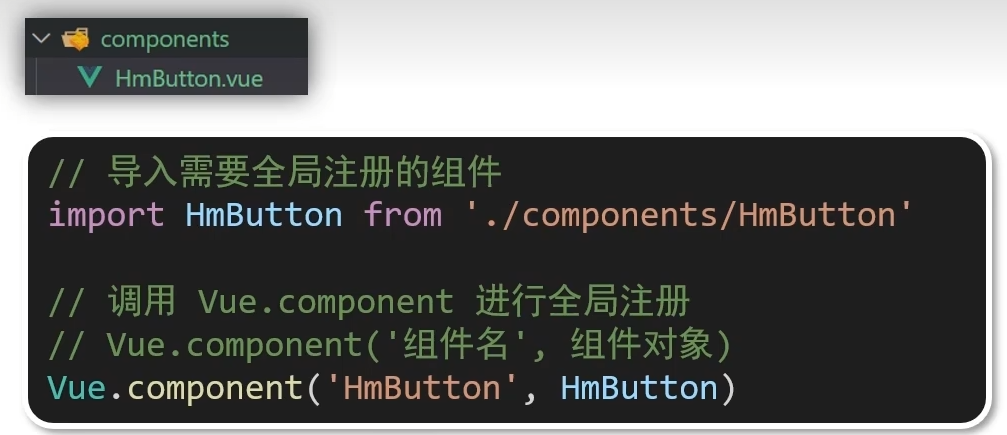
使用:当成html标签使用即可,例如:<组件名></组件名>
注意:组件名建议使用大驼峰命名法,如:HmHeader
技巧:一般都使用局部注册,如果发现确实是通用组件,再抽离到全局
组件的三大组成部分
- 结构
<template>
只能有一个根元素(vue2特有)
- 样式
<style>
- 全局样式(默认):影响所有组件
- 局部样式:scoped 下样式,只作用于当前组件
- 逻辑
<script>
el 根实例独有,<font style="color:#DF2A3F;">data 是一个函数</font>,其他配置项一致
组件的样式冲突 scoped
默认情况:写在组件中的样式会 全局生效
- 全局样式(默认):影响所有组件
- 局部样式:scoped 下样式,只作用于当前组件
原理:
- 当前组件内标签都被添加 data-v-hash值 的属性
2.css选择器都被添加 [data-v-hash值] 的属性选择器
最终效果:必须是当前组件的元素,才会有这个自定义属性,才会被这个样式作用到
data 是一个函数
一个组件的 data 选项必须是一个函数,以保证每个组件实例,维护独立的一份数据对象
每次创建新的组件实例,都会新执行一次 data 函数,得到一个新对象
1
2
3
4
5
| data () {
return {
属性名: 属性值
}
}
|
组件通信
父子通信
- 父组件通过 props 将数据传递给子组件
1
2
3
4
5
6
7
8
9
10
11
12
13
14
15
16
17
18
19
20
21
22
23
24
25
| <template>
<div class="app" style="border: 3px solid #000; margin: 10px">
我是APP组件
<!-- 1.给组件标签,添加属性方式 赋值 -->
<Son :title="myTitle"></Son>
</div>
</template>
<script>
import Son from "./components/Son.vue"
export default {
name: "App",
components: {
Son,
},
data() {
return {
myTitle: "学前端,就来黑马程序员",
}
},
}
</script>
<style>
</style>
|
1
2
3
4
5
6
7
8
9
10
11
12
13
14
15
16
17
18
| <template>
<div class="son" style="border:3px solid #000;margin:10px">
<!-- 3.直接使用props的值 -->
我是Son组件 {{ title }}
</div>
</template>
<script>
export default {
name: 'Son-Child',
// 2.通过props来接受,并且属性值要和html中的属性名一致
props: ['title']
}
</script>
<style>
</style>
|
- 子组件利用 $emit 通知父组件修改更新
1
2
3
4
5
6
7
8
9
10
11
12
13
14
15
16
17
18
19
20
21
22
23
24
25
26
27
28
29
30
31
| <template>
<div class="app" style="border: 3px solid #000; margin: 10px">
我是APP组件
<!-- 2.父组件,对消息进行监听 -->
<Son :title="myTitle" @changeTitle="handleChange"></Son>
</div>
</template>
<script>
import Son from "./components/Son.vue"
export default {
name: "App",
components: {
Son,
},
data() {
return {
myTitle: "学前端,就来黑马程序员",
}
},
methods: {
// 3.提供处理函数,提供逻辑
handleChange (newTitle) {
this.myTitle = newTitle
}
}
}
</script>
<style>
</style>
|
1
2
3
4
5
6
7
8
9
10
11
12
13
14
15
16
17
18
19
20
21
22
23
24
| <template>
<div class="son" style="border:3px solid #000;margin:10px">
我是Son组件 {{ title }}
<button @click="changeFn">修改title</button>
</div>
</template>
<script>
export default {
name: 'Son-Child',
props: ['title'],
methods: {
changeFn () {
// 1.通过$emit,向父组件发送消息通知
// this.$emit(父组件中的子组件html中的事件名, 修改后的值)
this.$emit('changeTitle', '传智教育')
}
}
}
</script>
<style>
</style>
|
Prop 定义
定义:组件上 注册的一些自定义属性
作用:向子组件传递数据
特点:
- 可以传递任意数量的prop
- 可以传递任意类型的prop
Prop 校验
作用:为组件的 prop 指定验证要求,不符合要求,控制台会有错误提示,以帮助开发者快速发现错误
语法:
- 类型校验
1
2
3
4
5
6
7
8
9
10
11
12
13
14
15
16
17
18
19
20
21
22
23
24
25
26
27
28
29
30
31
32
33
34
35
36
37
38
39
40
41
42
43
44
45
| <template>
<div class="base-progress">
<div class="inner" :style="{ width: w + '%' }">
<span>{{ w }}%</span>
</div>
</div>
</template>
<script>
export default {
// props: ["w"]
// 1.基础写法(类型校验)
props: {
w: Number
}
// 2.完整写法(类型、是否必填、默认值、自定义校验)
}
</script>
<style scoped>
.base-progress {
height: 26px;
width: 400px;
border-radius: 15px;
background-color: #272425;
border: 3px solid #272425;
box-sizing: border-box;
margin-bottom: 30px;
}
.inner {
position: relative;
background: #379bff;
border-radius: 15px;
height: 25px;
box-sizing: border-box;
left: -3px;
top: -2px;
}
.inner span {
position: absolute;
right: 0;
top: 26px;
}
</style>
|
1
2
3
4
5
6
7
8
9
10
11
12
13
14
15
16
17
18
19
20
21
22
| <template>
<div class="app">
<BaseProgress :w="width"></BaseProgress>
</div>
</template>
<script>
import BaseProgress from './components/BaseProgress.vue'
export default {
data() {
return {
width: 50,
}
},
components: {
BaseProgress,
},
}
</script>
<style>
</style>
|
- 非空校验
- 默认值
- 自定义校验
1
2
3
4
5
6
7
8
9
10
11
12
13
14
15
16
17
18
19
20
21
22
23
24
25
26
27
28
29
30
31
32
33
34
35
36
37
38
39
40
41
42
43
44
45
46
47
48
49
50
51
52
53
54
55
56
57
58
59
| <template>
<div class="base-progress">
<div class="inner" :style="{ width: w + '%' }">
<span>{{ w }}%</span>
</div>
</div>
</template>
<script>
export default {
// props: ["w"]
// 1.基础写法(类型校验)
// props: {
// w: Number
// }
// 2.完整写法(类型、是否必填、默认值、自定义校验)
props: {
w: {
type: Number,
// required: true,
default: 0,
validator (value) {
if (value >= 0 && value <= 100) {
return true
} else {
console.error('传入的prop w,必须是0到100之间的数字')
return false
}
}
}
}
}
</script>
<style scoped>
.base-progress {
height: 26px;
width: 400px;
border-radius: 15px;
background-color: #272425;
border: 3px solid #272425;
box-sizing: border-box;
margin-bottom: 30px;
}
.inner {
position: relative;
background: #379bff;
border-radius: 15px;
height: 25px;
box-sizing: border-box;
left: -3px;
top: -2px;
}
.inner span {
position: absolute;
right: 0;
top: 26px;
}
</style>
|
1
2
3
4
5
6
7
8
9
10
11
12
13
14
15
16
17
18
19
20
21
22
| <template>
<div class="app">
<BaseProgress :w="width"></BaseProgress>
</div>
</template>
<script>
import BaseProgress from './components/BaseProgress.vue'
export default {
data() {
return {
width: 50,
}
},
components: {
BaseProgress,
},
}
</script>
<style>
</style>
|
prop 和 data 的异同点
共同点:都可以给组件提供数据
区别:
- data的数据是本身组件的,可以随便修改
- prop 的数据是外部的,不能直接改,要遵循单向数据流
单向数据流:父级 prop 的数据更新,会向下流动,影响子组件。这个数据流动是单向的
1
2
3
4
5
6
7
8
9
10
11
12
13
14
15
16
17
18
19
20
21
22
23
24
25
26
27
28
29
30
31
32
33
34
35
36
| <template>
<div class="base-count">
<button @click="handleSub">-</button>
<span>{{ count }}</span>
<button @click="handleAdd">+</button>
</div>
</template>
<script>
export default {
// 1.自己的数据随便修改 (谁的数据 谁负责)
// data () {
// return {
// count: 100,
// }
// },
// 2.外部传过来的数据 不能随便修改
props: {
count: Number
},
methods: {
handleSub () {
this.$emit('changeCount', this.count - 1)
},
handleAdd () {
this.$emit('changeCount', this.count + 1)
}
}
}
</script>
<style>
.base-count {
margin: 20px;
}
</style>
|
1
2
3
4
5
6
7
8
9
10
11
12
13
14
15
16
17
18
19
20
21
22
23
24
25
26
27
28
29
30
31
| <template>
<div class="app">
<BaseCount
@changeCount="handleChange"
:count="myCount"
></BaseCount>
</div>
</template>
<script>
import BaseCount from './components/BaseCount.vue'
export default {
components:{
BaseCount
},
data(){
return {
myCount:100
}
},
methods:{
handleChange (newCount) {
this.myCount = newCount
}
}
}
</script>
<style>
</style>
|
非父子通信
非父子组件之间采用event bus 事件总线进行通信(简易消息传递,复杂建议使用Vuex)
步骤:
- 创建一个都能访问到的事件总线(空 Vue 实例)→ utils/EventBus.js
1
2
3
| import Vue from 'vue'
const Bus = new Vue()
export default Bus
|
- 消息接收方,监听 Bus 实例的事件
1
2
3
4
5
| created () {
Bus.$on('sendMsg', () => {
this.msg = msg
})
}
|
- 消息发送方,触发 Bus 实例的事件
1
| Bus.$emit('sendMsg', '这是一个消息')
|
跨层级的非父子通信
例如:爷爷级别的组件给孙子级别的组件传递消息
跨层级的非父子通信采用 provide & inject 进行通信
步骤:
- 父组件 provide 提供数据
1
2
3
4
5
6
7
8
9
10
11
12
13
14
15
16
17
18
19
20
| export defaut {
provide () {
return {
color: this.color,
userInfo: this.userInfo
}
},
data () {
return {
color: 'green',
userInfo: {
username: 'zs',
age: '18',
gender: '男'
}
}
}
}
|
- 子/孙足迹看 inject 取值使用
1
2
3
4
5
6
| export default {
inject: ['color', 'userInfo'],
created () {
console.log(this.color, this.userInfo)
}
}
|
进阶语法
v-model 原理
原理:v-model本质上是一个语法糖。例如应用在输入框上,就是value属性和input事件 的合写。
作用:提供数据的双向绑定
- 数据变,视图跟着变 :value
- 视图变,数据跟着变 @input
注意:$event用于在模板中,获取事件的形参
1
2
3
4
5
6
7
8
9
10
11
12
13
14
15
16
17
18
19
20
21
| <template>
<div class="app">
<input type="text" v-model="msg1"/>
<br />
<input type="text" :value="msg2" @input="msg2 = $event.target.value">
</div>
</template>
<script>
export default {
data() {
return {
msg1: '',
msg2: ''
}
},
}
</script>
<style>
</style>
|
表单类组件封装 & v-model 简化代码
表单类组件封装(实现子组件和父组件数据的双向绑定)
- 父传子:数据是父组件通过 props 传递
1
2
3
4
5
6
7
8
9
10
11
12
13
14
15
16
17
18
19
20
21
22
23
24
25
26
27
28
29
30
31
| <template>
<div class="app">
<!-- :cityId属性负责给子组件传值 -->
<!-- @change方式负责监听子组件发送的数据 -->
<BaseSelect :cityId="selectId" @change="selectId = $event"></BaseSelect>
</div>
</template>
<script>
import BaseSelect from './components/BaseSelect.vue'
export default {
data() {
return {
selectId: '102',
}
},
components: {
BaseSelect,
},
methods: {
handleChange(e) {
console.log(e);
this.selectId = e
}
}
}
</script>
<style>
</style>
|
- 子传父:父组件监听修改,子组件传值
1
2
3
4
5
6
7
8
9
10
11
12
13
14
15
16
17
18
19
20
21
22
23
24
25
26
27
28
29
| <template>
<div>
<!-- :value属性实现父组件数据改变,子组件视图发生变化 -->
<!-- @change事件实现子组件视图改变,将对应的数据发送给父组件,父组件再修改自己的数据 -->
<select :value="cityId" @change="handleChange">
<option value="101">北京</option>
<option value="102">上海</option>
<option value="103">武汉</option>
<option value="104">广州</option>
<option value="105">深圳</option>
</select>
</div>
</template>
<script>
export default {
props: {
cityId: String
},
methods: {
handleChange (e) {
this.$emit('change', e.target.value)
}
}
}
</script>
<style>
</style>
|
v-model 简化代码(结合原理)
- 子组件中:props 通过 value 接收,事件触发 input
1
2
3
4
5
6
7
8
9
10
11
12
13
14
15
16
17
18
19
20
21
22
23
24
25
26
27
| <template>
<div>
<select :value="value" @change="handleChange">
<option value="101">北京</option>
<option value="102">上海</option>
<option value="103">武汉</option>
<option value="104">广州</option>
<option value="105">深圳</option>
</select>
</div>
</template>
<script>
export default {
props: {
value: String
},
methods: {
handleChange (e) {
this.$emit('input', e.target.value)
}
}
}
</script>
<style>
</style>
|
- 父组件中:v-model 给组件直接绑定数据
1
2
3
4
5
6
7
8
9
10
11
12
13
14
15
16
17
18
19
20
21
22
23
24
25
26
27
28
29
| <template>
<div class="app">
<BaseSelect v-model="selectId"></BaseSelect>
</div>
</template>
<script>
import BaseSelect from './components/BaseSelect.vue'
export default {
data() {
return {
selectId: '102',
}
},
components: {
BaseSelect,
},
methods: {
handleChange(e) {
console.log(e);
this.selectId = e
}
}
}
</script>
<style>
</style>
|
.sync 修饰符
作用:可以实现 子组件 与 父组件数据 的 双向绑定,简化代码
特点:prop属性名,可以自定义,非固定为 value
场景:封装弹框类的基础组件,visible属性 true显示false隐藏
本质:就是 :属性名 和 @update:属性名 合写
1
2
3
4
5
6
7
8
9
10
11
12
13
14
15
16
17
18
19
20
21
22
23
24
25
26
27
28
29
30
31
32
33
34
35
36
37
38
39
| <template>
<div class="app">
<button
@click="fn"
>退出按钮</button>
<BaseDialog
v-show="isShow"
:visible.sync="isShow"
></BaseDialog>
<!-- 上述代码相当于以下代码 -->
<!-- <BaseDialog
v-show="isShow"
:visible="isShow"
@update:visible="isShow = $event"
></BaseDialog> -->
</div>
</template>
<script>
import BaseDialog from "./components/BaseDialog.vue"
export default {
data() {
return {
isShow: false
}
},
methods: {
fn () {
this.isShow = true
}
},
components: {
BaseDialog,
},
}
</script>
<style>
</style>
|
1
2
3
4
5
6
7
8
9
10
11
12
13
14
15
16
17
18
19
20
21
22
23
24
25
26
27
28
29
30
31
32
33
34
35
36
37
38
39
40
41
42
43
44
45
46
47
48
49
50
51
52
53
54
55
56
57
58
59
60
61
62
63
64
65
66
67
68
69
70
71
| <template>
<div class="base-dialog-wrap">
<div class="base-dialog">
<div class="title">
<h3>温馨提示:</h3>
<button class="close" @click="close">x</button>
</div>
<div class="content">
<p>你确认要退出本系统么?</p>
</div>
<div class="footer">
<button @click="close">确认</button>
<button @click="close">取消</button>
</div>
</div>
</div>
</template>
<script>
export default {
props: {
visible: Boolean
},
methods: {
close () {
this.$emit('update:visible', false)
}
}
}
</script>
<style scoped>
.base-dialog-wrap {
width: 300px;
height: 200px;
box-shadow: 2px 2px 2px 2px #ccc;
position: fixed;
left: 50%;
top: 50%;
transform: translate(-50%, -50%);
padding: 0 10px;
}
.base-dialog .title {
display: flex;
justify-content: space-between;
align-items: center;
border-bottom: 2px solid #000;
}
.base-dialog .content {
margin-top: 38px;
}
.base-dialog .title .close {
width: 20px;
height: 20px;
cursor: pointer;
line-height: 10px;
}
.footer {
display: flex;
justify-content: flex-end;
margin-top: 26px;
}
.footer button {
width: 80px;
height: 40px;
}
.footer button:nth-child(1) {
margin-right: 10px;
cursor: pointer;
}
</style>
|
ref 和 $refs
作用:利用ref和$refs可以用于 获取dom元素,或组件实例
特点:查找范围→当前组件内(更精确稳定)
querySelector 查找范围为整个页面
获取 DOM:
- 给目标标签添加 ref 属性
1
| <div ref="chartRef">我是渲染图表的容器</div>
|
- 在恰当时机(DOM渲染之后),通过 $refs.属性值 获取目标标签
1
2
3
| mounted () {
console.log(this.$refs.chartRef)
}
|
1
2
3
4
5
6
7
8
9
10
11
12
13
14
15
16
17
18
19
20
21
22
23
24
| <template>
<div class="app">
<div class="base-chart-box">
这是一个捣乱的盒子
</div>
<BaseChart></BaseChart>
</div>
</template>
<script>
import BaseChart from './components/BaseChart.vue'
export default {
components:{
BaseChart
}
}
</script>
<style>
.base-chart-box {
width: 200px;
height: 100px;
}
</style>
|
1
2
3
4
5
6
7
8
9
10
11
12
13
14
15
16
17
18
19
20
21
22
23
24
25
26
27
28
29
30
31
32
33
34
35
36
37
38
39
40
41
| <template>
<div ref="chartRef" class="base-chart-box">子组件</div>
</template>
<script>
import * as echarts from 'echarts'
export default {
mounted() {
// 基于准备好的dom,初始化echarts实例
const myChart = echarts.init(this.$refs.chartRef)
// 绘制图表
myChart.setOption({
title: {
text: 'ECharts 入门示例',
},
tooltip: {},
xAxis: {
data: ['衬衫', '羊毛衫', '雪纺衫', '裤子', '高跟鞋', '袜子'],
},
yAxis: {},
series: [
{
name: '销量',
type: 'bar',
data: [5, 20, 36, 10, 10, 20],
},
],
})
},
}
</script>
<style scoped>
.base-chart-box {
width: 400px;
height: 300px;
border: 3px solid #000;
border-radius: 6px;
}
</style>
|
获取组件标签:
- 给目标组件标签添加 ref 属性
1
| <BaseFrom ref="baseForm"></BaseFrom>
|
- 通过 $refs.属性值 获取组件标签
1
2
3
| mounted () {
console.log(this.$refs.baseFrom)
}
|
1
2
3
4
5
6
7
8
9
10
11
12
13
14
15
16
17
18
19
20
21
22
23
24
25
26
27
28
29
| <template>
<div class="app">
<BaseForm ref="baseForm"></BaseForm>
<div>
<button @click="handleGet">获取数据</button>
<button @click="handleReset">重置数据</button>
</div>
</div>
</template>
<script>
import BaseForm from './components/BaseForm.vue'
export default {
components: {
BaseForm,
},
methods: {
handleGet () {
this.$refs.baseForm.getFormData()
},
handleReset () {
this.$refs.baseForm.resetFormData()
}
}
}
</script>
<style>
</style>
|
1
2
3
4
5
6
7
8
9
10
11
12
13
14
15
16
17
18
19
20
21
22
23
24
25
26
27
28
29
30
31
32
33
34
35
36
37
38
39
40
41
42
43
44
| <template>
<div class="app">
<div>
账号: <input v-model="username" type="text">
</div>
<div>
密码: <input v-model="password" type="text">
</div>
</div>
</template>
<script>
export default {
data() {
return {
username: 'admin',
password: '123456',
}
},
methods: {
getFormData() {
console.log('获取表单数据', this.username, this.password);
},
resetFormData() {
this.username = ''
this.password = ''
console.log('重置表单数据成功');
},
}
}
</script>
<style scoped>
.app {
border: 2px solid #ccc;
padding: 10px;
}
.app div{
margin: 10px 0;
}
.app div button{
margin-right: 8px;
}
</style>
|
Vue 异步更新 和 $nextTick
Vue 异步更新:Vue 会在执行完所有更新DOM的代码后,统一更新DOM
$nextTick:等 DOM 更新后,才会触发执行此方法里的函数体
语法:this.$nextTick(函数体)
1
2
3
4
5
6
7
8
9
10
11
12
13
14
15
16
17
18
19
20
21
22
23
24
25
26
27
28
29
30
31
32
33
34
35
36
37
| <template>
<div class="app">
<div v-if="isShowEdit">
<input type="text" v-model="editValue" ref="inp" />
<button>确认</button>
</div>
<div v-else>
<span>{{ title }}</span>
<button @click="update">编辑</button>
</div>
</div>
</template>
<script>
export default {
data() {
return {
title: '大标题',
isShowEdit: false,
editValue: '',
}
},
methods: {
update () {
this.isShowEdit = true
// $nextTick会等Dom更新后立刻执行
this.$nextTick(() => {
// 输入框立刻获取焦点
this.$refs.inp.focus()
})
}
},
}
</script>
<style>
</style>
|
自定义指令
自定义指令:自定义的指令,可以封装一些DOM操作,扩展额外功能
1
2
3
4
5
6
7
| Vue.directive('指令名', {
// inserted函数会在指令所在标签被加载后立即执行
"inserted" (el) {
// 可以对 el 标签,扩展额外功能
el.focus()
}
})
|
1
2
3
4
5
6
7
8
9
10
| export default {
directives: {
"指令名": {
inserted (el) {
// 可以对 el 标签,扩展额外功能
el.focus()
}
}
}
}
|
1
2
3
4
5
6
7
8
9
10
11
12
13
14
15
16
| import Vue from 'vue'
import App from './App.vue'
Vue.config.productionTip = false
new Vue({
render: h => h(App),
}).$mount('#app')
|
1
2
3
4
5
6
7
8
9
10
11
12
13
14
15
16
17
18
19
20
21
22
23
24
25
26
27
| <template>
<div>
<h1>自定义指令</h1>
<input type="text" v-focus ref="inp">
</div>
</template>
<script>
export default {
// 常规操作
// mounted() {
// this.$refs.inp.focus()
// }
// 2.局部注册
directives: {
"focus": {
inserted (el) {
el.focus()
}
}
}
}
</script>
<style>
</style>
|
指令的值
语法:在绑定指令时,可以通过“等号”的形式为 指令 绑定具体的参数值
1
| <div v-指令名="指令值">我是内容</div>
|
通过 binding.value 可以拿到指令值,指令值修改会触发 update 函数
1
2
3
4
5
6
7
8
9
10
11
12
| directive: {
指令名: {
inserted (el, binding) {
console.log(binding.value)
},
update (el, binding) {
console.log(binding.value)
}
}
}
|
1
2
3
4
5
6
7
8
9
10
11
12
13
14
15
16
17
18
19
20
21
22
23
24
25
26
27
28
29
30
31
| <template>
<div>
<h1 v-color="color1">指令的值1测试</h1>
<h1 v-color="color2">指令的值2测试</h1>
</div>
</template>
<script>
export default {
data () {
return {
color1: 'red',
color2: 'green'
}
},
directives: {
color: {
inserted (el, binding) {
el.style.color = binding.value
},
update (el, binding) {
el.style.color = binding.value
}
}
}
}
</script>
<style>
</style>
|
插槽
默认插槽
基本语法:
- 组件内需要定制的结构部分,改用
<slot></slot>占位
- 使用组件时,<组件名></组件名>标签内部,传入结构替换slot
后备内容:如果在slot标签内填写内容后,当外部使用组件时,不传入内容,则会展示slot标签内的内容
1
2
3
4
5
6
7
8
9
10
11
12
13
14
15
16
17
18
19
20
21
22
23
24
25
26
27
28
29
30
31
32
33
34
35
36
37
38
39
40
41
42
43
44
45
46
47
48
49
50
51
52
53
54
55
56
57
58
59
60
61
62
63
64
65
66
67
68
69
70
71
72
73
74
75
76
77
78
| <template>
<div class="dialog">
<div class="dialog-header">
<h3>友情提示</h3>
<span class="close">✖️</span>
</div>
<div class="dialog-content">
<slot></slot>
</div>
<div class="dialog-footer">
<button>取消</button>
<button>确认</button>
</div>
</div>
</template>
<script>
export default {
data () {
return {
}
}
}
</script>
<style scoped>
* {
margin: 0;
padding: 0;
}
.dialog {
width: 470px;
height: 230px;
padding: 0 25px;
background-color: #ffffff;
margin: 40px auto;
border-radius: 5px;
}
.dialog-header {
height: 70px;
line-height: 70px;
font-size: 20px;
border-bottom: 1px solid #ccc;
position: relative;
}
.dialog-header .close {
position: absolute;
right: 0px;
top: 0px;
cursor: pointer;
}
.dialog-content {
height: 80px;
font-size: 18px;
padding: 15px 0;
}
.dialog-footer {
display: flex;
justify-content: flex-end;
}
.dialog-footer button {
width: 65px;
height: 35px;
background-color: #ffffff;
border: 1px solid #e1e3e9;
cursor: pointer;
outline: none;
margin-left: 10px;
border-radius: 3px;
}
.dialog-footer button:last-child {
background-color: #007acc;
color: #fff;
}
</style>
|
1
2
3
4
5
6
7
8
9
10
11
12
13
14
15
16
17
18
19
20
21
22
23
24
25
26
27
28
| <template>
<div>
<MyDialog>
<div>您确定要退出本系统吗?</div>
</MyDialog>
<MyDialog>
<p>您确定删除该文件吗?</p>
</MyDialog>
</div>
</template>
<script>
import MyDialog from "./components/MyDialog.vue"
export default {
data() {
return {}
},
components: {
MyDialog,
},
}
</script>
<style>
body {
background-color: #b3b3b3;
}
</style>
|
具名插槽
当组件内有多个位置需要定制时,需要使用具名插槽
语法:
- 多个slot使用name属性区分名字
- template配合v-slot:名字来分发对应标签
- v-slot:插槽名 可以简化为 #插槽名
1
2
3
4
5
6
7
8
9
10
11
12
13
14
15
16
17
18
19
20
21
22
23
24
25
26
27
28
29
30
31
32
33
34
35
36
37
38
39
40
41
42
43
44
45
46
47
48
49
50
51
52
53
54
55
56
57
58
59
60
61
62
63
64
65
66
67
68
69
70
71
72
73
74
75
| <template>
<div class="dialog">
<div class="dialog-header">
<slot name="head"></slot>
</div>
<div class="dialog-content">
<slot name="content"></slot>
</div>
<div class="dialog-footer">
<slot name="footer"></slot>
</div>
</div>
</template>
<script>
export default {
data () {
return {
}
}
}
</script>
<style scoped>
* {
margin: 0;
padding: 0;
}
.dialog {
width: 470px;
height: 230px;
padding: 0 25px;
background-color: #ffffff;
margin: 40px auto;
border-radius: 5px;
}
.dialog-header {
height: 70px;
line-height: 70px;
font-size: 20px;
border-bottom: 1px solid #ccc;
position: relative;
}
.dialog-header .close {
position: absolute;
right: 0px;
top: 0px;
cursor: pointer;
}
.dialog-content {
height: 80px;
font-size: 18px;
padding: 15px 0;
}
.dialog-footer {
display: flex;
justify-content: flex-end;
}
.dialog-footer button {
width: 65px;
height: 35px;
background-color: #ffffff;
border: 1px solid #e1e3e9;
cursor: pointer;
outline: none;
margin-left: 10px;
border-radius: 3px;
}
.dialog-footer button:last-child {
background-color: #007acc;
color: #fff;
}
</style>
|
1
2
3
4
5
6
7
8
9
10
11
12
13
14
15
16
17
18
19
20
21
22
23
24
25
26
27
28
29
30
31
32
33
34
| <template>
<div>
<MyDialog>
<template v-slot:head>
<div>标题</div>
</template>
<template v-slot:content>
<p>您确定删除该文件吗?</p>
</template>
<template #footer>
<button>取消</button>
<button>确认</button>
</template>
</MyDialog>
</div>
</template>
<script>
import MyDialog from "./components/MyDialog.vue"
export default {
data() {
return {}
},
components: {
MyDialog,
},
}
</script>
<style>
body {
background-color: #b3b3b3;
}
</style>
|
作用域插槽
作用域插槽:定义slot插槽的同时,可以进行传值,给插槽上可以绑定数据,将来使用组件时可以使用
步骤:
- 给 slot 标签,以添加属性的方式传值
1
| <slot :属性名1="属性值1" :属性名2="属性值2"></slot>
|
- 所有添加的属性,都会被收集到一个对象中
1
| { 属性名1:属性值1, 属性名2:属性值2 }
|
- 在template中,通过 #插槽名=”变量名” 接收,默认插槽的插槽名为 default
变量名为局部变量,可以随意取名,该变量名的值就是slot标签传的对象
1
2
| <template #插槽名="变量名">
</template>
|
1
2
3
4
5
6
7
8
9
10
11
12
13
14
15
16
17
18
19
20
21
22
23
24
25
26
27
28
29
30
31
32
33
34
35
36
37
38
39
40
41
42
43
44
45
46
47
48
49
50
51
52
53
54
55
56
57
58
59
60
61
62
63
64
65
66
67
68
69
70
71
72
| <template>
<table class="my-table">
<thead>
<tr>
<th>序号</th>
<th>姓名</th>
<th>年纪</th>
<th>操作</th>
</tr>
</thead>
<tbody>
<tr v-for="(item, index) in data" :key="item.id">
<td>{{ index + 1 }}</td>
<td>{{ item.name }}</td>
<td>{{ item.age }}</td>
<td>
<slot :row="item" :test="测试文本"></slot>
</td>
</tr>
</tbody>
</table>
</template>
<script>
export default {
props: {
data: Array,
},
}
</script>
<style scoped>
.my-table {
width: 450px;
text-align: center;
border: 1px solid #ccc;
font-size: 24px;
margin: 30px auto;
}
.my-table thead {
background-color: #1f74ff;
color: #fff;
}
.my-table thead th {
font-weight: normal;
}
.my-table thead tr {
line-height: 40px;
}
.my-table th,
.my-table td {
border-bottom: 1px solid #ccc;
border-right: 1px solid #ccc;
}
.my-table td:last-child {
border-right: none;
}
.my-table tr:last-child td {
border-bottom: none;
}
.my-table button {
width: 65px;
height: 35px;
font-size: 18px;
border: 1px solid #ccc;
outline: none;
border-radius: 3px;
cursor: pointer;
background-color: #ffffff;
margin-left: 5px;
}
</style>
|
1
2
3
4
5
6
7
8
9
10
11
12
13
14
15
16
17
18
19
20
21
22
23
24
25
26
27
28
29
30
31
32
33
34
35
36
37
38
39
40
41
42
43
44
45
46
| <template>
<div>
<MyTable :data="list">
<template #default="obj">
<button @click="del(obj.row.id)">删除</button>
</template>
</MyTable>
<MyTable :data="list2">
<template #default="{ row }">
<button @click="show(row)">查看</button>
</template>
</MyTable>
</div>
</template>
<script>
import MyTable from './components/MyTable.vue'
export default {
data () {
return {
list: [
{ id: 1, name: '张小花', age: 18 },
{ id: 2, name: '孙大明', age: 19 },
{ id: 3, name: '刘德忠', age: 17 },
],
list2: [
{ id: 1, name: '赵小云', age: 18 },
{ id: 2, name: '刘蓓蓓', age: 19 },
{ id: 3, name: '姜肖泰', age: 17 },
]
}
},
components: {
MyTable
},
methods: {
del (id) {
this.list = this.list.filter(item => item.id !== id)
},
show (row) {
alert(`姓名:${ row.name }; 年纪:${ row.age }`)
}
}
}
</script>
|
路由
VueRouter
介绍
作用:修改地址栏路径时,切换显示匹配的组件
说明:Vue官方的一个路由插件,是一个第三方包
官网:https://v3.router.vuejs.org/zh/
使用
基础步骤(固定)
- 下载:下载 VueRouter 模块到当前工程(Vue2对应的VueRouter版本为3.x,Vue3对应的则是4.x)
1
| yarn add vue-router@3.6.5
|
- 引入
1
| import VueRouter from 'vue-router'
|
- 安装注册
- 创建路由对象
1
| const router = new VueRouter()
|
- 注入,将路由对象注入到new Vue实例中,建立关联
1
2
3
4
| new Vue({
render: h => h(App),
router
}).$mount('#app')
|
核心步骤:
- 创建需要的组件(views目录),在main.js文件中配置路由规则
1
2
3
4
5
6
7
8
9
10
11
12
13
14
15
16
17
18
19
20
21
22
23
24
| import Vue from 'vue'
import App from './App.vue'
import VueRouter from 'vue-router'
import Find from "./views/Find";
import My from './views/My'
import Friend from "./views/Friend";
Vue.use(VueRouter)
Vue.config.productionTip = false
const router = new VueRouter({
routes: [
{path: '/find', component: Find},
{path: '/my', component: My},
{path: '/friend', component: Friend}
]
})
new Vue({
render: h => h(App),
router
}).$mount('#app')
|
- 配置导航,配置路由出口(路径匹配的组件显示的位置)
1
2
3
4
5
6
7
8
9
10
11
12
13
14
15
16
17
18
19
20
21
22
23
24
25
26
27
28
29
30
31
32
33
34
35
36
37
38
39
40
41
42
43
44
45
46
| <template>
<div>
<div class="footer_wrap">
<a href="#/find">发现音乐</a>
<a href="#/my">我的音乐</a>
<a href="#/friend">朋友</a>
</div>
<div class="top">
<!-- 路由出口 -->
<router-view></router-view>
</div>
</div>
</template>
<script>
export default {};
</script>
<style>
body {
margin: 0;
padding: 0;
}
.footer_wrap {
position: relative;
left: 0;
top: 0;
display: flex;
width: 100%;
text-align: center;
background-color: #333;
color: #ccc;
}
.footer_wrap a {
flex: 1;
text-decoration: none;
padding: 20px 0;
line-height: 20px;
background-color: #333;
color: #ccc;
border: 1px solid black;
}
.footer_wrap a:hover {
background-color: #555;
}
</style>
|
封装路由模块
当页面组件过多时,所有路由配置都堆在main.js中,不利于维护。故而将路由配置抽离到src/router/index.js文件中
1
2
3
4
5
6
7
8
9
10
11
12
13
14
15
16
| import VueRouter from 'vue-router'
import Find from "@/views/Find";
import My from '@/views/My'
import Friend from "@/views/Friend";
import Vue from "vue";
Vue.use(VueRouter)
const router = new VueRouter({
routes: [
{path: '/find', component: Find},
{path: '/my', component: My},
{path: '/friend', component: Friend}
]
})
export default router
|
声明式导航
导航链接
vue-router 提供了一个全局组件 router-link(取代 a 标签)
- 能实现跳转,配置 to 属性指定路径,本质还是 a 标签,to 无需 #
- 能实现高亮,默认就会提供高亮类名,可以直接设置高亮样式
1
2
3
4
5
6
7
8
9
10
11
12
13
14
15
16
17
18
19
20
21
22
23
24
25
26
27
28
29
30
31
32
33
34
35
36
37
38
39
40
41
42
43
44
45
46
47
48
49
| <template>
<div>
<div class="footer_wrap">
<router-link to="/find">发现音乐</router-link>
<router-link to="/my">我的音乐</router-link>
<router-link to="/friend">朋友</router-link>
</div>
<div class="top">
<router-view></router-view>
</div>
</div>
</template>
<script>
export default {};
</script>
<style>
body {
margin: 0;
padding: 0;
}
.footer_wrap {
position: relative;
left: 0;
top: 0;
display: flex;
width: 100%;
text-align: center;
background-color: #333;
color: #ccc;
}
.footer_wrap a {
flex: 1;
text-decoration: none;
padding: 20px 0;
line-height: 20px;
background-color: #333;
color: #ccc;
border: 1px solid black;
}
/* 添加高亮代码 */
.footer_wrap .router-link-active {
background-color: purple;
}
.footer_wrap a:hover {
background-color: #555;
}
</style>
|
router-link 标签会给当前所在路径的a标签添加router-link-active 和 router-link-exact-active类名,通过css的类名选择器给该标签添加高亮显示即可
- router-link-active 模糊匹配(常用)
to=”/my” 可以匹配地址栏后面 /my 、/my/a、/my/b 、…..
- router-link-exact-active 精确匹配
to=”/my” 只能匹配地址栏后面 /my
router-link 标签提供的两个类名可以自定义,通过以下配置自定义
1
2
3
4
5
| const router = new VueRouter({
routes: [...],
linkActiveClass: '类名1',
linkExactActiveclass: '类名2'
})
|
跳转传参
- 查询参数传参(适合传递多个参数)
- to=”/path?参数名=值”
- 对应组件通过$route.query.参数名接收传递过来的值
1
2
3
4
5
6
7
8
9
10
11
12
13
14
15
16
17
18
19
20
21
22
23
24
25
26
27
28
29
30
31
32
33
34
35
36
37
38
39
40
41
42
43
44
45
46
47
48
49
50
51
52
53
54
55
56
57
58
59
60
61
62
63
| <template>
<div class="home">
<div class="logo-box"></div>
<div class="search-box">
<input type="text">
<button>搜索一下</button>
</div>
<div class="hot-link">
热门搜索:
<router-link to="/search?key=黑马程序员">黑马程序员</router-link>
<router-link to="/search?key=前端培训">前端培训</router-link>
<router-link to="/search?key=如何成为前端大牛">如何成为前端大牛</router-link>
</div>
</div>
</template>
<script>
export default {
name: 'FindMusic'
}
</script>
<style>
.logo-box {
height: 150px;
background: url('@/assets/logo.jpeg') no-repeat center;
}
.search-box {
display: flex;
justify-content: center;
}
.search-box input {
width: 400px;
height: 30px;
line-height: 30px;
border: 2px solid #c4c7ce;
border-radius: 4px 0 0 4px;
outline: none;
}
.search-box input:focus {
border: 2px solid #ad2a26;
}
.search-box button {
width: 100px;
height: 36px;
border: none;
background-color: #ad2a26;
color: #fff;
position: relative;
left: -2px;
border-radius: 0 4px 4px 0;
}
.hot-link {
width: 508px;
height: 60px;
line-height: 60px;
margin: 0 auto;
}
.hot-link a {
margin: 0 5px;
}
</style>
|
1
2
3
4
5
6
7
8
9
10
11
12
13
14
15
16
17
18
19
20
21
22
23
24
25
26
27
28
29
30
31
32
| <template>
<div class="search">
<p>搜索关键字: {{ $route.query.key }} </p>
<p>搜索结果: </p>
<ul>
<li>.............</li>
<li>.............</li>
<li>.............</li>
<li>.............</li>
</ul>
</div>
</template>
<script>
export default {
name: 'MyFriend',
created () {
console.log(this.$route.query.key)
}
}
</script>
<style>
.search {
width: 400px;
height: 240px;
padding: 0 20px;
margin: 0 auto;
border: 2px solid #c4c7ce;
border-radius: 5px;
}
</style>
|
- 动态路由传参(适合传递单个参数)
1
2
3
4
5
6
| const router = new VueRouter({
routes: [{
path: '/search/:word',
component: 组件名
}],
})
|
1
2
3
4
5
6
7
8
9
10
11
12
13
14
15
16
17
18
19
20
21
22
23
24
25
26
27
28
29
30
31
32
33
34
35
36
37
38
39
40
41
42
43
44
45
46
47
48
49
50
51
52
53
54
55
56
57
58
59
60
61
62
63
| <template>
<div class="home">
<div class="logo-box"></div>
<div class="search-box">
<input type="text">
<button>搜索一下</button>
</div>
<div class="hot-link">
热门搜索:
<router-link to="/search/黑马程序员">黑马程序员</router-link>
<router-link to="/search/前端培训">前端培训</router-link>
<router-link to="/search/如何成为前端大牛">如何成为前端大牛</router-link>
</div>
</div>
</template>
<script>
export default {
name: 'FindMusic'
}
</script>
<style>
.logo-box {
height: 150px;
background: url('@/assets/logo.jpeg') no-repeat center;
}
.search-box {
display: flex;
justify-content: center;
}
.search-box input {
width: 400px;
height: 30px;
line-height: 30px;
border: 2px solid #c4c7ce;
border-radius: 4px 0 0 4px;
outline: none;
}
.search-box input:focus {
border: 2px solid #ad2a26;
}
.search-box button {
width: 100px;
height: 36px;
border: none;
background-color: #ad2a26;
color: #fff;
position: relative;
left: -2px;
border-radius: 0 4px 4px 0;
}
.hot-link {
width: 508px;
height: 60px;
line-height: 60px;
margin: 0 auto;
}
.hot-link a {
margin: 0 5px;
}
</style>
|
1
2
3
4
5
6
7
8
9
10
11
12
13
14
15
16
17
18
19
20
21
22
23
24
25
26
27
28
29
30
31
32
| <template>
<div class="search">
<p>搜索关键字: {{ $route.params.word }} </p>
<p>搜索结果: </p>
<ul>
<li>.............</li>
<li>.............</li>
<li>.............</li>
<li>.............</li>
</ul>
</div>
</template>
<script>
export default {
name: 'MyFriend',
created () {
console.log(this.$route.params.word)
}
}
</script>
<style>
.search {
width: 400px;
height: 240px;
padding: 0 20px;
margin: 0 auto;
border: 2px solid #c4c7ce;
border-radius: 5px;
}
</style>
|
注意:配置动态路由时 path: ‘/search/:word’ 后面未加? ,则表示必须传递参数,进入搜索页时,未传递参数时不会进行路由匹配。如果希望不传递参数,也可以匹配路由,则需要加上动态路由参数可选符”?“
Vue路由
重定向
网页打开,默认是 / 路径,未匹配到组件时,会出现空白。此时可以使用重定向,强制跳转到path路径
1
2
3
4
5
6
7
| const router = new VueRouter({
routes: [
{path: '/', redirect: '/home'},
{ path: '/home', component: Home },
{ path: '/search/:word', component: Search }
]
})
|
404
当路径找不到匹配时,给用户一个提示页面
1
2
3
4
5
6
7
8
| const router = new VueRouter({
routes: [
{ path: '/', redirect: '/home' },
{ path: '/home', component: Home },
{ path: '/search/:word', component: Search },
{ path: '*', component: NotFound }
]
})
|
1
2
3
4
5
6
7
8
9
10
11
12
13
14
15
| <template>
<div>
<h1>Page Not Found</h1>
</div>
</template>
<script>
export default {
}
</script>
<style>
</style>
|
模式设置
路由的路径默认带有#,可以通过设置将#去除
1
2
3
4
5
6
7
8
9
| const router = new VueRouter({
routes: [
{ path: '/', redirect: '/home' },
{ path: '/home', component: Home },
{ path: '/search/:word', component: Search },
{ path: '*', component: NotFound }
],
mode: 'history'
})
|
编程式导航
基本跳转
- 通过路径的方式进行跳转
1
2
3
4
5
6
|
this.$router.push('路由路径')
this.$router.push({
path: '路由路径'
})
|
- 通过命名路由的方式进行跳转(适用于路由路径过长的时候使用)
1
2
3
| this.$router.push({
name: '路由名'
})
|
1
2
3
4
5
6
7
8
9
| const router = new VueRouter({
routes: [
{ path: '/', redirect: '/home' },
{ path: '/home', component: Home },
{ name: 'search', path: '/search/:word', component: Search },
{ path: '*', component: NotFound }
],
mode: 'history'
})
|
路由传参
- path 路由跳转
1
2
3
4
5
6
7
8
9
|
this.$router.push('路由路径?参数名=参数值')
this.$router.push({
path: '路由路径',
query: {
参数名: 参数值
}
})
|
通过 $route.query.参数名 接收
1
2
3
4
5
6
|
this.$router.push('路由路径/参数值')
this.$router.push({
path: '路由路径/参数值',
})
|
通过 $route.params.参数名 接收
- 命名路由跳转
1
2
3
4
5
6
| this.$router.push({
name: '路由名',
query: {
参数名: 参数值
}
})
|
1
2
3
4
5
6
| this.$router.push({
name: '路由名',
params: {
参数名: 参数值
}
})
|
注意动态路由中的参数名必须和路由变量中配置的参数名一致
二级路由
步骤:
- 在一级路由配置中的children属性中配置二级路由
1
2
3
4
5
6
7
8
9
10
11
12
13
14
15
16
17
18
19
20
21
22
23
24
25
26
27
28
29
30
31
32
33
| const router = new VueRouter({
routes: [
{
path: '/',
component: Layout,
children: [
{
path: '/article',
component: Article
},
{
path: '/collect',
component: Collect
},
{
path: '/like',
component: Like
},
{
path: '/user',
component: User
}
]
},
{
path: '/articleDetail',
component: ArticleDetail
}
],
linkActiveClass: 'active',
linkExactActiveClass: 'exact-active'
})
|
- 在一级路由所对应的组件的特定位置添加 router-view 标签
1
2
3
4
5
6
7
8
9
10
11
12
13
14
15
16
17
18
19
20
21
22
23
24
25
26
27
28
29
30
31
32
33
34
35
36
37
38
39
40
41
42
43
44
45
46
47
48
49
50
51
52
53
54
55
| <template>
<div class="h5-wrapper">
<div class="content">
<router-view></router-view>
</div>
<nav class="tabbar">
<router-link to="/article">面经</router-link>
<router-link to="/collect">收藏</router-link>
<router-link to="/like">喜欢</router-link>
<router-link to="/user">我的</router-link>
</nav>
</div>
</template>
<script>
export default {
name: 'LayoutPage'
}
</script>
<style>
body{
margin: 0;
padding: 0;
}
</style>
<style lang="less" scoped>
.h5-wrapper {
.content {
margin-bottom: 51px;
}
.tabbar {
position: fixed;
left: 0;
bottom: 0;
width: 100%;
height: 50px;
line-height: 50px;
text-align: center;
display: flex;
background: #fff;
border-top: 1px solid #e4e4e4;
a {
flex: 1;
text-decoration: none;
font-size: 14px;
color: #333;
-webkit-tap-highlight-color: transparent;
}
.active {
background-color: gray;
}
}
}
</style>
|
跳转到上一次路由
1
| <button @click="$router.back"><</button>
|
组件缓存 keep-alive
由于路由发生跳转后,组件会被销毁,如果再进入该组件,又要重新构建,消耗性能,故而引入组件缓存
- keep-alive是什么
- keep-alive 是Vue的内置组件,当它包裹动态组件时,会缓存不活动的组件实例,而不是销毁它们。
- keep-alive 是一个抽象组件:它自身不会渲染成一个DOM元素,也不会出现在父组件链中。
2.keep-alive的优点
- 在组件切换过程中 把切换出去的组件保留在内存中,防止重复渲染DOM,
- 减少加载时间及性能消耗,提高用户体验性。
- keep-alive的三个属性
- include:组件名数组,只有匹配的组件会被缓存
- exclude:组件名数组,任何匹配的组件都不会被缓存
- max:最多可以缓存多少组件实例
组件名是只指在导出组件时,配置的name属性值,当未配置name属性值时,才以文件名作为组件名
1
2
3
4
5
6
7
8
9
10
11
12
13
14
15
16
17
18
19
20
21
22
23
24
25
26
27
28
29
30
31
32
33
34
35
36
37
38
39
40
41
42
43
44
45
46
47
48
49
50
51
52
53
54
55
56
57
58
59
60
61
62
63
64
| <template>
<div class="h5-wrapper">
<div class="content">
<!-- 缓存组件 -->
<keep-alive include="keepArr">
<router-view></router-view>
</keep-alive>
</div>
<nav class="tabbar">
<router-link to="/article">面经</router-link>
<router-link to="/collect">收藏</router-link>
<router-link to="/like">喜欢</router-link>
<router-link to="/user">我的</router-link>
</nav>
</div>
</template>
<script>
export default {
// 组件名
name: 'LayoutPage',
data () {
return {
keepArr: ["LayoutPage"]
}
}
}
</script>
<style>
body{
margin: 0;
padding: 0;
}
</style>
<style lang="less" scoped>
.h5-wrapper {
.content {
margin-bottom: 51px;
}
.tabbar {
position: fixed;
left: 0;
bottom: 0;
width: 100%;
height: 50px;
line-height: 50px;
text-align: center;
display: flex;
background: #fff;
border-top: 1px solid #e4e4e4;
a {
flex: 1;
text-decoration: none;
font-size: 14px;
color: #333;
-webkit-tap-highlight-color: transparent;
}
.active {
background-color: gray;
}
}
}
</style>
|
注意:再次进入被缓存的组件时,该组件的created、mounted、destroyed等钩子都不会被触发,反而离开时会触发deactived钩子,进入会触发actived钩子。这两个钩子是缓存组件特有的生命周期函数
自定义创建项目
步骤:
- 通过命令创建项目
- 选择自定义模式
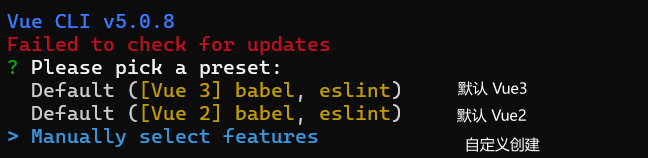
- 勾选需要的软件包(空格选中)

- 选择vue的版本

- 是否启用history模式的路由

- 选择样式的语法

- 选择ESLint的规范(第三个是无分号规范)
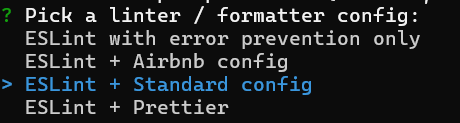
- 选择ESLint什么时候开始检查规范(第一个是保存文件的时候检查)

- 选择Babel, ESLint等配置代码存放位置(第一个是单独文件夹下,第二个是package.json文件中)

- 是否保存当前自定义选择(保存后,下次自定义使用保存的配置进行创建)

ESLint
- ESLint 用于检查代码规范
- 当代码不符合规范时,会在终端显示错误信息,此时可以采用以下两种方案解决
- 手动处理:通过手动查找 ESLint规则集 来处理对应的报错i信息
- 自动处理:在WebStorm中直接ctrl + s即可自动纠正错误,在VScode中需要安装ESLint插件,并进行相对应的配置(建议使用WebStrom)
Vuex
Vuex概念
- 定义:vuex 是一个插件,可以管理vue通用的数据(多组件共享的数据)
- 场景:
- 某个状态 在 很多个组件 来使用(例如:个人信息)
- 多个组件 共同维护 一份数据(例如:购物车)
- 优势
- 共同维护一份数据,数据集中化管理
- 响应式变化
- 操作简洁(vuex提供了一些辅助函数)
创建仓库语法
- 安装 Vuex 软件包
1
2
3
| yarn add vuex@3
或
npm install vuex@3
|
- 新建 Vuex 模块文件
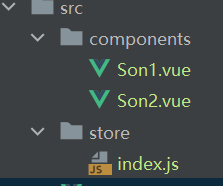
- 创建仓库
1
2
3
4
5
6
7
8
9
10
11
| import Vue from 'vue'
import Vuex from 'vuex'
Vue.use(Vuex)
const store = new Vuex.Store(undefined)
export default store
|
- 挂载 Vuex 工具
1
2
3
4
5
6
7
8
9
10
11
12
| import Vue from 'vue'
import App from './App.vue'
import store from '@/store/index'
Vue.config.productionTip = false
new Vue({
render: h => h(App),
store
}).$mount('#app')
|
提供和使用共享数据
- 提供
在state属性中提供数据即可
1
2
3
4
5
6
| const store = new Vuex.Store({
state: {
title: '大标题',
count: 100
}
})
|
- 基本使用
- 在JS模块中通过 引入的变量名.state.属性名 进行使用
1
2
3
4
5
6
7
8
9
10
11
12
13
| import Vue from 'vue'
import App from './App.vue'
import store from '@/store/index'
console.log(store.state.count)
Vue.config.productionTip = false
new Vue({
render: h => h(App),
store
}).$mount('#app')
|
- 在组件逻辑中通过 this.$store.state.属性名 进行使用
1
2
3
4
5
6
7
8
9
10
11
12
13
14
15
16
17
18
19
20
21
22
23
24
25
26
27
28
29
30
31
32
33
34
35
36
37
38
39
40
41
| <template>
<div id="app">
<h1>根组件 - {{ $store.state.title }} - {{ $store.state.count }}</h1>
<input type="text">
<Son1></Son1>
<hr>
<Son2></Son2>
</div>
</template>
<script>
import Son1 from './components/Son1.vue'
import Son2 from './components/Son2.vue'
export default {
name: 'app',
data: function () {
return {
}
},
created () {
console.log(this.$store.state.count)
},
components: {
Son1,
Son2
}
}
</script>
<style>
#app {
width: 600px;
margin: 20px auto;
border: 3px solid #ccc;
border-radius: 3px;
padding: 10px;
}
</style>
|
- 在模板中通过 $store.state.属性名 进行使用
1
2
3
4
5
6
7
8
9
10
11
12
13
14
15
16
17
18
19
20
21
22
23
24
25
26
27
28
29
30
31
32
33
34
35
36
37
38
| <template>
<div id="app">
<h1>根组件 - {{ $store.state.title }} - {{ $store.state.count }}</h1>
<input type="text">
<Son1></Son1>
<hr>
<Son2></Son2>
</div>
</template>
<script>
import Son1 from './components/Son1.vue'
import Son2 from './components/Son2.vue'
export default {
name: 'app',
data: function () {
return {
}
},
components: {
Son1,
Son2
}
}
</script>
<style>
#app {
width: 600px;
margin: 20px auto;
border: 3px solid #ccc;
border-radius: 3px;
padding: 10px;
}
</style>
|
- 辅助函数简化使用
1
| import {mapState} from 'vuex'
|
1
2
3
| computed: {
...mapState(['属性名', ....])
}
|
此时直接通过属性名进行使用
1
2
3
4
5
6
7
8
9
10
11
12
13
14
15
16
17
18
19
20
21
22
23
24
25
26
27
28
29
30
31
32
| <template>
<div class="box">
<h2>Son1 子组件</h2>
<!-- 直接通过属性名进行使用 -->
从vuex中获取的值: {{ count }}<label></label>
<br>
<button>值 + 1</button>
</div>
</template>
<script>
import { mapState } from 'vuex'
export default {
name: 'Son1Com',
computed: {
...mapState(['count'])
}
}
</script>
<style lang="css" scoped>
.box{
border: 3px solid #ccc;
width: 400px;
padding: 10px;
margin: 20px;
}
h2 {
margin-top: 10px;
}
</style>
|
修改共享数据
- 可以通过直接修改,但是该语法时错误的
可以开启严格模式来提示该语法错误
1
2
3
4
5
6
7
8
| const store = new Vuex.Store({
strict: true,
state: {
title: '大标题',
count: 100
}
})
|
- 通过mutations属性中的方法进行修改
- 定义 mutations 对象,对象中存放修改state的方法
1
2
3
4
5
6
7
8
9
10
11
12
13
14
15
16
17
18
19
20
21
22
23
24
25
26
27
| import Vue from 'vue'
import Vuex from 'vuex'
Vue.use(Vuex)
const store = new Vuex.Store({
strict: true,
state: {
title: '大标题',
count: 100
},
mutations: {
addCount (state) {
state.count += 1
},
addFive (state) {
state.count += 5
},
updateTitle (state) {
state.title = '小标题'
}
}
})
export default store
|
1
| this.$store.commit('mutation名')
|
1
2
3
4
5
6
7
8
9
10
11
12
13
14
15
16
17
18
19
20
21
22
23
24
25
26
27
28
29
30
31
32
33
34
35
36
37
38
39
40
41
42
43
44
| <template>
<div class="box">
<h2>Son1 子组件</h2>
从vuex中获取的值: {{ count }}<label></label>
<br>
<button @click="addFn">值 + 1</button>
<button @click="addFive">值 + 5</button>
<button @click="updateTitle">修改标题</button>
</div>
</template>
<script>
import { mapState } from 'vuex'
export default {
name: 'Son1Com',
computed: {
...mapState(['count'])
},
methods: {
addFn () {
this.$store.commit('addCount')
},
addFive () {
this.$store.commit('addFive')
},
updateTitle () {
this.$store.commit('updateTitle')
}
}
}
</script>
<style lang="css" scoped>
.box{
border: 3px solid #ccc;
width: 400px;
padding: 10px;
margin: 20px;
}
h2 {
margin-top: 10px;
}
</style>
|
- 通过mutations属性中的方法进行修改(带参数)
- 定义 mutations 对象,对象中存放修改state的方法,并且带参数、
1
2
3
4
5
6
7
8
9
10
11
12
13
14
15
16
17
18
19
20
21
22
23
24
25
| import Vue from 'vue'
import Vuex from 'vuex'
Vue.use(Vuex)
const store = new Vuex.Store({
strict: true,
state: {
title: '大标题',
count: 100
},
mutations: {
addCount (state, obj) {
console.log(obj)
state.count += obj.count
},
updateTitle (state, newTitle) {
state.title = newTitle
}
}
})
export default store
|
- 组件中提交调用 mutation(只允许传递单个参数,当要传递多个参数时,可以将多个参数封装成数组或者对象进行传递)
1
| this.$store.commit('mutation名', 参数)
|
1
2
3
4
5
6
7
8
9
10
11
12
13
14
15
16
17
18
19
20
21
22
23
24
25
26
27
28
29
30
31
32
33
34
35
36
37
38
39
40
41
42
43
44
| <template>
<div class="box">
<h2>Son1 子组件</h2>
从vuex中获取的值: {{ count }}<label></label>
<br>
<button @click="addFn(1)">值 + 1</button>
<button @click="addFn(5)">值 + 5</button>
<button @click="updateTitle">修改标题</button>
</div>
</template>
<script>
import { mapState } from 'vuex'
export default {
name: 'Son1Com',
computed: {
...mapState(['count'])
},
methods: {
addFn (n) {
this.$store.commit('addCount', {
count: n,
msg: '哈哈'
})
},
updateTitle () {
this.$store.commit('updateTitle', '黑马程序员')
}
}
}
</script>
<style lang="css" scoped>
.box{
border: 3px solid #ccc;
width: 400px;
padding: 10px;
margin: 20px;
}
h2 {
margin-top: 10px;
}
</style>
|
- 使用辅助函数进行修改
mapMutations函数是将位于mutations中的方法提取出来,映射到组件的methods属性中
1
2
3
4
5
6
7
8
9
10
11
12
13
14
15
16
17
18
19
20
21
22
23
24
25
26
27
28
29
30
31
32
33
34
35
36
37
38
39
40
41
| <template>
<div class="box">
<h2>Son2 子组件</h2>
从vuex中获取的值: {{ $store.state.count }}<label></label>
<br />
<button @click="subCount(1)">值 - 1</button>
<button @click="subCount(5)">值 - 5</button>
<button @click="subCount(10)">值 - 10</button>
<button @click="updateTitle('前端程序员')">改标题</button>
</div>
</template>
<script>
import { mapMutations } from 'vuex'
export default {
name: 'Son2Com',
methods: {
...mapMutations(['subCount', 'updateTitle']),
}
}
</script>
<style lang="css" scoped>
.box {
border: 3px solid #ccc;
width: 400px;
padding: 10px;
margin: 20px;
}
h2 {
margin-top: 10px;
}
</style>
|
异步修改共享数据
- 通过actions属性进行修改
1
2
3
4
5
| mutations: {
changeCount (state, num) {
state.count = num
}
}
|
- 提供action方法,该方法不能直接操作state,操作state还需要commit
1
2
3
4
5
6
7
8
9
10
| actions: {
setAsyncCount (context, num) {
setTimeout(() => {
context.commit('changeCount', num)
}, 1000)
}
}
|
1
| this.$store.dispath('action名', 参数)
|
1
2
3
4
5
6
7
8
9
10
11
12
13
14
15
16
17
18
19
20
21
22
23
24
25
26
27
28
29
30
31
32
33
34
35
36
37
38
39
40
41
42
43
44
45
46
47
48
49
| <template>
<div class="box">
<h2>Son1 子组件</h2>
从vuex中获取的值: {{ count }}<label></label>
<br>
<button @click="addFn(1)">值 + 1</button>
<button @click="addFn(5)">值 + 5</button>
<button @click="addFn(10)">值 + 10</button>
<button @click="setAsyncCount(666)">1秒后将值改为666</button>
<button @click="updateTitle">修改标题</button>
</div>
</template>
<script>
import { mapState } from 'vuex'
export default {
name: 'Son1Com',
computed: {
...mapState(['count'])
},
methods: {
addFn (n) {
this.$store.commit('addCount', {
count: n,
msg: '哈哈'
})
},
setAsyncCount (num) {
this.$store.dispatch('setAsyncCount', num)
},
updateTitle () {
this.$store.commit('updateTitle', '黑马程序员')
}
}
}
</script>
<style lang="css" scoped>
.box{
border: 3px solid #ccc;
width: 400px;
padding: 10px;
margin: 20px;
}
h2 {
margin-top: 10px;
}
</style>
|
mutations 属性中只能执行同步代码,不能执行异步代码
- 通过辅助函数进行修改
mapActions函数是将位于actions中的方法提取出来,映射到组件的methods属性中
1
2
3
4
5
6
7
8
9
10
11
12
13
14
15
16
17
18
19
20
21
22
23
24
25
26
27
28
29
30
31
32
33
34
35
36
37
38
39
40
| <template>
<div class="box">
<h2>Son2 子组件</h2>
从vuex中获取的值: {{ $store.state.count }}<label></label>
<br />
<button @click="subCount(1)">值 - 1</button>
<button @click="subCount(5)">值 - 5</button>
<button @click="subCount(10)">值 - 10</button>
<button @click="setAsyncCount(888)">1秒后将值改为888</button>
<button @click="updateTitle('前端程序员')">改标题</button>
</div>
</template>
<script>
import { mapActions, mapMutations } from 'vuex'
export default {
name: 'Son2Com',
methods: {
...mapMutations(['subCount', 'updateTitle']),
...mapActions(['setAsyncCount'])
// 相当于以下代码
// setAsyncCount (num) {
// this.$store.dispatch('setAsyncCount', num)
// }
}
}
</script>
<style lang="css" scoped>
.box {
border: 3px solid #ccc;
width: 400px;
padding: 10px;
margin: 20px;
}
h2 {
margin-top: 10px;
}
</style>
|
getters
除了state之外,有时还需要从state中派生出一些状态,这些状态依赖于state,此时会使用getters属性。例如:显示state属性中的list数组中大于5的所有数据
- 定义getters
1
2
3
4
5
6
7
8
9
10
| state: {
list: [1, 2, 3, 4, 5, 6, 7, 8, 9, 10]
},
getters: {
filterList (state) {
return state.list.filter(item => item > 5)
}
}
|
- 访问getters
1
2
3
4
5
6
7
8
9
10
11
12
13
14
15
16
17
18
19
20
21
22
23
24
25
26
27
28
29
30
31
32
33
34
35
36
37
38
39
40
41
42
43
44
45
46
47
48
49
50
51
52
53
54
| <template>
<div class="box">
<h2>Son1 子组件</h2>
从vuex中获取的值: {{ count }}<label></label>
<br>
<button @click="addFn(1)">值 + 1</button>
<button @click="addFn(5)">值 + 5</button>
<button @click="addFn(10)">值 + 10</button>
<button @click="setAsyncCount(666)">1秒后将值改为666</button>
<button @click="updateTitle">修改标题</button>
<hr>
{{ list }}
<br>
<!-- 通过 store 访问 getters -->
{{ $store.getters.filterList }}
</div>
</template>
<script>
import { mapState } from 'vuex'
export default {
name: 'Son1Com',
computed: {
...mapState(['count', 'list'])
},
methods: {
addFn (n) {
this.$store.commit('addCount', {
count: n,
msg: '哈哈'
})
},
setAsyncCount (num) {
this.$store.dispatch('setAsyncCount', num)
},
updateTitle () {
this.$store.commit('updateTitle', '黑马程序员')
}
}
}
</script>
<style lang="css" scoped>
.box{
border: 3px solid #ccc;
width: 400px;
padding: 10px;
margin: 20px;
}
h2 {
margin-top: 10px;
}
</style>
|
- 通过辅助函数 mapGetters 映射到计算属性中
1
2
3
4
5
6
7
8
9
10
11
12
13
14
15
16
17
18
19
20
21
22
23
24
25
26
27
28
29
30
31
32
33
34
35
36
37
38
39
40
41
| <template>
<div class="box">
<h2>Son2 子组件</h2>
从vuex中获取的值: {{ $store.state.count }}<label></label>
<br />
<button @click="subCount(1)">值 - 1</button>
<button @click="subCount(5)">值 - 5</button>
<button @click="subCount(10)">值 - 10</button>
<button @click="setAsyncCount(888)">1秒后将值改为888</button>
<button @click="updateTitle('前端程序员')">改标题</button>
<hr>
{{ filterList }}
</div>
</template>
<script>
import { mapActions, mapGetters, mapMutations } from 'vuex'
export default {
name: 'Son2Com',
methods: {
...mapMutations(['subCount', 'updateTitle']),
...mapActions(['setAsyncCount'])
},
computed: {
...mapGetters(['filterList'])
}
}
</script>
<style lang="css" scoped>
.box {
border: 3px solid #ccc;
width: 400px;
padding: 10px;
margin: 20px;
}
h2 {
margin-top: 10px;
}
</style>
|
模块 module
注册挂载子模块
当项目体积增大时,vuex中index.js文件中的state状态会变得非常臃肿,此时引入模块
- 在store/modules下创建子模块文件
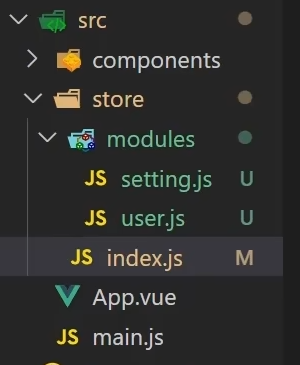
1
2
3
4
5
6
7
8
9
10
11
12
13
14
15
16
17
18
| const state = {
user: {
age: 18,
name: 'zs'
},
score: 80
}
const getters = {}
const actions = {}
const mutations = {}
export default {
state,
getters,
actions,
mutations
}
|
1
2
3
4
5
6
7
8
9
10
11
12
13
14
15
| const state = {
background: 'light',
color: 'blue'
}
const getters = {}
const actions = {}
const mutations = {}
export default {
state,
getters,
actions,
mutations
}
|
- 挂载注册子模块
1
2
3
4
5
6
7
8
9
10
11
12
13
14
15
16
17
18
19
20
21
22
23
24
25
26
27
28
29
30
31
32
33
34
35
36
37
38
39
40
41
42
43
44
45
46
47
48
49
50
51
52
53
54
55
| import Vue from 'vue'
import Vuex from 'vuex'
import user from '@/store/modules/user'
import setting from '@/store/modules/setting'
Vue.use(Vuex)
const store = new Vuex.Store({
strict: true,
state: {
title: '大标题',
count: 100,
list: [1, 2, 3, 4, 5, 6, 7, 8, 9, 10]
},
getters: {
filterList (state) {
return state.list.filter(item => item > 5)
}
},
mutations: {
addCount (state, obj) {
console.log(obj)
state.count += obj.count
},
subCount (state, num) {
state.count -= num
},
changeCount (state, num) {
state.count = num
},
updateTitle (state, newTitle) {
state.title = newTitle
}
},
actions: {
setAsyncCount (context, num) {
setTimeout(() => {
context.commit('changeCount', num)
}, 1000)
}
},
modules: {
user,
setting
}
})
export default store
|
开启命名空间
只有开启命名空间才能将该模块的属性挂载到该模块中
1
2
3
4
| export default {
namespaced: true,
.....
}
|
使用子模块的state
尽管已经分模块,但其实子模块的状态还是会挂载到根级别的state中,属性名就是模块名
使用模块中的数据:
- 原生访问
1
| $store.state.模块名.子模块state中的属性名
|
1
2
3
4
5
6
7
8
9
10
11
12
13
14
15
16
17
18
19
20
21
22
23
24
25
26
27
28
29
30
31
32
33
34
35
36
37
38
39
40
41
42
43
44
45
46
47
48
49
50
51
52
53
54
55
56
57
58
59
| <template>
<div class="box">
<h2>Son1 子组件</h2>
从vuex中获取的值: {{ count }}<label></label>
<br>
<button @click="addFn(1)">值 + 1</button>
<button @click="addFn(5)">值 + 5</button>
<button @click="addFn(10)">值 + 10</button>
<button @click="setAsyncCount(666)">1秒后将值改为666</button>
<button @click="updateTitle">修改标题</button>
<hr>
{{ list }}
<br>
<!-- 通过 store 访问 getters -->
{{ $store.getters.filterList }}
<hr>
<!-- 访问子模块的state - 原生 -->
{{ $store.state.user.userInfo.name }}
<br>
{{ $store.state.setting.background }}
</div>
</template>
<script>
import { mapState } from 'vuex'
export default {
name: 'Son1Com',
computed: {
...mapState(['count', 'list'])
},
methods: {
addFn (n) {
this.$store.commit('addCount', {
count: n,
msg: '哈哈'
})
},
setAsyncCount (num) {
this.$store.dispatch('setAsyncCount', num)
},
updateTitle () {
this.$store.commit('updateTitle', '黑马程序员')
}
}
}
</script>
<style lang="css" scoped>
.box{
border: 3px solid #ccc;
width: 400px;
padding: 10px;
margin: 20px;
}
h2 {
margin-top: 10px;
}
</style>
|
- 辅助函数访问
1
| mapState('模块名', ['子模块state中的属性名'])
|
1
2
3
4
5
6
7
8
9
10
11
12
13
14
15
16
17
18
19
20
21
22
23
24
25
26
27
28
29
30
31
32
33
34
35
36
37
38
39
40
41
42
43
44
45
46
47
48
49
50
51
52
| <template>
<div class="box">
<h2>Son2 子组件</h2>
从vuex中获取的值: {{ $store.state.count }}<label></label>
<br />
<button @click="subCount(1)">值 - 1</button>
<button @click="subCount(5)">值 - 5</button>
<button @click="subCount(10)">值 - 10</button>
<button @click="setAsyncCount(888)">1秒后将值改为888</button>
<button @click="updateTitle('前端程序员')">改标题</button>
<hr>
{{ filterList }}
<hr>
<!-- 访问子模块的state - 辅助函数 -->
<!-- 根级别 -->
{{ user.userInfo.name }}
<br>
<!-- 子模块级别 -->
{{ background }}
</div>
</template>
<script>
import { mapActions, mapGetters, mapMutations, mapState } from 'vuex'
export default {
name: 'Son2Com',
methods: {
...mapMutations(['subCount', 'updateTitle']),
...mapActions(['setAsyncCount'])
},
computed: {
...mapGetters(['filterList']),
// 根级别的映射
...mapState(['user', 'setting']),
// 子模块的映射
...mapState('setting', ['background'])
}
}
</script>
<style lang="css" scoped>
.box {
border: 3px solid #ccc;
width: 400px;
padding: 10px;
margin: 20px;
}
h2 {
margin-top: 10px;
}
</style>
|
使用子模块的getters
- 先在子模块中提供getters
1
2
3
4
5
6
7
8
9
10
11
12
13
14
15
16
17
18
19
20
21
22
23
| const state = {
userInfo: {
age: 18,
name: 'zs'
},
score: 80
}
const getters = {
toUpperCase (state) {
return state.userInfo.name.toUpperCase()
}
}
const actions = {}
const mutations = {}
export default {
namespaced: true,
state,
getters,
actions,
mutations
}
|
- 原生访问
1
| $store.getters['模块名/子模块中的getter名']
|
1
2
3
4
5
6
7
8
9
10
11
12
13
14
15
16
17
18
19
20
21
22
23
24
25
26
27
28
29
30
31
32
33
34
35
36
37
38
39
40
41
42
43
44
45
46
47
48
49
50
51
52
53
54
55
56
57
58
59
60
61
62
| <template>
<div class="box">
<h2>Son1 子组件</h2>
从vuex中获取的值: {{ count }}<label></label>
<br>
<button @click="addFn(1)">值 + 1</button>
<button @click="addFn(5)">值 + 5</button>
<button @click="addFn(10)">值 + 10</button>
<button @click="setAsyncCount(666)">1秒后将值改为666</button>
<button @click="updateTitle">修改标题</button>
<hr>
{{ list }}
<br>
<!-- 通过 store 访问 getters -->
{{ $store.getters.filterList }}
<hr>
<!-- 访问子模块的state - 原生 -->
{{ $store.state.user.userInfo.name }}
<br>
{{ $store.state.setting.background }}
<hr>
<!-- 访问子模块的getters - 原生 -->
{{ $store.getters['user/toUpperCase']}}
</div>
</template>
<script>
import { mapState } from 'vuex'
export default {
name: 'Son1Com',
computed: {
...mapState(['count', 'list'])
},
methods: {
addFn (n) {
this.$store.commit('addCount', {
count: n,
msg: '哈哈'
})
},
setAsyncCount (num) {
this.$store.dispatch('setAsyncCount', num)
},
updateTitle () {
this.$store.commit('updateTitle', '黑马程序员')
}
}
}
</script>
<style lang="css" scoped>
.box{
border: 3px solid #ccc;
width: 400px;
padding: 10px;
margin: 20px;
}
h2 {
margin-top: 10px;
}
</style>
|
- 通过辅助函数访问
1
| mapState('模块名', ['子模块中的getter名'])
|
1
2
3
4
5
6
7
8
9
10
11
12
13
14
15
16
17
18
19
20
21
22
23
24
25
26
27
28
29
30
31
32
33
34
35
36
37
38
39
40
41
42
43
44
45
46
47
48
49
50
51
52
53
54
| <template>
<div class="box">
<h2>Son2 子组件</h2>
从vuex中获取的值: {{ $store.state.count }}<label></label>
<br />
<button @click="subCount(1)">值 - 1</button>
<button @click="subCount(5)">值 - 5</button>
<button @click="subCount(10)">值 - 10</button>
<button @click="setAsyncCount(888)">1秒后将值改为888</button>
<button @click="updateTitle('前端程序员')">改标题</button>
<hr>
{{ filterList }}
<hr>
<!-- 访问子模块的state - 辅助函数 -->
{{ user.userInfo.name }}
<br>
{{ background }}
<hr>
{{ toUpperCase }}
</div>
</template>
<script>
import { mapActions, mapGetters, mapMutations, mapState } from 'vuex'
export default {
name: 'Son2Com',
methods: {
...mapMutations(['subCount', 'updateTitle']),
...mapActions(['setAsyncCount'])
},
computed: {
// 根级别的映射(无法使用根级别映射到子模块的getters)
...mapGetters(['filterList']),
// 根级别的映射
...mapState(['user', 'setting']),
// 子模块的映射
...mapState('setting', ['background']),
// 子模块的映射
...mapGetters('user', ['toUpperCase'])
}
}
</script>
<style lang="css" scoped>
.box {
border: 3px solid #ccc;
width: 400px;
padding: 10px;
margin: 20px;
}
h2 {
margin-top: 10px;
}
</style>
|
使用子模块的mutations
注意:模块中的mutations和actions默认会挂载到全局,只有开启了命名空间才能使用子模块映射,否则只能使用全局映射,这样后期不方便维护
- 先在子模块中提供mutations
1
2
3
4
5
6
7
8
9
10
11
12
13
14
15
16
17
18
19
20
21
22
23
24
25
26
27
28
| const state = {
userInfo: {
age: 18,
name: 'zs'
},
score: 80
}
const getters = {
toUpperCase (state) {
return state.userInfo.name.toUpperCase()
}
}
const actions = {}
const mutations = {
setUser (state, userInfo) {
state.userInfo = userInfo
}
}
export default {
namespaced: true,
state,
getters,
actions,
mutations
}
|
- 原生访问
1
| $store.commit('模块名/子模块中的mutation名', 参数)
|
1
2
3
4
5
6
7
8
9
10
11
12
13
14
15
16
17
18
19
20
21
22
23
24
25
26
27
28
29
30
31
32
33
34
35
36
37
38
39
40
41
42
43
44
45
46
47
48
49
50
51
52
53
54
55
56
57
58
59
60
61
62
63
64
65
66
67
68
69
70
| <template>
<div class="box">
<h2>Son1 子组件</h2>
从vuex中获取的值: {{ count }}<label></label>
<br>
<button @click="addFn(1)">值 + 1</button>
<button @click="addFn(5)">值 + 5</button>
<button @click="addFn(10)">值 + 10</button>
<button @click="setAsyncCount(666)">1秒后将值改为666</button>
<button @click="updateTitle">修改标题</button>
<hr>
{{ list }}
<br>
<!-- 通过 store 访问 getters -->
{{ $store.getters.filterList }}
<hr>
<!-- 访问子模块的state - 原生 -->
{{ $store.state.user.userInfo.name }}
<button @click="updateUser({ name: 'wangming', age: 25})">修改姓名</button>
<br>
{{ $store.state.setting.theme }}
<button @click="updateTheme('black')">修改主题</button>
<hr>
<!-- 访问子模块的getters - 原生 -->
{{ $store.getters['user/toUpperCase']}}
</div>
</template>
<script>
import { mapState } from 'vuex'
export default {
name: 'Son1Com',
computed: {
...mapState(['count', 'list'])
},
methods: {
addFn (n) {
this.$store.commit('addCount', {
count: n,
msg: '哈哈'
})
},
setAsyncCount (num) {
this.$store.dispatch('setAsyncCount', num)
},
updateTitle () {
this.$store.commit('updateTitle', '黑马程序员')
},
updateUser (user) {
this.$store.commit('user/setUser', user)
},
updateTheme (theme) {
this.$store.commit('setting/setTheme', theme)
}
}
}
</script>
<style lang="css" scoped>
.box{
border: 3px solid #ccc;
width: 400px;
padding: 10px;
margin: 20px;
}
h2 {
margin-top: 10px;
}
</style>
|
- 通过辅助函数访问
1
2
|
mapMutations('模块名', ['子模块中的mutation名'])
|
1
2
3
4
5
6
7
8
9
10
11
12
13
14
15
16
17
18
19
20
21
22
23
24
25
26
27
28
29
30
31
32
33
34
35
36
37
38
39
40
41
42
43
44
45
46
47
48
49
50
51
52
53
54
55
56
57
58
59
60
| <template>
<div class="box">
<h2>Son2 子组件</h2>
从vuex中获取的值: {{ $store.state.count }}<label></label>
<br />
<button @click="subCount(1)">值 - 1</button>
<button @click="subCount(5)">值 - 5</button>
<button @click="subCount(10)">值 - 10</button>
<button @click="setAsyncCount(888)">1秒后将值改为888</button>
<button @click="updateTitle('前端程序员')">改标题</button>
<hr>
{{ filterList }}
<hr>
<!-- 访问子模块的state - 辅助函数 -->
{{ user.userInfo.name }}
<button @click="setUser({ name: 'lisi', age: 25})">修改姓名</button>
<br>
{{ theme }}
<button @click="setTheme('black')">修改主体</button>
<hr>
{{ toUpperCase }}
</div>
</template>
<script>
import { mapActions, mapGetters, mapMutations, mapState } from 'vuex'
export default {
name: 'Son2Com',
methods: {
...mapMutations(['subCount', 'updateTitle']),
...mapActions(['setAsyncCount']),
// 子模块级别映射
...mapMutations('user', ['setUser']),
...mapMutations('setting', ['setTheme'])
},
computed: {
// 根级别的映射(无法使用根级别映射到子模块的getters)
...mapGetters(['filterList']),
// 根级别的映射
...mapState(['user', 'setting']),
// 子模块的映射
...mapState('setting', ['theme']),
// 子模块的映射
...mapGetters('user', ['toUpperCase'])
}
}
</script>
<style lang="css" scoped>
.box {
border: 3px solid #ccc;
width: 400px;
padding: 10px;
margin: 20px;
}
h2 {
margin-top: 10px;
}
</style>
|
使用子模块的actions
- 先在子模块中提供actions
1
2
3
4
5
6
7
8
9
10
11
12
13
14
15
16
17
18
19
20
21
22
23
24
25
26
27
28
29
30
31
32
33
34
35
| const state = {
userInfo: {
age: 18,
name: 'zs'
},
score: 80
}
const getters = {
toUpperCase (state) {
return state.userInfo.name.toUpperCase()
}
}
const actions = {
setUserInfoSecond (context, newUserInfo) {
setTimeout(() => {
context.commit('setUser', newUserInfo)
}, 1000)
}
}
const mutations = {
setUser (state, newUserInfo) {
state.userInfo = newUserInfo
}
}
export default {
namespaced: true,
state,
getters,
actions,
mutations
}
|
- 原生访问
1
| $store.dispatch('模块名/子模块中的action名', 参数)
|
1
2
3
4
5
6
7
8
9
10
11
12
13
14
15
16
17
18
19
20
21
22
23
24
25
26
27
28
29
30
31
32
33
34
35
36
37
38
39
40
41
42
43
44
45
46
47
48
49
50
51
52
53
54
55
56
57
58
59
60
61
62
63
64
65
66
67
68
69
70
71
72
73
74
| <template>
<div class="box">
<h2>Son1 子组件</h2>
从vuex中获取的值: {{ count }}<label></label>
<br>
<button @click="addFn(1)">值 + 1</button>
<button @click="addFn(5)">值 + 5</button>
<button @click="addFn(10)">值 + 10</button>
<button @click="setAsyncCount(666)">1秒后将值改为666</button>
<button @click="updateTitle">修改标题</button>
<hr>
{{ list }}
<br>
<!-- 通过 store 访问 getters -->
{{ $store.getters.filterList }}
<hr>
<!-- 访问子模块的state - 原生 -->
{{ $store.state.user.userInfo.name }}
<button @click="updateUser({ name: 'wangming', age: 25})">修改姓名</button>
<button @click="updateUserSecond({ name: 'wangming', age: 25})">一秒后修改信息</button>
<br>
{{ $store.state.setting.theme }}
<button @click="updateTheme('black')">修改主题</button>
<hr>
<!-- 访问子模块的getters - 原生 -->
{{ $store.getters['user/toUpperCase']}}
</div>
</template>
<script>
import { mapState } from 'vuex'
export default {
name: 'Son1Com',
computed: {
...mapState(['count', 'list'])
},
methods: {
addFn (n) {
this.$store.commit('addCount', {
count: n,
msg: '哈哈'
})
},
setAsyncCount (num) {
this.$store.dispatch('setAsyncCount', num)
},
updateTitle () {
this.$store.commit('updateTitle', '黑马程序员')
},
updateUser (user) {
this.$store.commit('user/setUser', user)
},
updateTheme (theme) {
this.$store.commit('setting/setTheme', theme)
},
updateUserSecond (userInfo) {
this.$store.dispatch('user/setUserInfoSecond', userInfo)
}
}
}
</script>
<style lang="css" scoped>
.box{
border: 3px solid #ccc;
width: 400px;
padding: 10px;
margin: 20px;
}
h2 {
margin-top: 10px;
}
</style>
|
- 通过辅助函数访问
1
| ...mapActions('模块名', ['子模块中的action名'])
|
1
2
3
4
5
6
7
8
9
10
11
12
13
14
15
16
17
18
19
20
21
22
23
24
25
26
27
28
29
30
31
32
33
34
35
36
37
38
39
40
41
42
43
44
45
46
47
48
49
50
51
52
53
54
55
56
57
58
59
60
61
| <template>
<div class="box">
<h2>Son2 子组件</h2>
从vuex中获取的值: {{ $store.state.count }}<label></label>
<br />
<button @click="subCount(1)">值 - 1</button>
<button @click="subCount(5)">值 - 5</button>
<button @click="subCount(10)">值 - 10</button>
<button @click="setAsyncCount(888)">1秒后将值改为888</button>
<button @click="updateTitle('前端程序员')">改标题</button>
<hr>
{{ filterList }}
<hr>
<!-- 访问子模块的state - 辅助函数 -->
{{ user.userInfo.name }}
<button @click="setUser({ name: 'lisi', age: 25})">修改姓名</button>
<button @click="setUserInfoSecond({ name: 'lisi', age: 25})">一秒后修改信息</button>
<br>
{{ theme }}
<button @click="setTheme('black')">修改主体</button>
<hr>
{{ toUpperCase }}
</div>
</template>
<script>
import { mapActions, mapGetters, mapMutations, mapState } from 'vuex'
export default {
name: 'Son2Com',
methods: {
...mapMutations(['subCount', 'updateTitle']),
...mapActions(['setAsyncCount']),
...mapMutations('user', ['setUser']),
...mapMutations('setting', ['setTheme']),
...mapActions('user', ['setUserInfoSecond'])
},
computed: {
// 根级别的映射(无法使用根级别映射到子模块的getters)
...mapGetters(['filterList']),
// 根级别的映射
...mapState(['user', 'setting']),
// 子模块的映射
...mapState('setting', ['theme']),
// 子模块的映射
...mapGetters('user', ['toUpperCase'])
}
}
</script>
<style lang="css" scoped>
.box {
border: 3px solid #ccc;
width: 400px;
padding: 10px;
margin: 20px;
}
h2 {
margin-top: 10px;
}
</style>
|
第三方软件包 json-server
该软件包可以通过json文件生成所有的增删改查基础代码,并且启动该服务
- 全局安装
1
| npm install json-server -g
|
- 创建json文件
- 启动服务
1
| json-server --watch 文件名.json
|
vant 组件库
vant2 支持 vue2
官网地址:https://vant-ui.github.io/vant/v2/#/zh-CN/
vant3 / vant4 支持 vue3
官网地址:https://vant-ui.github.io/vant/#/zh-CN
当组件导入过多时,会导致main.js文件内容过多,此时在utils文件夹下新建vant-ui.js文件,将导入组件的配置都写在该文件中,并将该文件导入到main.js文件即可
postcss 插件 实现项目 vw 适配
官网:https://vant-ui.github.io/vant/v2/#/zh-CN/advanced-usage
- 安装插件
1
2
3
| yarn aadd postcss-px-to-viewport@1.1.1 -D
或
npm install postcss-px-to-viewport --save-dev
|
版本号可以查找官网
- 根目录新建 postcss.config.js 文件,配置插件
1
2
3
4
5
6
7
8
9
10
| module.exports = {
plugins: {
'postcss-px-to-viewport': {
viewportWidth: 375
}
}
}
|
Toast 实现轻提示
官网:https://vant-ui.github.io/vant/v2/#/zh-CN/toast#jie-shao
- 注册安装
1
2
| import { Toast } from 'vant'
Vue.use(Toast)
|
- 使用方式
1
2
| import { Toast } from 'vant'
Toast('提示内容')
|
本质:将toast方法注册挂载到了Vue原型上 Vue.prototype.$toast = xxx
封装 request 请求模块
在src/utils目录下新建request.js文件,用来封装axios请求对象
1
2
3
4
5
6
7
8
9
10
11
12
13
14
15
16
17
18
19
20
21
22
23
24
25
26
27
28
29
30
31
32
| import axios from 'axios'
const instance = axios.create({
baseURL: 'http://smart-shop.itheima.net/index.php?s=/api',
timeout: 5000,
headers: { platform: 'h5' }
})
instance.interceptors.request.use(function (config) {
return config
}, function (error) {
return Promise.reject(error)
})
instance.interceptors.response.use(function (response) {
return response.data
}, function (error) {
return Promise.reject(error)
})
export default instance
|
封装 api 接口模块
在src目录下新建api目录,将请求接口封装到 api 文件夹下的js文件中,根据功能新建js文件,以实现请求和页面的解耦
1
2
3
4
5
6
7
8
|
import request from '@/utils/request'
export function getPicCode () {
return request.get('/captcha/image')
}
|
封装 storage 存储模块
当刷新页面时,vuex的数据会丢失,此时需要进行持久化存储,但是项目中的键不能取得过于简短,不然会后续可能会导致冲突。这样会导致每次进行持久化存储的操作很繁琐,故而引入了 storage 存储模块。在src/utils下新建storage.js文件
1
2
3
4
5
6
7
8
9
10
11
12
13
14
15
16
17
18
19
20
21
22
23
|
const INFO_KEY = 'hm_userInfo'
export const getUserInfoByStorage = () => {
const defaultUserInfo = {
token: '',
userInfo: ''
}
const result = localStorage.getItem(INFO_KEY)
return result ? JSON.parse(result) : defaultUserInfo
}
export const setUserInfoByStorage = (obj) => {
localStorage.setItem(INFO_KEY, JSON.stringify(obj))
}
export const removeUserInfoByStorage = () => {
localStorage.removeItem(INFO_KEY)
}
|
路由导航守卫 - 全局前置守卫
当路由进行跳转时,会先触发该方法,一般用来在用户进入权限界面时,检测用户是否登录,未登录会将用户拦截到登陆页面进行登录
1
2
3
4
5
6
7
8
9
10
11
12
13
14
15
16
17
18
19
20
21
22
23
24
25
26
27
28
29
30
31
32
33
34
35
36
37
38
39
40
41
42
43
44
45
46
47
48
49
50
51
52
53
54
55
56
57
58
59
60
61
62
63
64
| import Vue from 'vue'
import VueRouter from 'vue-router'
import layout from '@/views/layout'
import login from '@/views/login'
import myorder from '@/views/myorder'
import pay from '@/views/pay'
import prodetail from '@/views/prodetail'
import search from '@/views/search'
import list from '@/views/search/list'
import home from '@/views/layout/home'
import category from '@/views/layout/category'
import cart from '@/views/layout/cart'
import user from '@/views/layout/user'
import state from '@/store/index'
Vue.use(VueRouter)
const router = new VueRouter({
routes: [
{
path: '/',
component: layout,
redirect: '/home',
children: [
{ path: '/home', component: home },
{ path: '/category', component: category },
{ path: '/cart', component: cart },
{ path: '/user', component: user }
]
},
{ path: '/login', component: login },
{ path: '/myorder', component: myorder },
{ path: '/pay', component: pay },
{ path: '/prodetail/:id', component: prodetail },
{ path: '/search', component: search },
{ path: '/searchlist', component: list }
]
})
const authUrls = ['/myorder', '/user', '/pay']
router.beforeEach((to, from, next) => {
if (!authUrls.includes(to.path)) {
next()
} else {
const token = state.getters.getToken
if (token) {
next()
} else {
next('/login')
}
}
})
export default router
|
混入语法
当组件中有相同的代码逻辑,可以使用混入语法
- 在src/mixins中新建js文件
1
2
3
4
5
6
7
8
9
10
11
12
13
14
15
16
17
18
19
20
21
22
23
24
25
26
27
28
29
30
31
32
33
34
35
36
| export default {
data: {
title: '标题'
},
methods: {
loginConfirm () {
if (!this.$store.getters.getToken) {
this.$dialog.confirm({
title: '温馨提示',
message: '此时需要登录才能继续操作哦',
confirmButtonText: '去登陆',
cancelButtonText: '再逛逛'
}).then(
() => {
this.$router.replace({
path: '/login',
query: {
backUrl: this.$route.fullPath
}
})
}
).catch(
() => {
}
)
return false
}
return true
}
}
}
|
- 在要混入的组件中混入该js文件
1
2
3
4
5
6
7
8
9
10
11
12
13
14
|
<script>
import loginConfirm from '@/mixins/loginConfirm'
export default {
name: 'ProDetail',
// 混入语法,数组可以混入多个数据,后面数据中的同名属性和方法会覆盖掉前面的
mixins: [loginConfirm],
data () {
return {
}
}
}
</script>
|
打包发布
说明:vue脚手架工具已经提供了打包命令,直接使用即可。
命令:
1
2
3
| yarn build
或
npm run build
|
结果:在项目的根目录会自动创建一个文件夹`dist’,dist中的文件就是打包后的文件,只需要放到服务器中即可。
配置:默认情况下,需要放到服务器根目录打开,如果希望双击运行,需要配置publicPath配成相对路径,在vue.config.js文件中配置
1
2
3
4
5
| const { defineConfig } = require('@vue/cli-service')
module.exports = defineConfig({
publicPath: './',
transpileDependencies: true
})
|
打包优化
说明:当打包构建应用时,JavaScript包会变得非常大,影响页面加载。如果我们能把不同路由对应的组件分割成不同的代码块,然后当路由被访问的时候才加载对应组件,这样就更加高效了。
- 异步组件改造
- 路由中应用
1
2
3
4
5
6
7
8
9
10
11
12
13
14
15
16
17
18
19
20
21
22
23
24
25
26
27
28
29
30
31
32
33
34
35
36
37
38
39
40
41
42
43
44
45
46
47
48
49
50
51
52
53
54
55
56
57
58
59
60
61
62
63
64
65
66
67
| import Vue from 'vue'
import VueRouter from 'vue-router'
import layout from '@/views/layout'
import home from '@/views/layout/home'
import category from '@/views/layout/category'
import user from '@/views/layout/user'
import cart from '@/views/layout/cart'
const login = () => import('@/views/login')
const myorder = () => import('@/views/myorder')
const pay = () => import('@/views/pay')
const prodetail = () => import('@/views/prodetail')
const search = () => import('@/views/search')
const list = () => import('@/views/search/list')
const state = () => import('@/store/index')
Vue.use(VueRouter)
const router = new VueRouter({
routes: [
{
path: '/',
component: layout,
redirect: '/home',
children: [
{ path: '/home', component: home },
{ path: '/category', component: category },
{ path: '/cart', component: cart },
{ path: '/user', component: user }
]
},
{ path: '/login', component: login },
{ path: '/myorder', component: myorder },
{ path: '/pay', component: pay },
{ path: '/prodetail/:id', component: prodetail },
{ path: '/search', component: search },
{ path: '/searchlist', component: list }
]
})
const authUrls = ['/myorder', '/user', '/pay']
router.beforeEach((to, from, next) => {
if (!authUrls.includes(to.path)) {
next()
} else {
const token = state.getters.getToken
if (token) {
next()
} else {
next('/login')
}
}
})
export default router
|