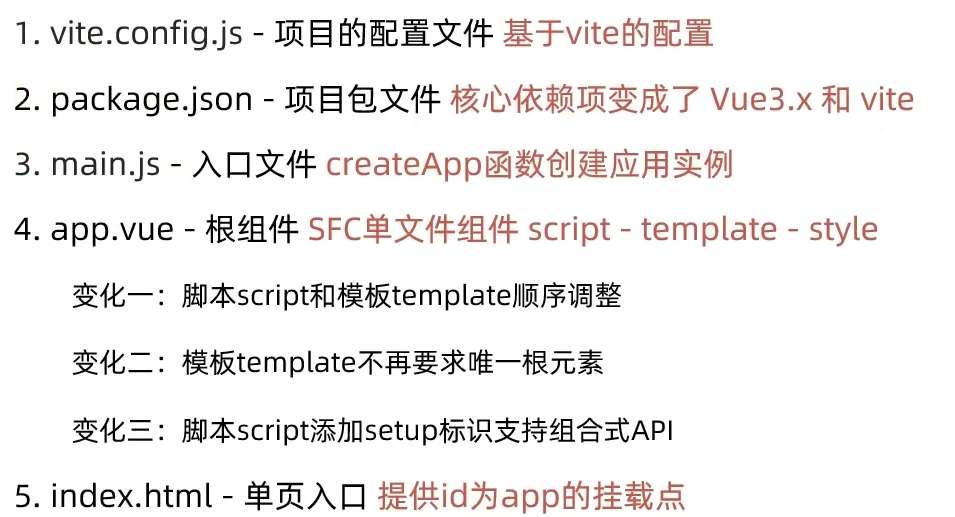
使用create-vue创建项目
vue3官网:https://cn.vuejs.org/
前提环境条件:node版本必须在16.0以上
创建Vue3的项目
1
2
3
npm init vue@latest 或 pnpm create vue
这一指令将会安装并执行 create-vue,本质底层会采用vite脚手夹进行创建
初始vue3项目中的关键文件 组合式API setup 选项的写法和执行时机 setup 函数执行时机比Vue组件中的生命周期函数执行时期还要早
原始写法:
1
2
3
4
5
6
7
8
9
10
11
12
13
14
15
16
17
18
19
20
21
22
23
24
25
26
27
28
29
30
<script> export default { setup () { console.log('setup函数执行') // 数据 const message = 'hello vue3' // 函数 const logMessage = () => { console.log(message) } // 所写的数据和函数必须return,不然template中无法调用 return { message, logMessage } }, created () { console.log('created函数执行') } } </script> <template> <div>{{ message }}</div> <button @click="logMessage">按钮</button> </template>
语法糖写法:
1
2
3
4
5
6
7
8
9
10
11
12
<script setup> const message = 'hello vue3' const logMessage = () => { console.log(message) } </script> <template> <div>{{ message }}</div> <button @click="logMessage">按钮</button> </template>
语法糖的底层还是将script中的数据和方法return了出去,只是为了方便开发者编写代码
setup 函数中的this指向undefined
reactive 和 ref 函数的使用 reactive() 作用:接收对象类型数据的参数传入并返回一个响应式的对象
步骤:
从 vue 包中导入 reactive 函数
在中执行 reactive 函数并传入类型为对象的初始值,并使用变量接收返回值
1
2
3
4
5
6
7
8
9
10
11
12
13
14
15
<script setup> import { reactive } from 'vue' const state = reactive ({ count : 0 }) const addCount = ( state.count ++ } </script> <template > <div > {{ state.count }}</div > <button @click ="addCount" > 按钮</button > </template >
ref() ref函数可以接收复杂类型和简单类型,底层还是用的raective函数
1
2
3
4
5
6
7
8
9
10
11
12
13
14
15
16
<script setup> import { ref } from 'vue' const count = ref (0 )const addCount = ( count.value ++ } </script> <template > <div > {{ count }}</div > <button @click ="addCount" > 按钮</button > </template >
计算属性 computed
从 vue 包中导入 computed
将要返回的数据写在 computed 函数的参数中
1
2
3
4
5
6
7
8
9
10
11
12
13
14
15
<script setup> import { computed, ref } from 'vue' const state = ref ([1 ,2 ,3 ,4 ,5 ,6 ])const computedList = computed (() => state.value .filter (item =>2 ))const updateList = ( state.value .push (666 ) } </script> <template > <div > 原始数据:{{ state }}</div > <div > 修改后:{{ computedList }}</div > <button @click ="updateList" > 按钮</button > </template >
一般不推荐通过计算属性的方法去修改ref中数据的值,如果要修改则推荐采用get和set语法
计算属性默认是只读的。当你尝试修改一个计算属性时,你会收到一个运行时警告。只在某些特殊场景中你可能才需要用到“可写”的属性,你可以通过同时提供 getter 和 setter 来创建:
1
2
3
4
5
6
7
8
9
10
11
12
13
14
15
16
17
18
<script setup> import { ref, computed } from 'vue' const firstName = ref ('John' )const lastName = ref ('Doe' )const fullName = computed ({ get ( return firstName.value + ' ' + lastName.value }, set (newValue ) { [firstName.value , lastName.value ] = newValue.split (' ' ) } }) </script>
监听 watch 基本语法 当监听的数据发生变化时,立即执行回调函数
1
2
3
4
5
6
7
8
9
10
11
12
13
14
15
16
17
18
19
20
21
22
23
24
25
26
27
28
29
30
31
32
<script setup> import {ref, watch} from 'vue' const number = ref (0 )const nickname= ref ('张三' )const updateNumber = ( number.value ++ } const updateNickname = ( nickname.value = '李四' } watch ([number, nickname], (newValue, oldValue ) => { console .log (newValue, oldValue) }) </script> <template > <div > {{number}}</div > <button @click ="updateNumber" > 修改数字</button > <div > {{nickname}}</div > <button @click ="updateNickname" > 修改昵称</button > </template >
immediate属性为true时,进入页面立即调用该回调函数
1
2
3
4
5
6
7
8
9
10
11
12
13
14
15
16
17
18
19
20
21
22
23
24
25
26
27
28
29
<script setup> import {ref, watch} from 'vue' const number = ref (0 )const nickname= ref ('张三' )const updateNumber = ( number.value ++ } const updateNickname = ( nickname.value = '李四' } watch (number, (newValue, oldValue ) => { console .log (newValue, oldValue) }, { immediate : true }) </script> <template > <div > {{number}}</div > <button @click ="updateNumber" > 修改数字</button > <div > {{nickname}}</div > <button @click ="updateNickname" > 修改昵称</button > </template >
深度监视 deep 当监视数据为对象时,如果不开启深度监视,只有当对象的地址发生变化时才会触发回调函数,deep 属性为true时,当对象中的属性值发生变化也会触发回调函数
1
2
3
4
5
6
7
8
9
10
11
12
13
14
15
16
17
18
19
20
21
22
23
24
<script setup> import {ref, watch} from 'vue' const userInfo = ref ({ name : '张三' , age : 18 }) const setUserInfo = ( userInfo.value .age ++ } watch (userInfo, (newValue ) => { console .log (newValue) }, { deep : true }) </script> <template > <div > {{userInfo}}</div > <button @click ="setUserInfo" > 修改年龄</button > </template >
精确监听复杂类型的某个属性 开启深度监视,监听复杂类型时,当复杂类型中的任意一个属性发生变化都会触发回调函数。如果想要只监听复杂类型的某个属性,可以将第一个参数写成函数的形式,并且返回值为要监听的复杂类型的某个属性即可
1
2
3
4
5
6
7
8
9
10
11
12
13
14
15
16
17
18
19
20
21
22
23
24
<script setup> import {ref, watch} from 'vue' const userInfo = ref ({ name : '张三' , age : 18 }) const setUserInfo = ( userInfo.value .age ++ } watch (() => userInfo.value .age , (newValue ) => { console .log (newValue) }) </script> <template > <div > {{ userInfo }}</div > <button @click ="setUserInfo" > 修改年龄</button > </template >
Vue3的生命周期API(选项式和组合式)
选项式API 组合式API
beforeCreate/created
setup
beforeMount
onBeforeMount
mounted
onMounted
beforeUpdate
onBeforeUpdate
updated
onUpdated
beforeUnmount(vue2中是beforeDestroy)
onBeforeUnmount
unmounted(vue2中是destroyed)
onUnmounted
其中beforeCreate/created函数在组合式API中直接写在脚本中并调用即可
1
2
3
4
5
6
7
8
9
10
11
12
13
14
15
16
17
18
19
20
21
22
23
24
25
<script setup> import {onMounted} from "vue" ;function getData ( setTimeout (() => { console .log ('请求获取数据' ) }, 1000 ) } getData ()onMounted (() => { console .log ('onMounted函数触发-逻辑1' ) }) onMounted (() => { console .log ('onMounted函数触发-逻辑2' ) }) </script> <template > </template >
父子通信 父传子
父组件中给子组件的属性绑定值
子组件通过props接收父组件传递的值
由于使用组合式API,故而不能直接使用props,而是采用编译器宏函数 defineProps 来自动编译props
1
2
3
4
5
6
7
8
9
10
11
12
13
14
15
16
17
18
19
20
21
22
<script setup> import { ref } from "vue"; import Son from '@/components/son.vue' const cart = ref('宝马车') const money = ref(100) function addMoney () { money.value += 10 } </script> <template> <div> <h5> 父组件 - {{ money }} <button @click="addMoney">挣钱</button> </h5> <Son cart="cart" :money="money"></Son> </div> </template>
1
2
3
4
5
6
7
8
9
10
11
12
13
14
15
16
17
18
19
20
21
22
23
24
25
<script setup> // 通过编译器宏函数 defineProps 接收数据 const props = defineProps({ cart: String, money: Number }) // 脚本调用传递的参数,需要使用对象名.props console.log(props.cart) </script> <template> <div class="box"> <!-- 模板调用则直接使用参数名即可 --> 我是子组件 - {{ cart }} - {{ money }} </div> </template> <style scoped> .box { border: 1px solid black; padding: 30px; } </style>
子传父
父组件中给子组件标签通过@绑定事件
子组件内部通过emit方法触发事件
由于使用组合式API,故而不能直接使用emit,而是采用编译器宏函数 defineEmits 来自动编译emit
1
2
3
4
5
6
7
8
9
10
11
12
13
14
15
16
17
18
19
20
21
22
23
24
25
26
27
28
29
30
31
<script setup> import { ref } from "vue"; import Son from '@/components/son.vue' const cart = ref('宝马车') const money = ref(100) function addMoney () { money.value += 10 } // value就是子组件传递的值 const changeFn = (value) => { money.value -= value } </script> <template> <div> <h5> 父组件 - {{ money }} <button @click="addMoney">挣钱</button> </h5> <Son cart="cart" :money="money" @changeMoney="changeFn" ></Son> </div> </template>
1
2
3
4
5
6
7
8
9
10
11
12
13
14
15
16
17
18
19
20
21
22
23
24
25
26
27
28
29
30
31
32
33
34
35
<script setup> // 通过编译器宏函数 defineProps 接收数据 const props = defineProps({ cart: String, money: Number }) // 通过编译器宏函数 defineEmits 发送数据 // 使用emit触发父组件中绑定的事件,需要先声明事件名 const emit = defineEmits(['changeMoney']) const buy = () => { // 通过emit给父组件传递数据 emit('changeMoney', 5) } // 脚本调用传递的参数,需要使用对象名.props console.log(props.cart) </script> <template> <div class="box"> <!-- 模板调用则直接使用参数名即可 --> 我是子组件 - {{ cart }} - {{ money }} <button @click="buy">花钱</button> </div> </template> <style scoped> .box { border: 1px solid black; padding: 30px; } </style>
模板引用 概念:通过ref标识获取真实的dom对象或者组件实例对象
步骤:
通过ref函数创建ref对象
在组件标签或者html标签中绑定ref属性
通过ref对象名.value访问元素或组件
子组件默认不向父组件暴露自己的属性和方法,可以通过编译器宏函数 defineExpose 暴露对应的方法和属性。这样才能在父组件中应用子组件中的方法和属性
1
2
3
4
5
6
7
8
9
10
11
12
13
14
15
16
17
18
19
20
21
22
23
24
25
26
27
28
<script setup> import {onMounted, ref} from "vue"; import Test from '@/components/test.vue' // 1.通过ref函数创建ref对象 const inp = ref(null) const test = ref(null) // 注意:必须等dom渲染完,才能拿到 onMounted(() => { // 3.通过ref对象名.value访问元素或组件 console.log(inp.value) inp.value.focus() }) const getTest = () => { console.log(test.value.count) test.value.logMessage() } </script> <template> <!-- 2.在组件标签或者html标签中绑定ref属性 --> <input ref="inp" type="text"> <Test ref="test"></Test> <button @click="getTest">获取组件元素</button> </template>
1
2
3
4
5
6
7
8
9
10
11
12
13
14
15
16
17
18
19
20
21
22
<script setup> const count = 999 const logMessage = () => { console.log('hello vue3') } // 子组件默认不向父组件暴露自己的属性和方法 // 可以通过编译器宏函数 defineExpose 暴露对应的方法和属性 defineExpose({ count, logMessage }) </script> <template> 我是子组件 - {{count}} </template> <style scoped> </style>
provide 和 inject 实现跨层级传递数据或方法 在根组件使用provide传递数据或方法,在后代组件中使用inject接收数据或方法,一般可以传递以下数据和方法:
跨层级传递普通数据
跨层级传递响应数据
跨层级传递方法
1 2 3 provide (key, 数据或方法)const 对象名 = inject (key)
即两组件之间可以相隔多个组件传递数据和方法
1
2
3
4
5
6
7
8
9
10
11
12
13
14
15
16
17
18
19
20
21
22
23
24
25
26
27
28
29
30
31
32
33
<script setup> import {provide, ref} from "vue"; import Son from '@/components/son.vue' // 传递普通数据 provide('count', 100) // 传递响应式数据 const money = ref(200) provide('money', money) setTimeout(() => { money.value = 500 }, 2000) // 传递方法 const updateMoney = (newValue) => { money.value = newValue } provide('updateMoney', updateMoney) </script> <template> <h1> 我是根组件 </h1> <Son></Son> </template> <style scoped> </style>
1
2
3
4
5
6
7
8
9
10
11
12
13
14
<script setup> import Grandson from '@/components/grandson.vue' </script> <template> <h2> 我是son组件 </h2> <Grandson></Grandson> </template> <style scoped> </style>
1
2
3
4
5
6
7
8
9
10
11
12
13
14
15
16
17
18
19
<script setup> import {inject} from "vue"; const count = inject('count') const money = inject('money') const updateMoney = inject('updateMoney') </script> <template> <h3> 我是grandson组件 - {{ count }} - {{ money }} <button @click="updateMoney(50)">修改金额</button> </h3> </template> <style scoped> </style>
defineOptions 在vue3.3之前的版本,由于中只能写setup函数中的属性或者方法,此时就没法通过name属性定义组件名。故而在之后的版本引入了编译器宏函数 defineOptions
1
2
3
4
5
6
7
8
9
10
11
12
13
<script setup> defineOptions({ name: 'loginIndex' }) </script> <template> </template> <style scoped> </style>
defineModel 在Vue3中,自定义组件上使用v-model,相当于传递一个modelValue属性,同时触发 update:modelValue 事件
1 2 3 <Child v-moel ="isVisible" > </Child > 相当于 <Child :modelValue ="isVisible" @update:modelValue ="isVisible" > </Child >
此时如果是父子通信,需要在子组件中定义props和emit。如果要修改此值,还需要手动调用 emit 函数。会很麻烦,故而引入 defineModel 函数,可以简化子组件代码
原始写法:
1
2
3
4
5
6
7
8
9
10
11
12
13
14
15
<script setup> import Son from '@/components/son.vue' import {ref} from "vue"; const count = ref('100') </script> <template> <Son v-model="count"></Son> {{ count }} </template> <style scoped> </style>
1
2
3
4
5
6
7
8
9
10
11
12
13
14
15
16
17
18
19
<script setup> defineProps({ modelValue: String }) const emit = defineEmits(['update:modelValue']) </script> <template> <input :value="modelValue" @input="e => emit('update:modelValue', e.target.value)" type="text" > </template> <style scoped> </style>
使用defineModel 函数的写法(父组件无变化)
1
2
3
4
5
6
7
8
9
10
11
12
13
14
15
16
<script setup> const modelValue = defineModel() </script> <template> <input :value="modelValue" @input="e => modelValue = e.target.value" type="text" > </template> <style scoped> </style>
此时可直接修改,无需emit发送
Pinia 定义 Pinia 是 Vue 的最新的状态管理工具,是 Vuex 的替代品
区别:
提供更加简单的API(去掉了 mutation)
提供符合组合式风格的API(和 Vue3 新语法统一)
去掉了 modules 的概念,每一个 store 都是一个独立的模块
配合 TypeScript 更加友好,提供可靠的类型判断
手动安装
新建vue3项目
安装Pinia软件包
1
2
3
npm install pinia 或 yarn add pinia
导入Pinia(在main.js文件中)
1
2
3
4
5
6
7
8
9
10
11
12
import { createApp } from 'vue' import { createPinia } from 'pinia' import App from './App.vue' const app = createApp (App )const pinia = createPinia ()app.use (pinia) app.mount ('#app' )
使用Pinia
在src/store/文件名.js中导出对应的创建store对象的函数
1
2
3
4
5
6
7
8
9
10
11
12
13
14
15
16
17
18
19
20
21
22
23
24
25
26
27
28
29
30
31
32
33
import {defineStore} from "pinia" import {computed, ref} from "vue" ;export const useCounterStore = defineStore ('counter' , () => { const count = ref (100 ) const addCount = ( count.value ++ } const subCount = ( count.value -- } const result = computed (() => count.value * 2 ) const msg = ref ('hello pinia' ) return { count, msg, addCount, subCount, result } })
在组件的脚本中导入该函数,并通过函数创建store对象
在组件的模板中调用该对象中的属性和方法即可
1
2
3
4
5
6
7
8
9
10
11
12
13
14
15
16
<script setup> import {useCounterStore} from '@/store/counter.js' const counterStore = useCounterStore() </script> <template> <h4> 我是son2.vue - {{ counterStore.count }} <button @click="counterStore.subCount()">-</button> </h4> </template> <style scoped> </style>
在Pinia中异步操作数据
导出创建store对象的函数
1
2
3
4
5
6
7
8
9
10
11
12
13
14
15
16
17
18
19
import {defineStore} from 'pinia' import {ref} from "vue" ;import axios from "axios" export const useChannelStore = defineStore ('channel' , () => { const channelList = ref ([]) const getList = async ( const {data : {data}} = await axios.get ('http://geek.itheima.net/v1_0/channels' ) channelList.value = data.channels } return { channelList, getList } })
导入使用
1
2
3
4
5
6
7
8
9
10
11
12
13
14
15
16
<script setup> import {useChannelStore} from '@/store/channel.js' const channelStore = useChannelStore() </script> <template> <div> <button @click="channelStore.getList()">获取频道数据</button> <ul> <li v-for="item in channelStore.channelList" :key="item.id">{{ item.name }}</li> </ul> </div> </template> <style scoped></style>
解构对象获取属性和方法
直接解构得到的属性是失去响应式的,使用storeToRefs函数可以防止失去响应式
store中的方法是可以直接解构的,因为方法不需要响应式
1
2
3
4
5
6
7
8
9
10
11
12
13
14
15
16
17
18
19
20
21
22
23
24
25
26
27
28
29
30
31
32
33
<script setup> import Son1Com from '@/componets/Son1Com.vue' import Son2Com from '@/componets/Son2Com.vue' import {useCounterStore} from '@/store/counter.js' import {useChannelStore} from '@/store/channel.js' import {storeToRefs} from "pinia"; const counterStore = useCounterStore() const channelStore = useChannelStore() // 直接解构得到的属性是失去响应式的 // const { count, msg, result } = counterStore // 使用storeToRefs函数可以防止失去响应式 const { count, msg, result } = storeToRefs(counterStore) // store中的方法是可以直接解构的,因为方法不需要响应式 const {getList} = channelStore </script> <template> <div> <h3>我是App.vue - {{ count }} - {{ msg }}</h3> {{ result }} <Son1Com></Son1Com> <Son2Com></Son2Com> <button @click="getList()">获取频道数据</button> <ul> <li v-for="item in channelStore.channelList" :key="item.id">{{ item.name }}</li> </ul> </div> </template> <style scoped></style>
持久化存储
官网:https://prazdevs.github.io/pinia-plugin-persistedstate/zh/
下载插件
1 npm i pinia-plugin-persistedstate
导入使用插件(在main.js中)
1
2
3
4
5
6
7
8
9
10
11
12
13
14
15
16
17
import { createApp } from 'vue' import { createPinia } from 'pinia' import persist from 'pinia-plugin-persistedstate' import App from './App.vue' const app = createApp (App )const pinia = createPinia ()pinia.use (persist) app.use (pinia) app.mount ('#app' )
在store模块中配置该插件即可实现该模块中所有state的持久化存储
1
2
3
4
5
6
7
8
9
10
11
12
13
14
15
16
17
18
19
20
21
22
23
24
25
26
27
28
29
30
31
32
33
34
35
import {defineStore} from "pinia" import {computed, ref} from "vue" ; // 通过defineStore创建store对象 // 语法:defineStore('唯一标识' , 回调函数) export const useCounterStore = defineStore('counter' , () => { // 定义数据 相当于 state const count = ref(100 ) // 定义方法 相当于 actions const addCount = () => { count.value++ } const subCount = () => { count.value-- } // 定义基于数据的计算属性 相当于 computed const result = computed(() => count.value * 2 ) // 定义数据 相当于 state const msg = ref('hello pinia' ) // 定义方法和属性必须return 才能被外部使用 return { count, msg, addCount, subCount, result } }, { persist: true // 实现该模块的持久化 })
Prettier Eslint 用于代码纠错,Prettier 用于美化代码,用于格式化代码风格
路由 路由初始化
创建路由示例由 createRouter 实现
路由模式
hsitory 模式使用 createWebHistory()
hash 模式使用 createWebHashHistory()
参数是基础路径,默认是/,其中import.meta.env.BASE_URL表示的是 vite.config.js 中的 base 配置的值
1
2
3
4
5
6
7
8
import { createRouter, createWebHistory } from 'vue-router' const router = createRouter ({ history : createWebHistory (import .meta .env .BASE_URL ) routes : [] }) export default router
组件中使用router跳转路径,使用route获取路径中的参数
1
2
3
4
5
6
7
8
9
10
11
12
13
14
15
<script setup> import {UseRoute, useRouter} from 'vue-router' const router = UserRouter const route = UseRoute const goList = () => { router.push('/list') console.log(router, route) } </script> <template> <button @click='goList'>跳转1</button> <button @click='$router.push('/list')'>跳转2</button> </template>
可以在vite.config.js中配置base的值,这样可以改变路由的前缀路径
1
2
3
4
5
6
7
8
9
10
11
12
13
14
15
16
17
18
19
20
import { fileURLToPath, URL } from 'node:url' import { defineConfig } from 'vite' import vue from '@vitejs/plugin-vue' import vueDevTools from 'vite-plugin-vue-devtools' export default defineConfig ({ plugins : [ vue (), vueDevTools (), ], base : '/api' , resolve : { alias : { '@' : fileURLToPath (new URL ('./src' , import .meta .url )) }, }, })